블로그 이미지
Sunny's

calendar

1 2 3 4 5
6 7 8 9 10 11 12
13 14 15 16 17 18 19
20 21 22 23 24 25 26
27 28 29 30

Notice

2010. 5. 12. 12:50 Ajax

 The jQuery library has a passionate community of developers, and it is now the most widely used JavaScript library on the web today.

Two years ago I announced that Microsoft would begin offering product support for jQuery, and that we’d be including it in new versions of Visual Studio going forward. By default, when you create new ASP.NET Web Forms and ASP.NET MVC projects with VS 2010 you’ll find jQuery automatically added to your project.

A few weeks ago during my second keynote at the MIX 2010 conference I announced that Microsoft would also begin contributing to the jQuery project.  During the talk, John Resig -- the creator of the jQuery library and leader of the jQuery developer team – talked a little about our participation and discussed an early prototype of a new client templating API for jQuery.

In this blog post, I’m going to talk a little about how my team is starting to contribute to the jQuery project, and discuss some of the specific features that we are working on such as client-side templating and data linking (data-binding).

Contributing to jQuery

jQuery has a fantastic developer community, and a very open way to propose suggestions and make contributions.  Microsoft is following the same process to contribute to jQuery as any other member of the community.

As an example, when working with the jQuery community to improve support for templating to jQuery my team followed the following steps:

  1. We created a proposal for templating and posted the proposal to the jQuery developer forum (http://forum.jquery.com/topic/jquery-templates-proposal and http://forum.jquery.com/topic/templating-syntax ).
  2. After receiving feedback on the forums, the jQuery team created a prototype for templating and posted the prototype at the Github code repository (http://github.com/jquery/jquery-tmpl ).
  3. We iterated on the prototype, creating a new fork on Github of the templating prototype, to suggest design improvements. Several other members of the community also provided design feedback by forking the templating code.

There has been an amazing amount of participation by the jQuery community in response to the original templating proposal (over 100 posts in the jQuery forum), and the design of the templating proposal has evolved significantly based on community feedback.

The jQuery team is the ultimate determiner on what happens with the templating proposal – they might include it in jQuery core, or make it an official plugin, or reject it entirely.  My team is excited to be able to participate in the open source process, and make suggestions and contributions the same way as any other member of the community.

jQuery Template Support

Client-side templates enable jQuery developers to easily generate and render HTML UI on the client.  Templates support a simple syntax that enables either developers or designers to declaratively specify the HTML they want to generate.  Developers can then programmatically invoke the templates on the client, and pass JavaScript objects to them to make the content rendered completely data driven.  These JavaScript objects can optionally be based on data retrieved from a server.

Because the jQuery templating proposal is still evolving in response to community feedback, the final version might look very different than the version below. This blog post gives you a sense of how you can try out and use templating as it exists today (you can download the prototype by the jQuery core team at http://github.com/jquery/jquery-tmpl or the latest submission from my team at http://github.com/nje/jquery-tmpl). 

jQuery Client Templates

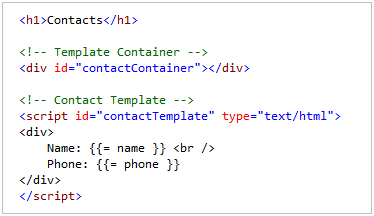
You create client-side jQuery templates by embedding content within a <script type="text/html"> tag.  For example, the HTML below contains a <div> template container, as well as a client-side jQuery “contactTemplate” template (within the <script type="text/html"> element) that can be used to dynamically display a list of contacts:

image

The {{= name }} and {{= phone }} expressions are used within the contact template above to display the names and phone numbers of “contact” objects passed to the template.

We can use the template to display either an array of JavaScript objects or a single object. The JavaScript code below demonstrates how you can render a JavaScript array of “contact” object using the above template. The render() method renders the data into a string and appends the string to the “contactContainer” DIV element:

image

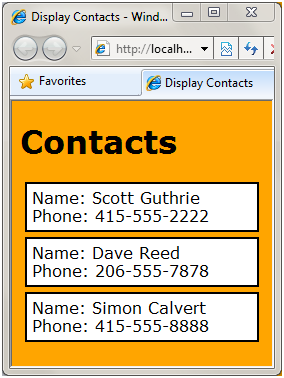
When the page is loaded, the list of contacts is rendered by the template.  All of this template rendering is happening on the client-side within the browser:

image 

Templating Commands and Conditional Display Logic

The current templating proposal supports a small set of template commands - including if, else, and each statements. The number of template commands was deliberately kept small to encourage people to place more complicated logic outside of their templates.

Even this small set of template commands is very useful though. Imagine, for example, that each contact can have zero or more phone numbers. The contacts could be represented by the JavaScript array below:

image

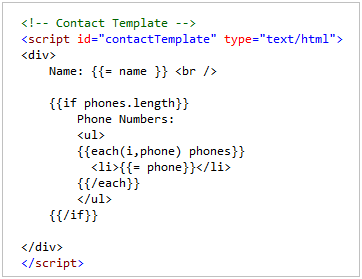
The template below demonstrates how you can use the if and each template commands to conditionally display and loop the phone numbers for each contact:

image

If a contact has one or more phone numbers then each of the phone numbers is displayed by iterating through the phone numbers with the each template command:

image

The jQuery team designed the template commands so that they are extensible. If you have a need for a new template command then you can easily add new template commands to the default set of commands.

Support for Client Data-Linking

The ASP.NET team recently submitted another proposal and prototype to the jQuery forums (http://forum.jquery.com/topic/proposal-for-adding-data-linking-to-jquery). This proposal describes a new feature named data linking. Data Linking enables you to link a property of one object to a property of another object - so that when one property changes the other property changes.  Data linking enables you to easily keep your UI and data objects synchronized within a page.

If you are familiar with the concept of data-binding then you will be familiar with data linking (in the proposal, we call the feature data linking because jQuery already includes a bind() method that has nothing to do with data-binding).

Imagine, for example, that you have a page with the following HTML <input> elements:

image

The following JavaScript code links the two INPUT elements above to the properties of a JavaScript “contact” object that has a “name” and “phone” property:

image

When you execute this code, the value of the first INPUT element (#name) is set to the value of the contact name property, and the value of the second INPUT element (#phone) is set to the value of the contact phone property. The properties of the contact object and the properties of the INPUT elements are also linked – so that changes to one are also reflected in the other.

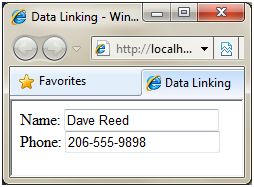
Because the contact object is linked to the INPUT element, when you request the page, the values of the contact properties are displayed:

image

More interesting, the values of the linked INPUT elements will change automatically whenever you update the properties of the contact object they are linked to.

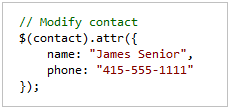
For example, we could programmatically modify the properties of the “contact” object using the jQuery attr() method like below:

image

Because our two INPUT elements are linked to the “contact” object, the INPUT element values will be updated automatically (without us having to write any code to modify the UI elements):

image

Note that we updated the contact object above using the jQuery attr() method. In order for data linking to work, you must use jQuery methods to modify the property values.

Two Way Linking

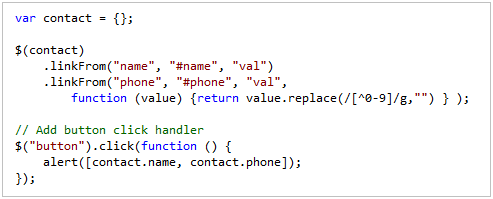
The linkBoth() method enables two-way data linking. The contact object and INPUT elements are linked in both directions. When you modify the value of the INPUT element, the contact object is also updated automatically.

For example, the following code adds a client-side JavaScript click handler to an HTML button element. When you click the button, the property values of the contact object are displayed using an alert() dialog:

image

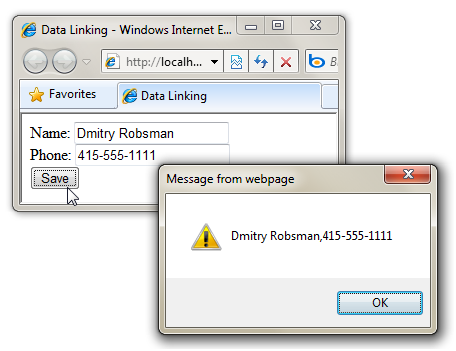
The following demonstrates what happens when you change the value of the Name INPUT element and click the Save button. Notice that the name property of the “contact” object that the INPUT element was linked to was updated automatically:

image

The above example is obviously trivially simple.  Instead of displaying the new values of the contact object with a JavaScript alert, you can imagine instead calling a web-service to save the object to a database. The benefit of data linking is that it enables you to focus on your data and frees you from the mechanics of keeping your UI and data in sync.

Converters

The current data linking proposal also supports a feature called converters. A converter enables you to easily convert the value of a property during data linking.

For example, imagine that you want to represent phone numbers in a standard way with the “contact” object phone property. In particular, you don’t want to include special characters such as ()- in the phone number - instead you only want digits and nothing else. In that case, you can wire-up a converter to convert the value of an INPUT element into this format using the code below:

image

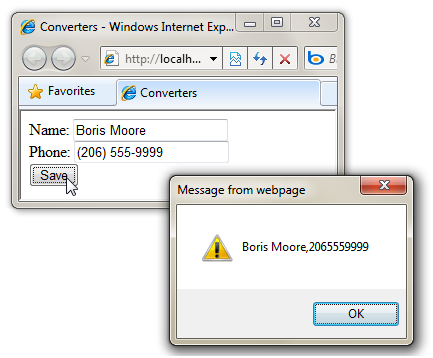
Notice above how a converter function is being passed to the linkFrom() method used to link the phone property of the “contact” object with the value of the phone INPUT element. This convertor function strips any non-numeric characters from the INPUT element before updating the phone property.  Now, if you enter the phone number (206) 555-9999 into the phone input field then the value 2065559999 is assigned to the phone property of the contact object:

image

You can also use a converter in the opposite direction also. For example, you can apply a standard phone format string when displaying a phone number from a phone property.

Combining Templating and Data Linking

Our goal in submitting these two proposals for templating and data linking is to make it easier to work with data when building websites and applications with jQuery. Templating makes it easier to display a list of database records retrieved from a database through an Ajax call. Data linking makes it easier to keep the data and user interface in sync for update scenarios.

Currently, we are working on an extension of the data linking proposal to support declarative data linking. We want to make it easy to take advantage of data linking when using a template to display data.

For example, imagine that you are using the following template to display an array of product objects:

image

Notice the {{link name}} and {{link price}} expressions. These expressions enable declarative data linking between the SPAN elements and properties of the product objects. The current jQuery templating prototype supports extending its syntax with custom template commands. In this case, we are extending the default templating syntax with a custom template command named “link”.

The benefit of using data linking with the above template is that the SPAN elements will be automatically updated whenever the underlying “product” data is updated.  Declarative data linking also makes it easier to create edit and insert forms. For example, you could create a form for editing a product by using declarative data linking like this:

image

Whenever you change the value of the INPUT elements in a template that uses declarative data linking, the underlying JavaScript data object is automatically updated. Instead of needing to write code to scrape the HTML form to get updated values, you can instead work with the underlying data directly – making your client-side code much cleaner and simpler.

Downloading Working Code Examples of the Above Scenarios

You can download this .zip file to get with working code examples of the above scenarios.  The .zip file includes 4 static HTML page:

  • Listing1_Templating.htm – Illustrates basic templating.
  • Listing2_TemplatingConditionals.htm – Illustrates templating with the use of the if and each template commands.
  • Listing3_DataLinking.htm – Illustrates data linking.
  • Listing4_Converters.htm – Illustrates using a converter with data linking.

You can un-zip the file to the file-system and then run each page to see the concepts in action.

Summary

We are excited to be able to begin participating within the open-source jQuery project.  We’ve received lots of encouraging feedback in response to our first two proposals, and we will continue to actively contribute going forward.  These features will hopefully make it easier for all developers (including ASP.NET developers) to build great Ajax applications.

Hope this helps,

Scott

출처 : http://weblogs.asp.net/scottgu/archive/2010/05/07/jquery-templates-and-data-linking-and-microsoft-contributing-to-jquery.aspx

posted by Sunny's
2009. 12. 9. 09:40 Ajax

Json -> xml
xml - > Json


<script type="text/javascript" src="inc/xml2json.js"></script>
<script type="text/javascript" src="inc/json2xml.js"></script>

<script type="text/javascript">
  /**
   * @file action
   * @brief Javascript Action 2.0
   *
   * registered date 20091209
   * updated date 20091209
   * programmed by Yong Sun. Choi. (최용선)
   * http://sunnydev.tistory.com
   */
  var m_xml = '<Pages><page><no>1</no><status>1</status></page><page><no>2</no><status>2</status></page></Pages>';

 // xmldom 로드
  var dom = parseXml(m_xml);

  // dom -> json 변형 : 문자열인 상태
  var json = xml2json(dom, "");

  // json 객체화
  json = eval("(" + json + ")");

 document.writeln(json.Pages.page[0].status);

 json.Pages.page[0].status = 5;

 document.writeln(json.Pages.page[0].status);

  // json -> dom 변형 : 문자열인 상태
  var data = json2xml(json, null);
  alert(data);


  function parseXml(xml) {
      var dom = null;
      if (window.DOMParser) {
          try {
              dom = (new DOMParser()).parseFromString(xml, "text/xml");
          }
          catch (e) { dom = null; }
      }
      else if (window.ActiveXObject) {
          try {
              dom = new ActiveXObject('Microsoft.XMLDOM');
              dom.async = false;
              if (!dom.loadXML(xml)) // parse error ..
                  window.alert(dom.parseError.reason + dom.parseError.srcText);
          }
          catch (e) { dom = null; }
      }
      else
          alert("oops");
      return dom;
  }


posted by Sunny's
2009. 10. 9. 13:45 Ajax

After some days of hard labor, I finished my cross site Ajax plugin for the prototype framework 1.5.0. (Download Plugin Here) While working on a new product of mine I realized I needed cross site Ajax, which is not supported in the Prototype framework.

During cross site Ajax requests the standard XmlHttpRequest approach breaks down. The problem is that XmlHttpRequest is bounded by the same site policy. Fortunately the script tag has the freedom to do as it pleases.

Some other libraries such as dojo and jquery do support the script method for doing Ajax. There is even a project on source-forge called COWS, which is dedicated to this purpose. This plugin is an adaptation of the jquery plugin, but modeled to look like an XmlHttpRequest. The credits of the original code go to Ralf S. Engelschall , which amazingly achieved to make it nicely cross browser compatible. This plugin supports FF, IE, Safari, Opera and Konqueror, but has only been properly tested in FF and IE.

Prototype’s structured way of doing Ajax was my main reason to choose the prototype framework. Furthermore it is also included in the great Symfony framework. In Prototype Ajax requests are written like this:

new Ajax.Request('myurl', {
method: 'GET',
crossSite: true,
parameters: Form.serialize(obj),
onLoading: function() {
//things to do at the start
},
onSuccess: function(transport) {
//things to do when everything goes well
},
onFailure: function(transport) {
//things to do when we encounter a failure
}
});

The cross site plugin simply allows you to do Ajax cross site, by specifying crossSite: true (line 3 of the above example). I will now cover some technical aspects of the plugin, but if you just want to start using it simply skip to the plug and play instructions below.

How it works – Technical Aspects

This plugin uses the dynamic script tag technique. This basically means that we insert new <script> tags into the Dom. Since this script tag is not bound to the same site you can send and receive data in the Ajax way. In its most basic form the javascript would be like this:

this.node = document.createElement('SCRIPT');
this.node.type = 'text/javascript';
this.node.src = 'http://www.serversite.com';
var head = document.getElementsByTagName('HEAD')[0];
head.appendChild(this.node);

In order to make it very easy to use with Prototype, or any other library for that matter, I decided to mimic the functions of the XmlHttpRequest. This is easily achieved by implementing the functions open, send and onreadystatechange. Furthermore I needed to specify the variables readyState and status in order to support prototype’s onLoad, onSucces and onFailure.

Detecting the loading of a script element is not that easy. Browsers such as Safari and Konqueror simply give no indication of this at all. One common solution to dealing with this is to use an interval and perform a check. The work at TrainOfThoughts however takes the beautiful approach of inserting a helper script. This exploits the fact that the dynamically added scripts are executed in sequence. This approach makes the plugin nicely cross browser compatible.

Detecting failure is rather cumbersome for the script technique. As far as I know there is no way to read the headers on the incoming file, or to inspect its contents through javascript. This leaves us with the rather blunt approach of setting a global variable using the server output. It works, but it could be prettier.

Plug and Play implementation instructions

Firstly you need to load the plugin javascript file: download cross site ajax plugin for the prototype framework 1.5.0.

Secondly you need to change your regular prototype Ajax request, by ensuring that you instruct it to use the crossSite and GET methods, as such (observe line 2 and 3):

new Ajax.Request(baseurl+'/comment/giveratingjs', {
method: 'GET',
crossSite: true,
parameters: Form.serialize(obj),
onLoading: function() {
//things to do at the start
},
onSuccess: function(transport) {
//things to do when everything goes well
},
onFailure: function(transport) {
//things to do when we encounter a failure
}
});

Thirdly you might need to rewrite some of your javascript code to accommodate the instant execution of the scripts.

Fourthly, if you want to use onFailure for any of your scripts you need to send some javascript instructions back from the server. You need to do this both on success and on failure (since a global variable is used). This is the javascript variable you need to set:

'var _xsajax$transport_status = 200;' Or
'var _xsajax$transport_status = 404;'

Symfony specific tips

Symfony detects if it receives a XmlHttpRequest and automatically turns off your debug bar and layout. Unfortunately it is not so kind to the script technique. So in your action you need to do this manually:

sfConfig::set('sf_web_debug', false);
$this->setLayout(false);

Furthermore your validation files by default only look at POST variables (this one tricked me). To instruct them to look at both, simply mention

methods: [post, get]

at the top of your validation.yml

Since you will probably want to send html to the browser, I would suggest you put this little function (found in the symfony escape helpers) in your toolbox.

public static function esc_js($value) {
return addcslashes($value, "\0..\37\\'\"\177..\377\/");
}

Conclusion

The dynamic script tag technique opens up a wide range of possibilities. Personally I am very glad with the results and would like to thank Ralf S. Engelschall for his superb cbc work. Unfortunately I didn’t include an example this time. You will have to wait for the products’ launch:). Comments and improvements are always appreciated. Enjoy your cross site scripting!

링크 : http://www.mellowmorning.com/2007/10/25/introducing-a-cross-site-ajax-plugin-for-prototype/
링크 : http://techbug.tistory.com/138

posted by Sunny's
2009. 10. 9. 11:33 Ajax
<!DOCTYPE html PUBLIC "-//W3C//DTD XHTML 1.0 Strict//EN" "http://www.w3.org/TR/xhtml1/DTD/xhtml1-strict.dtd">
<html>
<head>
<meta http-equiv="Content-Type" content="text/html;charset=utf-8" />
<script type="text/javascript" src="jquery.min.js"></script>
<script type="text/javascript" src="jquery.webservice.js"></script>
<script type="text/javascript">
$(document).ready(function() {
$('input').click(function() {
$.webservice({
url: "http://61.96.206.106/Service.asmx",
data: {_company:"infraware",_id:"kimbokki"},
dataType: "text",
nameSpace: "https://www.infraware.net/",
methodName: "GetImagePreViewData",
requestType: "soap1.2",
success:function(data,textStatus){
$(data).find('name').each(function(){
alert('[name] : ' + $(this).text());
});
//alert('[name] : ' + $(data).find('name').text());
//alert('[name] : ' + $('name', data).text());
alert('[success data] : ' + data);
},
});
});
});
</script>
</head>
<body>
<input type="button" value="click!" />
</body>
</html>


PS. JavaScript로 WebService를 호출하는 방법이 있어야 하는데, jQuery쪽에서 하는 Plugin이 있어서 사용했다.
그냥 JavaScript를 사용하려면 XMLHttpRequest 객체를 직접 사용해서 호출하는 방법을 사용하면 된다.
data에 Soap Data를 넣어서 호출하면 됨.

출처 : http://itbaby.egloos.com/4539237

posted by Sunny's
2009. 10. 9. 11:11 Ajax

When used correctly, jQuery can help you make your website more interactive, interesting and exciting. This article will share some best practices and examples for using the popular Javascript framework to create unobtrusive, accessible DOM scripting effects. The article will explore what constitutes best practices with regard to Javascript and, furthermore, why jQuery is a good choice of a framework to implement best practices.

1. Why jQuery?

jQuery is ideal because it can create impressive animations and interactions. jQuery is simple to understand and easy to use, which means the learning curve is small, while the possibilities are (almost) infinite.

Javascript and Best Practices

Javascript has long been the subject of many heated debates about whether it is possible to use it while still adhering to best practices regarding accessibility and standards compliance.

The answer to this question is still unresolved, however, the emergence of Javascript frameworks like jQuery has provided the necessary tools to create beautiful websites without having to worry (as much) about accessibility issues.

Obviously there are cases where a Javascript solution is not the best option. The rule of thumb here is: use DOM scripting to enhance functionality, not create it.

Unobtrusive DOM Scripting

While the term “DOM scripting” really just refers to the use of scripts (in this case, Javascripts) to access the Document Object Model, it has widely become accepted as a way of describing what should really be called “unobtrusive DOM scripting”—basically, the art of adding Javascript to your page in such a way that if there were NO Javascript, the page would still work (or at least degrade gracefully). In the website world, our DOM scripting is done using Javascript.

The Bottom Line: Accessible, Degradable Content

The aim of any web producer, designer or developer is to create content that is accessible to the widest range of audience. However, this has to be carefully balanced with design, interactivity and beauty. Using the theories set out in this article, designers, developers and web producers will have the knowledge and understanding to use jQuery for DOM scripting in an accessible and degradable way; maintaining content that is beautiful, functional AND accessible.

2. Unobtrusive DOM Scripting?

In an ideal world, websites would have dynamic functionality AND effects that degrade well. What does this mean? It would mean finding a way to include, say, a snazzy Javascript Web 2.0 animated sliding news ticker widget in a web page, while still ensuring that it fails gracefully if a visitor’s browser can’t (or won’t) run Javascripts.

The theory behind this technique is quite simple: the ultimate aim is to use Javascript for non-invasive, “behavioural” elements of the page. Javascript is used to add or enhance interactivity and effects. The primary rules for DOM scripting follow.

Rule #1: Separate Javascript Functionality

Separate Javascript functionality into a “behavioural layer,” so that it is separate from and independent of (X)HTML and CSS. (X)HTML is the markup, CSS the presentation and Javascript the behavioural layer. This means storing ALL Javascript code in external script files and building pages that do not rely on Javascript to be usable.

For a demonstration, check out the following code snippets:

CrossBad markup:

Never include Javascript events as inline attributes. This practice should be completely wiped from your mind.

  1. <a onclick="doSomething()" href="#">Click!</a>  
TickGood markup:

All Javascript behaviours should be included in external script files and linked to the document with a <script> tag in the head of the page. So, the anchor tag would appear like this:

  1. <a href="backuplink.html" class="doSomething">Click!</a>  

And the Javascript inside the myscript.js file would contain something like this:

  1. ...   
  2.   
  3. $('a.doSomething').click(function(){   
  4.     // Do something here!   
  5.     alert('You did something, woo hoo!');   
  6. });   
  7. ...  

The .click() method in jQuery allows us to easily attach a click event to the result(s) of our selector. So the code will select all of the <a> tags of class “doSomething” and attach a click event that will call the function. In practice, this

In Rule #2 there is a further demonstration of how a similar end can be achieved without inline Javascript code.

Rule #2: NEVER Depend on Javascript

To be truly unobtrusive, a developer should never rely on Javascript support to deliver content or information. It’s fine to use Javascript to enhance the information, make it prettier, or more interactive—but never assume the user’s browser will have Javascript enabled. This rule of thumb can in fact be applied to any third-party technology, such as Flash or Java. If it’s not built into every web browser (and always enabled), then be sure that the page is still completely accessible and usable without it.

CrossBad markup:

The following snippet shows Javascript that might be used to display a “Good morning” (or “afternoon”) message on a site, depending on the time of day. (Obviously this is a rudimentary example and would in fact probably be achieved in some server-side scripting language).

  1. <script language="javascript">  
  2. var now = new Date();   
  3. if(now.getHours() < 12)   
  4.     document.write('Good Morning!');   
  5. else   
  6.     document.write('Good Afternoon!');   
  7. </script>  

This inline script is bad because if the target browser has Javascript disabled, NOTHING will be rendered, leaving a gap in the page. This is NOT graceful degradation. The non-Javascript user is missing out on our welcome message.

TickGood markup:

A semantically correct and accessible way to implement this would require much simpler and more readable (X)HTML, like:

  1. <p title="Good Day Message">Good Morning!</p>  

By including the “title” attribute, this paragraph can be selected in jQuery using a selector (selectors are explained later in this article) like the one in the following Javascript snippet:

  1. var now = new Date();   
  2. if(now.getHours() >= 12)   
  3. {   
  4.     var goodDay = $('p[title="Good Day Message"]');   
  5.     goodDay.text('Good Afternoon!');   
  6. }  

The beauty here is that all the Javascript lives in an external script file and the page is rendered as standard (X)HTML, which means that if the Javascript isn’t run, the page is still 100% semantically pure (X)HTML—no Javascript cruft. The only problem would be that in the afternoon, the page would still say “Good morning.” However, this can be seen as an acceptable degradation.

Rule #3: Semantic and Accessible Markup Comes First

It is very important that the (X)HTML markup is semantically structured. (While it is outside the scope of this article to explain why, see the links below for further reading on semantic markup.) The general rule here is that if the page’s markup is semantically structured, it should follow that it is also accessible to a wide range of devices. This is not always true, though, but it is a good rule of thumb to get one started.

Semantic markup is important to unobtrusive DOM scripting because it shapes the path the developer will take to create the DOM scripted effect. The FIRST step in building any jQuery-enhanced widget into a page is to write the markup and make sure that the markup is semantic. Once this is achieved, the developer can then use jQuery to interact with the semantically correct markup (leaving an (X)HTML document that is clean and readable, and separating the behavioural layer).

CrossTerrible markup:

The following snippet shows a typical list of items and descriptions in a typical (and terribly UNsemantic) way.

  1. <table>  
  2.     <tr>  
  3.         <td onclick="doSomething();">First Option</td>  
  4.         <td>First option description</td>  
  5.     </tr>  
  6.     <tr>  
  7.         <td onclick="doSomething();">Second Option</td>  
  8.         <td>Second option description</td>  
  9.     </tr>  
  10. </table>  
CrossBad markup:

The following snippet shows a typical list of items and descriptions in a more semantic way. However, the inline Javascript is far from perfect.

  1. <dl>  
  2.     <dt onclick="doSomething();">First Option</dt>  
  3.     <dd>First option description</dd>  
  4.     <dt onclick="doSomething();">Second Option</dt>  
  5.     <dd>Second option description</dd>  
  6. </dl>  
TickGood markup:

This snippet shows how the above list should be marked up. Any interaction with Javascript would be attached at DOM load using jQuery, effectively removing all behavioural markup from the rendered (X)HTML.

  1. <dl id="OptionList">  
  2.     <dt>First Option</dt>  
  3.     <dd>First option description</dd>  
  4.     <dt>Second Option</dt>  
  5.     <dd>Second option description</dd>  
  6. </dl>  

The <id> of “OptionList” will enable us to target this particular definition list in jQuery using a selector—more on this later.

3. Understanding jQuery for Unobtrusive DOM Scripting

This section will explore three priceless tips and tricks for using jQuery to implement best practices and accessible effects.

Understanding Selectors: the Backbone of jQuery

The first step to unobtrusive DOM scripting (at least in jQuery and Prototype) is using selectors. Selectors can (amazingly) select an element out of the DOM tree so that it can be manipulated in some way.

If you’re familiar with CSS then you’ll understand selectors in jQuery; they’re almost the same thing and use almost the same syntax. jQuery provides a special utility function to select elements. It is called $.

A set of very simple examples of jQuery selectors:
  1. $(document); // Activate jQuery for object   
  2. $('#mydiv')  // Element with ID "mydiv"   
  3. $('p.first'// P tags with class first.   
  4. $('p[title="Hello"]'// P tags with title "Hello"   
  5. $('p[title^="H"]'// P tags title starting with H  
So, as the Javascript comments suggest:
  1. $(document);
    The first option will apply the jQuery library methods to a DOM object (in this case, the document object).
  2. $(’#mydiv’)
    The second option will select every <div> that has the <id> attribute set to “mydiv”.
  3. $(’p.first’)
    The third option will select all of the <p> tags with the class of “first”.
  4. $(’p[title="Hello"]‘)
    This option will select from the page all <p> tags that have a title of “Hello”. Techniques like this enable the use of much more semantically correct (X)HTML markup, while still facilitating the DOM scripting required to create complex interactions.
  5. $(’p[title^="H"]‘)
    This enables the selection of all of the <p> tags on the page that have a title that starts with the letter H.
These examples barely scratch the surface.

Almost anything you can do in CSS3 will work in jQuery, plus many more complicated selectors. The complete list of selectors is well documented on the jQuery Selectors documentation page. If you’re feeling super-geeky, you could also read the CSS3 selector specification from the W3C.

Get ready.
$(document).ready()

Traditionally Javascript events were attached to a document using an “onload” attribute in the <body> tag of the page. Forget this practice. Wipe it from your mind.

jQuery provides us with a special utility on the document object, called “ready”, allowing us to execute code ONLY after the DOM has completely finished loading. This is the key to unobtrusive DOM scripting, as it allows us to completely separate our Javascript code from our markup. Using $(document).ready(), we can queue up a series of events and have them execute after the DOM is initialized.

This means that we can create entire effects for our pages without changing the markup for the elements in question.

Hello World! Why $(document).ready() is SO cool

To demonstrate the beauty of this functionality, let’s recreate the standard introduction to Javascript: a “Hello World” alert box.

The following markup shows how we might have run a “Hello World” alert without jQuery:

CrossBad markup:
  1. <script language="javascript">  
  2. alert('Hello World');   
  3. </script>  
TickGood markup:

Using this functionality in jQuery is simple. The following code snippet demonstrates how we might call the age-old “Hello World” alert box after our document has loaded. The true beauty of this markup is that it lives in an external Javascript file. There is NO impact on the (X)HTML page.

  1. $(document).ready(function()   
  2. {   
  3.     alert('Hello World');   
  4. });  
How it works

The $(document).ready() function takes a function as its argument. (In this case, an anonymous function is created inline—a technique that is used throughout the jQuery documentation.) The function passed to $(document).ready() is called after the DOM has finished loading and executes the code inside the function, in this case, calling the alert.

Dynamic CSS Rule Creation

One problem with many DOM scripting effects is that they often require us to hide elements of the document from view. This hiding is usually achieved through CSS. However, this is less than desirable. If a user’s browser does not support Javascript (or has Javascript disabled), yet does support CSS, then the elements that we hide in CSS will never be visible, since our Javascript interactions will not have run.

The solution to this comes in the form of a plugin for jQuery called cssRule, which allows us to use Javascript to easily add CSS rules to the style sheet of the document. This means we can hide elements of the page using CSS—however the CSS is ONLY executed IF Javascript is running.

CrossBad markup:
  1. HTML:   
  2. <h2>This is a heading</h2>  
  3. <p class="hide-me-first">  
  4. This is some information about the heading.   
  5. </p>  
  6.   
  7. CSS:   
  8. p.hide-me-first   
  9. {   
  10.     display: none;   
  11. }  

Assuming that a paragraph with the class of “hide-me-first” is going to first be hidden by CSS and then be displayed by a Javascript after some future user interaction, if the Javascript never runs the content will never be visible.

TickGood markup:
  1. HTML:   
  2. <h2>This is a heading</h2>  
  3. <p class="hide-me-first">  
  4. This is some information about the heading.   
  5. </p>  
  6.   
  7. jQuery Javascript:   
  8. $(document).ready(function{   
  9.     jQuery.cssRule("p.hide-me-first", "display", "none");   
  10. });  

Using a $(document).ready() Javascript here to hide the paragraph element means that if Javascript is disabled, the paragraphs won’t ever be hidden—so the content is still accessible. This is the key reason for runtime, Javascript-based, dynamic CSS rule creation.

4. Conclusion

jQuery is an extremely powerful library that provides all the tools necessary to create beautiful interactions and animations in web pages, while empowering the developer to do so in an accessible and degradable manner.

This article has covered:

  1. Why unobtrusive DOM scripting is so important for accessibility,
  2. Why jQuery is the natural choice to implement unobtrusive DOM scripting effects,
  3. How jQuery selectors work,
  4. How to implement unobtrusive CSS rules in jQuery.

5. Further Reading

Further Reading: jQuery and JavaScript Practices

  1. jQuery Web Site: How jQuery Works and Tutorials
    John Resig + Other Contributors
    One of jQuery’s true strengths is the documentation provided by John Resig and his team.
  2. 51 Best jQuery Tutorials and Examples
  3. Easy As Pie: Unobtrusive JavaScript
  4. Seven Rules of Unobtrusive JavaScript
  5. Learning jQuery
  6. Visual jQuery
  7. jQuery Tutorials For Designers
  8. jQuery For Designers
    jQuery for Designers: learn how easy it is to apply web interaction using jQuery.
  9. 15 Days Of jQuery
    jQuery tutorials and example code that takes you from zero to hero in no time flat.
  10. 15 Resources To Get You Started With jQuery From Scratch
  11. The Seven Rules Of Pragmatic Progressive Enhancement
  12. The Behaviour Layer Slides
    Jeremy Keith
    Great slide notes giving a quick rundown on unobtrusive Javascripting.
  13. A List Apart: Behavioral Separation
    Jeremy Keith
    A more in-depth explanation of the idea of separating Javascript into an unobtrusive “behavioural” layer.
  14. Unobtrusive JavaScript with jQuery
    Simon Willison
    A great set of slides about using jQuery unobtrusively. Also, finishes with a wonderful summary of jQuery methods and usage.

Further Reading: Semantic Markup

  1. Wikipedia: Definition of Semantics
    It’s worth understanding the idea of semantics in general prior to trying to wrap one’s head around the concept of semantic markup.
  2. Who cares about semantic markup?
    Dave Shea
    Dave Shea explores the benefits of semantic markup and
  3. Standards don’t necessarily have anything to do with being semantically correct
    Jason Kottke
    Kottke discusses the differences between standards compliance and semantic markup.
  4. CSS3 selector specification
    W3C
    The complete specification for CSS3 selectors (most of which work perfectly in jQuery selectors also). This is great reading for anyone who likes to keep up to date with best practices and standards compliance.
posted by Sunny's
2009. 10. 5. 10:09 Ajax

Propeties.js 에서 cross Domain  처리 보고 힌트 얻읍

crossSite: true


Ajax
$.ajax({
                type: "POST",
                url: "임의의 URL",
                crossSite: true,
                data: "",
                success: function(data) {
                }


posted by Sunny's
2009. 9. 30. 18:20 Ajax

Header Script
<script type="text/javascript">
/******************************************
* Ajax load XML file script -- By Eddie Traversa (http://dhtmlnirvana.com/)
* Script featured on Dynamic Drive (http://www.dynamicdrive.com/)
* Keep this notice intact for use
******************************************/
  
   function ajaxLoader(url,id)
 {
  if (document.getElementById) {
   var x = (window.ActiveXObject) ? new ActiveXObject("Microsoft.XMLHTTP") : new XMLHttpRequest();
   }
   if (x)
    {
   x.onreadystatechange = function()
     {
    if (x.readyState == 4 && x.status == 200)
      {
      el = document.getElementById(id);
      el.innerHTML = x.responseText;
     }
     }
    x.open("GET", url, true);
    x.send(null);
    }
     }

</script>


Body
<body onload="ajaxLoader('basic.xml','contentLYR')">
<div id="contentLYR">
</div>
</body>

posted by Sunny's
2009. 9. 29. 11:27 Ajax
posted by Sunny's
2009. 9. 29. 10:46 Ajax

jQuery plugin: Autocomplete

Autocomplete an input field to enable users quickly finding and selecting some value, leveraging searching and filtering.

By giving an autocompleted field focus or entering something into it, the plugin starts searching for matching entries and displays a list of values to choose from. By entering more characters, the user can filter down the list to better matches.

This can be used to enter previous selected values, eg. for tags, to complete an address, eg. enter a city name and get the zip code, or maybe enter email addresses from an addressbook.

Current version: 1.1
Compressed filesize: 8.001 bytes
License: MIT/GPL
Tested in: Firefox 3, IE 6 & 7, Opera 9, Safari 3

Files:

Download
Changelog
Demos
Documentation (Plugin Options)

Dependencies

Required

Optional

  • optional: bgiframe plugin to fix select-problems in IE, just include to apply to autocomplete

Support

  • Please post questions to the jQuery discussion list, putting (autocomplete) into the subject of your post, making it easier to spot it and respond quickly. Keep your question short and succinct and provide code when possible; a testpage makes it much more likely that you get an useful answer in no time.
  • Please post bug reports and other contributions (enhancements, features) to the plugins.jQuery.com bug tracker (requires login/registration)
posted by Sunny's
2009. 9. 29. 10:44 Ajax

jQuery 플러그인 중에 autocomplete가 있는데, 이 녀석은 배열을 사용하기 때문에 URL에서 넘어온 JSON 데이터를 제대로 인식하지 못할 뿐더러, JSON을 인식한다쳐도 스프링 JSONView가 만들어주는 JSON에서 모델이름으로 값을 꺼내와야 하는데, 그런 장치가 전혀 없기 때문에... 뜯어 고쳤습니다.

새로운 option을 추가하고, Ajax 요청을 보내는 부분을 고치고, Ajax로 받아온 데이터를 파싱하는 부분을 수정했더니 잘 동작했습니다. 스프링 JsonView에 특화된 jQuery 자동완성 플러긴으로 보면 되겠군요.


목록에 보여줄 형태를 옵션으로 지정해 줄 수 있어서 이름 + " " + 이메일 형태를 보여주도록 설정했습니다. 넓이도 조정할 수 있으니.. 글자가 잘리지 않게 너비를 조정할 수도 있겠네요.

자세한 옵션은 http://docs.jquery.com/Plugins/Autocomplete/autocomplete#url_or_dataoptions

여러가지 사용 예제는 http://jquery.bassistance.de/autocomplete/demo/

모든 옵션을 확인하진 않았지만, 대부분의 옵션(목록 갯수 설정, 검색할 때 필요한 최소 글자 수, 등등등)이 제대로 동작했습니다.

기본으로 화살표 이동도 되고, 캐싱도 지원해주니.. 이 정도면 썩 괜찮으 듯 합니다. 선택이 했을 때는 선택한 데이터 row를 가지고 function을 실행할 수 있게 해주는데, 그걸 이용해서 입력한 값 주변에 기타 정보를 출력하도록 만들 수 있었습니다.

그러나 한글값을 넘겨봤더니 깨지더군요. 그래서 encodeURIComponent()로 값을 감싸서 UTF-8로 보냈습니다. 그런 다음 컨트롤러에서 받아서 디코딩을 했죠.

keyword = URLDecoder.decode(keyword,"UTF-8");

디코딩 하는 방법은 성윤이가 도와줬습니다. 흠.. 사부님 말씀으로는 이렇게 UTF-8로 인코딩/디코딩 하지 않고도 처리할 수 있는 방법이 있는 것 같은데.. 일단 거기까진 신경쓰지 않기로 했습니다. 지금도 충분히 어지러우니까요. @_@

라이선스가 GPL하고 mit 라이선스던데 소스를 공개해야 라이선스를 위반하지 않는거 아닌지 모르겠네요. 대충 고친건데.. 흠..

이젠 테스트 데이터를 왕창 넣고 확인해 봐야겠습니다.
posted by Sunny's
prev 1 2 3 next