One of the things my team has been working on has been a new view engine option for ASP.NET.
ASP.NET MVC has always supported the concept of “view engines” – which are the pluggable modules that implement different template syntax options. The “default” view engine for ASP.NET MVC today uses the same .aspx/.ascx/.master file templates as ASP.NET Web Forms. Other popular ASP.NET MVC view engines used today include Spark and NHaml.
The new view-engine option we’ve been working on is optimized around HTML generation using a code-focused templating approach. The codename for this new view engine is “Razor”, and we’ll be shipping the first public beta of it shortly.
Design Goals
We had several design goals in mind as we prototyped and evaluated “Razor”:
-
Compact, Expressive, and Fluid: Razor minimizes the number of characters and keystrokes required in a file, and enables a fast, fluid coding workflow. Unlike most template syntaxes, you do not need to interrupt your coding to explicitly denote server blocks within your HTML. The parser is smart enough to infer this from your code. This enables a really compact and expressive syntax which is clean, fast and fun to type.
-
Is not a new language: We consciously chose not to create a new imperative language with Razor. Instead we wanted to enable developers to use their existing C#/VB (or other) language skills with Razor, and deliver a template markup syntax that enables an awesome HTML construction workflow with your language of choice.
We’ve spent the last few months building applications with it and doing lots of usability studies of it with a variety of volunteers (including several groups of non-.NET web developers). The feedback so far from people using it has been really great.
Choice and Flexibility
One of the best things about ASP.NET is that most things in it are pluggable. If you find something doesn’t work the way you want it to, you can swap it out for something else.
The next release of ASP.NET MVC will include a new “Add->View” dialog that makes it easy for you to choose the syntax you want to use when you create a new view template file. It will allow you to easily select any of of the available view engines you have installed on your machine – giving you the choice to use whichever view approach feels most natural to you:

Razor will be one of the view engine options we ship built-into ASP.NET MVC. All view helper methods and programming model features will be available with both Razor and the .ASPX view engine.
You’ll also be able to mix and match view templates written using multiple view-engines within a single application or site. For example, you could write some views using .aspx files, some with .cshtml or .vbhtml files (the file-extensions for Razor files – C# and VB respectively), and some with Spark or NHaml. You can also have a view template using one view-engine use a partial view template written in another. You’ll have full choice and flexibility.
Hello World Sample with Razor
Razor enables you to start with static HTML (or any textual content) and then make it dynamic by adding server code to it. One of the core design goals behind Razor is to make this coding process fluid, and to enable you to quickly integrate server code into your HTML markup with a minimum of keystrokes.
To see a quick example of this let’s create a simple “hello world” sample that outputs a message like so:

Building it with .ASPX Code Nuggets
If we were to build the above “hello world” sample using ASP.NET’s existing .ASPX markup syntax, we might write it using <%= %> blocks to indicate “code nuggets” within our HTML markup like so:

One observation to make about this “hello world” sample is that each code nugget block requires 5 characters (<%= %>) to denote the start and stop of the code sequence. Some of these characters (in particular the % key – which is center top on most keyboards) aren’t the easiest to touch-type.
Building it with Razor Syntax
You denote the start of a code block with Razor using a @ character. Unlike <% %> code nuggets, Razor does not require you to explicitly close the code-block:

The Razor parser has semantic knowledge of C#/VB code used within code-blocks – which is why we didn’t need to explicitly close the code blocks above. Razor was able to identify the above statements as self-contained code blocks, and implicitly closed them for us.
Even in this trivial “hello world” example we’ve managed to save ourselves 12 keystrokes over what we had to type before. The @ character is also easier to reach on the keyboard than the % character which makes it faster and more fluid to type.
Loops and Nested HTML Sample
Let’s look at another simple scenario where we want to list some products (and the price of each product beside it):

Building it with .ASPX Code Nuggets
If we were to implement this using ASP.NET’s existing .ASPX markup syntax, we might write the below code to dynamically generate a <ul> list with <li> items for each product inside it:

Building it with Razor Syntax
Below is how to generate the equivalent output using Razor:

Notice above how we started a “foreach” loop using the @ symbol, and then contained a line of HTML content with code blocks within it. Because the Razor parser understands the C# semantics in our code block, it was able to determine that the <li> content should be contained within the foreach and treated like content that should be looped. It also recognized that the trailing } terminated the foreach statement.
Razor was also smart enough to identify the @p.Name and @p.Price statements within the <li> element as server code – and execute them each time through the loop. Notice how Razor was smart enough to automatically close the @p.Name and @p.Price code blocks by inferring how the HTML and code is being used together.
The ability to code like this without having to add lots of open/close markers throughout your templates ends up making the whole coding process really fluid and fast.
If-Blocks and Multi-line Statements
Below are a few examples of other common scenarios:
If Statements
Like our foreach example above, you can embed content within if statements (or any other C# or VB language construct), without having to be explicit about the code block’s begin/end. For example:

Multi-line Statements
You can denote multiple lines of code by wrapping it within a @{ code } block like so:

Notice above how variables can span multiple server code blocks – the “message” variable defined within the multi-line @{ } block, for example, is also being used within the @message code block. This is conceptually the same as the <% %> and <%= %> syntax within .aspx markup files.
Multi-Token Statements
The @( ) syntax enables a code block to have multiple tokens. For example, we could re-write the above code to concatenate a string and the number together within a @( code ) block:

Integrating Content and Code
The Razor parser has a lot of language smarts built-into it – enabling you to rely on it to do the heavily lifting, as opposed to you having to explicitly do it yourself.
Does it break with email addresses and other usages of @ in HTML?
Razor’s language parser is clever enough in most cases to infer whether a @ character within a template is being used for code or static content. For example, below I’m using a @ character as part of an email address:

When parsing a file, Razor examines the content on the right-hand side of any @ character and attempts to determine whether it is C# code (if it is a CSHTML file) or VB code (if it is a VBHTML file) or whether it is just static content. The above code will output the following HTML (where the email address is output as static content and the @DateTime.Now is evaluated as code:

In cases where the content is valid as code as well (and you want to treat it as content), you can explicitly escape out @ characters by typing @@.
Identifying Nested Content
When nesting HTML content within an if/else, foreach or other block statement, you should look to wrap the inner content within an HTML or XML element to better identify that it is the beginning of a content block.
For example, below I’ve wrapped a multi-line content block (which includes a code-nugget) with a <span> element:

This will render the below content to the client – note that it includes the <span> tag:

You can optionally wrap nested content with a <text> block for cases where you have content that you want to render to the client without a wrapping tag:
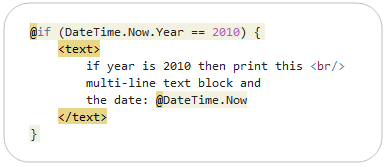
The above code will render the below content to the client – note that it does not include any wrapping tag:

HTML Encoding
By default content emitted using a @ block is automatically HTML encoded to better protect against XSS attack scenarios.
Layout/MasterPage Scenarios – The Basics
It is important to have a consistent look and feel across all of the pages within your web-site/application. ASP.NET 2.0 introduced the concept of “master pages” which helps enable this when using .aspx based pages or templates. Razor also supports this concept using “layout pages” – which allow you to define a common site template, and then inherit its look and feel across all the views/pages on your site.
Simple Layout Example
Below is a simple example of a layout page – which we’ll save in a file called “SiteLayout.cshtml”. It can contain any static HTML content we want to include in it, as well as dynamic server code. We’ll then add a call to the “RenderBody()” helper method at the location in the template where we want to “fill in” specific body content for a requested URL:
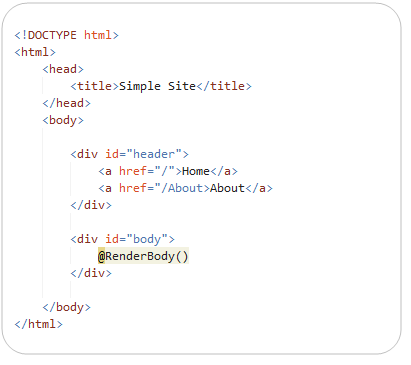
We can then create a view template called “Home.cshtml” that contains only the content/code necessary to construct the specific body of a requested page, and which relies on the layout template for its outer content:
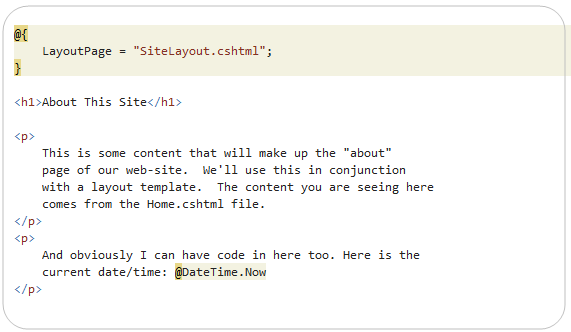
Notice above how we are explicitly setting the “LayoutPage” property in code within our Home.cshtml file. This indicates that we want to use the SiteLayout.cshtml template as the layout for this view. We could alternatively indicate the layout file we want to use within a ASP.NET MVC Controller invoking Home.cshtml as a view template, or by configuring it as the default layout to use for our site (in which case we can specify it in one file in our project and have all view templates pick it up automatically).
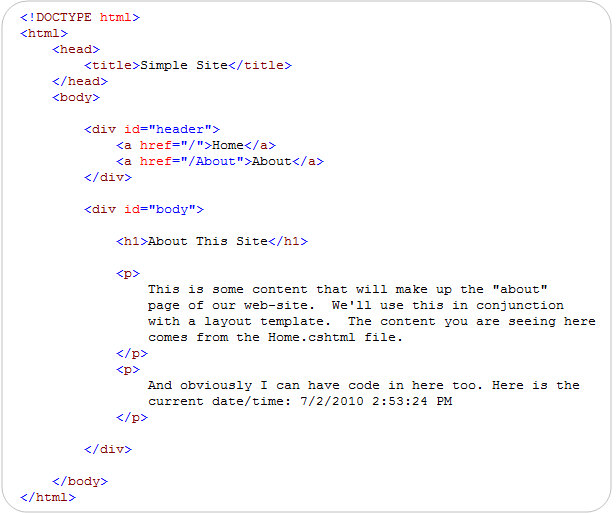
When we render Home.cshtml as a view-template, it will combine the content from the layout and sub-page and send the following content to the client:
Compact, Clean, Expressive Code
One of the things to notice in the code above is that the syntax for defining layouts and using them from views/pages is clean and minimal. The code screen-shots above of the SiteLayout.cshtml and Home.cshtml files contain literally all of the content in the two .cshtml files – there is no extra configuration or additional tags, no <%@ Page%> prefix, nor any other markup or properties that need to be set.
We are trying to keep the code you write compact, easy and fluid. We also want to enable anyone with a text editor to be able to open, edit and easily tweak/customize them. No code generation or intellisense required.
Layout/MasterPage Scenarios – Adding Section Overrides
Layout pages optionally support the ability to define different “sections” within them that view templates based on the layout can then override and “fill-in” with custom content. This enables you to easily override/fill-in discontinuous content regions within a layout page, and provides you with a lot of layout flexibility for your site.
For example, we could return to our SiteLayout.cshtml file and define two sections within our layout that the view templates within our site can optionally choose to fill-in. We’ll name these sections “menu” and “footer” – and indicate that they are optional (and not required) within our site by passing an optional=true parameter to the RenderSection() helper call (we are doing this using the new C# optional parameter syntax that I’ve previously blogged about).

Because these two sections are marked as “optional”, I’m not required to define them within my Home.cshtml file. My site will continue to work fine if they aren’t there.
Let’s go back into Home.cshtml, though, and define a custom Menu and Footer section for them. The below screenshot contains all of the content in Home.cshtml – there is nothing else required in the file. Note: I moved setting the LayoutPage to be a site wide setting – which is why it is no longer there.
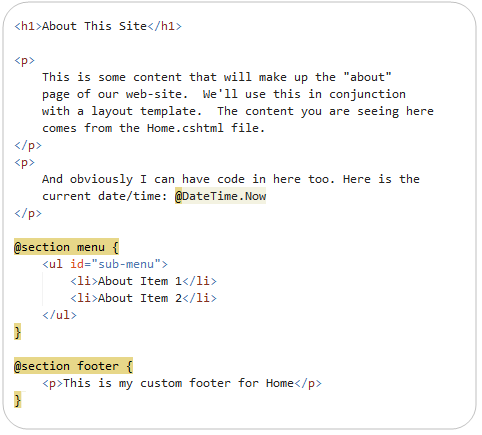
Our custom “menu” and “footer” section overrides are being defined within named @section { } blocks within the file. We chose not to require you to wrap the “main/body” content within a section and instead to just keep it inline (which both saves keystrokes and enables you to easily add sections to your layout pages without having to go back through all your existing pages changing their syntax).
When we render Home.cshtml as a view-template again, it will now combine the content from the layout and sub-page, integrating the two new custom section overrides in it, and send down the following content to the client:

Encapsulation and Re-Use with HTML Helpers
We’ve covered how to maintain a consistent site-wide look and feel using layout pages. Let’s now look at how we can also create re-usable “HTML helpers” that enable us to cleanly encapsulate HTML generation functionality into libraries that we can re-use across our site – or even across multiple different sites.
Code Based HTML Helpers
ASP.NET MVC today has the concept of “HTML Helpers” – which are methods that can be invoked within code-blocks, and which encapsulate generating HTML. These are implemented using pure code today (typically as extension methods). All of the existing HTML extension methods built with ASP.NET MVC (both ones we’ve built and ones built by others) will work using the “Razor” view engine (no code changes required):

Declarative HTML Helpers
Generating HTML output using a code-only class approach works – but is not ideal.
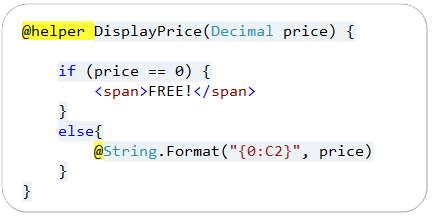
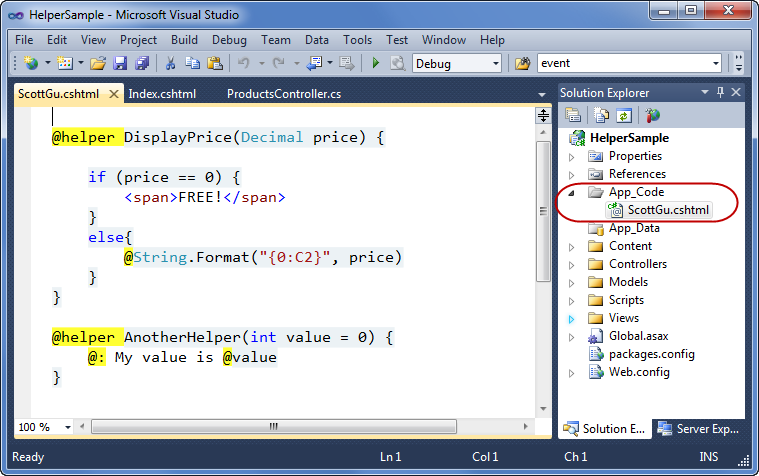
One of the features we are looking to enable with Razor is an easy way to create re-usable HTML helpers using a more declarative approach. Our plan is to enable you to define reusable helpers using a @helper { } declarative syntax like below.

You’ll be able to place .cshtml files that contain these helpers into a Views\Helpers directory and then re-use them from any view or page in your site (no extra steps required):

Note above how our ProductListing() helper is able to define arguments and parameters. This enables you to pass any parameters you want to them (and take full advantage of existing languages features like optional parameters, nullable types, generics, etc). You’ll also get debugging support for them within Visual Studio.
Note: The @helper syntax won’t be in the first beta of Razor – but is something we hope will be enabled with the next drop. Code-based helpers will work with the first beta.
Passing Inline Templates as Parameters
One other useful (and extremely powerful) feature we are enabling with Razor is the ability to pass “inline template” parameters to helper methods. These “inline templates” can contain both HTML and code, and can be invoked on-demand by helper methods.
Below is an example of this feature in action using a “Grid” HTML Helper that renders a DataGrid to the client:

The Grid.Render() method call above is C#. We are using the new C# named parameter syntax to pass strongly-typed arguments to the Grid.Render method - which means we get full statement completion/intellisense and compile-time checking for the above syntax.
The “format” parameter we are passing when defining columns is an “inline template” – which contains both custom html and code, and which we can use to customize the format of the data. What is powerful about this is that the Grid helper can invoke our inline template as a delegate method, and invoke it as needed and as many times as it wants. In the scenario above it will call it each time it renders a row in the grid – and pass in the “item” that our template can use to display the appropriate response.
This capability will enable much richer HTML helper methods to be developed. You’ll be able to implement them using both a code approach (like the way you build extension methods today) as well as using the declarative @helper {} approach.
Visual Studio Support
As I mentioned earlier, one of our goals with Razor is to minimize typing, and enable it to be easily edited with nothing more than a basic text editor (notepad works great). We’ve kept the syntax clean, compact and simple to help enable that.
We have also designed Razor so that you get a rich code editing experience within Visual Studio. We will provide full HTML, JavaScript and C#/VB code intellisense within Razor based files:
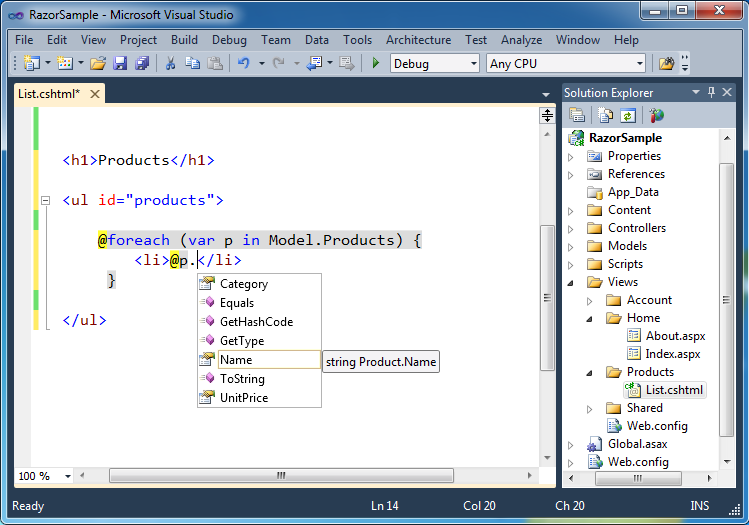
Notice above how we are providing intellisense for a Product object on the “@p.” code embedded within the <li> element inside a foreach loop. Also notice how our \Views folder within the Solution Explorer contains both .aspx and .cshtml view templates. You can use multiple view engines within a single application – making it easy to choose whichever syntax feels best to you.
Summary
We think “Razor” provides a great new view-engine option that is streamlined for code-focused templating. It a coding workflow that is fast, expressive and fun. It’s syntax is compact and reduces typing – while at the same time improving the overall readability of your markup and code. It will be shipping as a built-in view engine with the next release of ASP.NET MVC. You can also drop standalone .cshtml/.vbhtml files into your application and run them as single-pages – which also enables you to take advantage of it within ASP.NET Web Forms applications as well.
The feedback from developers who have been trying it out the last few months has been extremely positive. We are going to be shipping the first public beta of it shortly, and are looking forward to your feedback on it.
Hope this helps,
Scott
출처 : http://weblogs.asp.net/scottgu/archive/2010/07/02/introducing-razor.aspx


