Fast Forward: Visual Studio 2010 and .NET 4.0
This blog entry is all about Visual Studio 2010 and introduces some startup code to play with WPF and the Task Parallel Library.
Here is a rough outline about what this blog entry:
You will learn about:
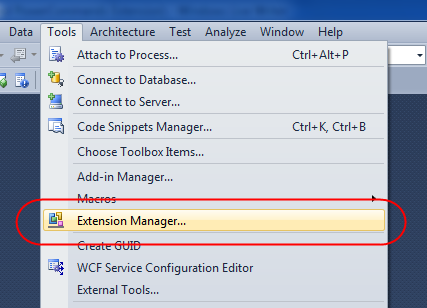
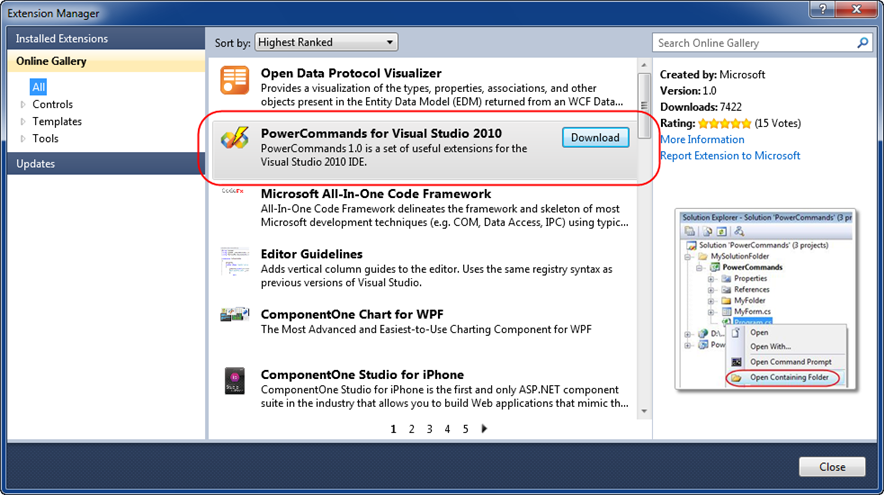
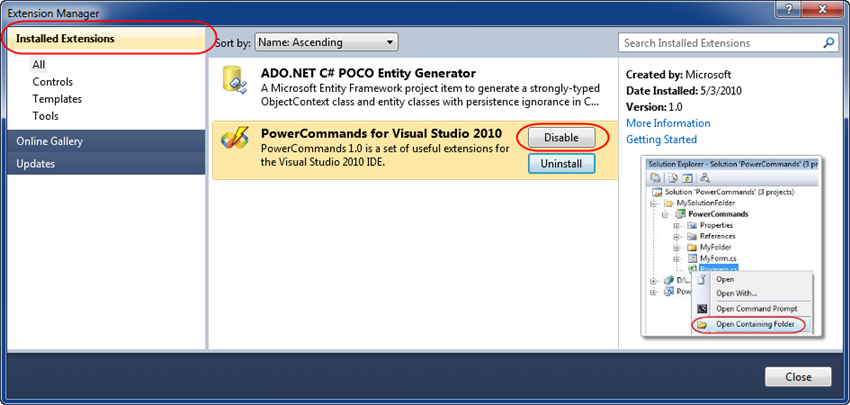
(1) How to install Visual Studio 2010 and where to watch a video about it
(2) Basic Intro to the Microsoft Concurrency Web Site
(3) What is the whole point of parallel programming efforts
(4) MSDN Article is a good starting point
(5) Concurrency Samples to download and learn
(6) How to start task based threads with Task.Factory.StartNew()
- Working with ParallelExtensionsExtras (thread-safe data structures)
- var orders = new ObservableConcurrentCollection<PizzaOrder>();
(7) How to work with XAML (for WPF and Silverlight Apps)
- How to work with Data Templates, DataContext Objects, and ItemsControls
- Embedding User Controls into Canvas objects for custom GUI development

If you haven’t done it yet, please start it now
Yes, to maximize the use of this blog, you should follow along. Learn how to install Visual Studio, then do it.

Remember, Start by installing Visual Studio 2010

Intro - Why Interesting
This is one of the oldest problems in computer science. Humankind is working hard to figure this out, but it is a real challenge.Thinking in terms of doing two or things at once is natural in our day to day lives, but somehow when we start righting code, we think sequential. Good engineers always solve problems one step at a time.
But we are at a crossroads today. The fastest clock speeds are limited to around 3 GHz.
If you aren’t learning about parallelism you are throwing away CPU. There are built in things into the OS and the .NET Framework that try to use your multi-core CPUs. However, everything from kernel mode device drivers to user mode business applications require intelligent use of parallel programming.

The Big Picture Visual Studio 2010
You can think of the Task Parallel Library as a generic set of parallel capabilities, whereas PLINQ focuses on database (or object) manipulation.

Parallelism and Concurrency Architecture
.png)
Hazim Shafi, Principal Architect, Microsoft Corporation tells us the following:
Parallelism is about performance
Step 1: Understand your goals
Step 2: Measure existing performance
Step 3: Performance tuning
| |
Starts with sequential version |
Step 4: Identify opportunities for parallelism
| |
Hide latency
Speed up CPU bound phases |
Step 5: Express parallelism
Step 6: Tune
Here is a good article on MSDN Magazine

http://msdn.microsoft.com/en-us/magazine/cc163329.aspx#S1
Many brilliant people are working on these things
OS resource management, a concurrency runtime, programming models, language extensions, libraries, and tools, which will make it simpler for both native and managed code developers. It is about making manycore architectures simple and accessible to the broad developer community.
Parallel Technologies in Microsoft Visual Studio 2010
Microsoft Visual Studio 2010 leads the first wave of developer tools to simplify the mainstream transition to parallel software development. Learn about Microsoft’s approach to parallel computing and the parallel technologies available in Visual Studio 2010.
What is so darn difficult about threading or concurrency?
· How to express and exploit fine-grain concurrency
· How to coordinate parallel access to shared state
· How to test and debug for correctness and performance
Traditional approaches to threading are difficult
Handling locks, semaphores, and other synchronization mechanisms is difficult, and might thus not be familiar with concepts such as deadlocks or race conditions.
Is it really harder than regular old sequential programming?
Writing programs that express and exploit fine-grain concurrency is inherently more difficult than writing sequential programs because of the extra concepts the programmer must manage and the additional requirements parallelism places on the program.
When I (Bruno) was a field engineer…
I had to fly to customer locations and use WinDBG to find unintended interactions between threads that share memory (“data races”) and the difficulties of locating and fixing such problems should they exist within a program.
The preferred thread debugging tool at Microsoft
Wikipedia says this: WinDbg is a multipurpose debugger for Microsoft Windows, distributed on the web by Microsoft. It can be used to debug user mode applications, drivers, and the operating system itself in kernel mode. It is a GUI application, but has little in common with the more well-known, but less powerful, Visual Studio Debugger.
They are right – that’s what it does.
Task Parallel Library is one option from Microsoft

Think Sets
LINQ is a set-at-a-time programming model for expressing computations and places an emphasis on specifying what needs to get done instead of how it is to be done. That is perfect for parallelism. It turns out that query languages lend themselves a beautiful to parallelization. For example, one core could be reading the index, another core could be used to sort the results, and perhaps a third core can be used for some sort of regular expression parsing or syntax within the given language.
Examples of Upcoming Technologies
Task Parallel Library, PLINQ
Upcoming releases of Visual Studio 2010 and .NET 4.0 will include support that allows you to execute for and foreach loop iterations in parallel with only small alterations to your code. Similarly, you can use a parallel version of LINQ to help boost the performance of your queries.

There are a lot of great samples
![image71[1] image71[1]](http://brunoblogfiles.com/bruno/wpf/FastForwardVisualStudio2010and.NET4.0_11FC0/image711.png)

![image_thumb11[1] image_thumb11[1]](http://brunoblogfiles.com/bruno/wpf/FastForwardVisualStudio2010and.NET4.0_11FC0/image_thumb111.png)
There are a lot of interesting demos here.
![image_thumb41[1] image_thumb41[1]](http://brunoblogfiles.com/bruno/wpf/FastForwardVisualStudio2010and.NET4.0_11FC0/image_thumb411.png)

Let’s take a look at AcmePizza
It is a WPF app that shows how to populate a user interface in a background thread. This allows the user to continue to interact with the application.
Watch the video and you can see how update the user interface in the background while the user can interact with other elements on the screen.
What you are supposed to notice
That you can have the GUI updating the main application window while the user can continue to interact with the application by hitting the command button with the caption “Process Next Order”

Notice in the application above, orders above are streaming into the application as new tickets. But the user can still hit the “Process Next Order” button.
What you should learn
| How to create a user interface that do two things at once, allowing the end user to continue to work as other things are being done. |
Watch this video and see that the main window is updating. Yet we can still click “Process Next Order”
 |
We are talking about “tasks,” not threads
This sample code provides a great starting point for learning WPF and the task parallel library. I will start by talking about the high level data structures. From there we will discuss other architectural decisions that were made for this application. The main point of understanding this application is for the task of parallel library.

The code below illustrates the following. <ItemsControl displays an array of PizzaOrders. When this application starts, it populates the m_orders array with a bunch of random PizzaOrder objects. The window object will display these PizzaOrder objects by using the <ItemsControl>. The <ItemsControl> is a child of the window object. The <ItemsControl> will go to it's parent DataContext object, which is the window object. So when the <ItemsControl> needs to render the interface, it effectively uses the m_orders array.
![image_thumb2[1] image_thumb2[1]](http://brunoblogfiles.com/bruno/wpf/FastForwardVisualStudio2010and.NET4.0_11FC0/image_thumb21.png)
| Line 9 |
Data Template used in <ItemsControl> in Window1.xaml |
| Lines 10 - 17 |
The Canvas that represents our pizza order.
 |
| Lines 18 – 46 |
These data triggers are used to update the user interface based on conditions. For example, if the pizza order is a delivery, hten color the canvas pink.
If the Order Source is the Internet, then use internetsource.ico as the file. |
Here is the application object that illustrates these data template triggers.
1: <Application x:Class="AcmePizza.App"
2: xmlns="http://schemas.microsoft.com/winfx/2006/xaml/presentation"
3: xmlns:x="http://schemas.microsoft.com/winfx/2006/xaml"
4: xmlns:local="clr-namespace:AcmePizza"
5: StartupUri="Window1.xaml">
6: <Application.Resources>
7: <!--A reusable data template when binding to a collection of pizza orders. this template is used in both the main window and
8: current order window, where it is scaled larger-->
9: <DataTemplate x:Key="PizzaOrderTemplate">
10: <Canvas Width="200" Height="200">
11: <Rectangle x:Name="orderRectangle" RadiusX="6" RadiusY="6" Width="200" Height="200" Fill="LightBlue" Opacity="60"/>
12: <TextBlock Margin="10,10,0,0" Text="Phone:"/>
13: <TextBlock Margin="50,10,0,0" FontWeight="Bold" Text="{Binding Path=PhoneNumber}"/> 14: <local:PizzaSizeCircle x:Name="pizzaSize" Canvas.Right="5" Canvas.Bottom="5" PizzaSize="17"/>
15: <Image x:Name="sourceIcon" Source="phonesource.ico" Canvas.Left="5" Canvas.Bottom="5"/>
16: <ItemsControl Canvas.Top="40" Canvas.Left="30" ItemsSource="{Binding Path=Toppings}"/> 17: </Canvas>
18: <DataTemplate.Triggers>
19: <DataTrigger Binding="{Binding Path=IsDelivery}" Value="true"> 20: <DataTrigger.Setters>
21: <Setter Property="Fill" TargetName="orderRectangle" Value="Pink"/>
22: </DataTrigger.Setters>
23: </DataTrigger>
24: <DataTrigger Binding="{Binding Path=Size}" Value="11"> 25: <DataTrigger.Setters>
26: <Setter Property="PizzaSize" TargetName="pizzaSize" Value="11"/>
27: </DataTrigger.Setters>
28: </DataTrigger>
29: <DataTrigger Binding="{Binding Path=Size}" Value="13"> 30: <DataTrigger.Setters>
31: <Setter Property="PizzaSize" TargetName="pizzaSize" Value="13"/>
32: </DataTrigger.Setters>
33: </DataTrigger>
34: <DataTrigger Binding="{Binding Path=Source}" Value="{x:Static Member=local:OrderSource.Internet}"> 35: <Setter Property="Source" TargetName="sourceIcon" Value="internetsource.ico"/>
36: </DataTrigger>
37: <DataTrigger Binding="{Binding Path=Source}" Value="{x:Static Member=local:OrderSource.Phone}"> 38: <Setter Property="Source" TargetName="sourceIcon" Value="phonesource.ico"/>
39: </DataTrigger>
40: <DataTrigger Binding="{Binding Path=Source}" Value="{x:Static Member=local:OrderSource.Fax}"> 41: <Setter Property="Source" TargetName="sourceIcon" Value="faxsource.ico"/>
42: </DataTrigger>
43: <DataTrigger Binding="{Binding Path=Source}" Value="{x:Static Member=local:OrderSource.WalkIn}"> 44: <Setter Property="Source" TargetName="sourceIcon" Value="walkinsource.ico"/>
45: </DataTrigger>
46: </DataTemplate.Triggers>
47: </DataTemplate>
48: </Application.Resources>
49: </Application>
XAML Programming
You may have noticed that the canvas embeds user control to represent the pizza size. The pizza size is represented by an ellipse and a text box. We change the diameter of the ellipse based on data triggers.
Its the job of our user controls to represent the pizza size. Notice the “Orange” “Ellipse” below, whose width we can change based on the pizza size being ordered. Note that we just have a grid with an ellipse and a textblock.
![image_thumb31[1] image_thumb31[1]](http://brunoblogfiles.com/bruno/wpf/FastForwardVisualStudio2010and.NET4.0_11FC0/image_thumb311.png)
Here is the code for UserControl
<!--A user control that changes the appearance of a circle (and text label)
based on the specified pizza size-->
<UserControl x:Class="AcmePizza.PizzaSizeCircle"
xmlns="http://schemas.microsoft.com/winfx/2006/xaml/presentation"
xmlns:x="http://schemas.microsoft.com/winfx/2006/xaml"
Height="Auto" Width="Auto">
<Grid x:Name="layoutRoot" Height="75" Width="75">
<Ellipse x:Name="circle" Width="75" Height="75" Fill="Orange"/>
<TextBlock x:Name="label" VerticalAlignment="Center" HorizontalAlignment="Center" Text="17" FontSize="20" Foreground="White"/>
</Grid>
</UserControl>
Our code-behind is as follows:
| Line 9 |
The property “PizzaSize”. This backed by a dependency property, which manages a callback event called PizzaSizeChangedCallBack. |
| Line 27 - 56 |
If PizzaSize changed to 11, 13, or 17, then alter the diameter, change the label's text, so that the user control resizes and reflects the new pizza diameter (pizza size) correctly. |
Notice on line 58 we define a DependencyProperty that is backed with a property and a “changed” event. Note that when some code changes the “PizzaSize” property, code will run from line 29 to 55.
The callback event gives you access to the actual PizzaSizeCircle object whose size was changed, which then allows you to make additional changes to it, like adjusting the label text and other visually oriented control attributes. The point here is that if someone changes the size of the pizza, we need to make various other changes to the graphical interface. That's why you see the width and the height of the circle being changed to different diameters.
It is the magic of dependency properties that make this possible.
Dependencies properties are needed because we need to enforce the circle redraw. If a data trigger changes the size of the pizza, then we’ll need to draw a smaller or bigger circle. A dependency property connects all the plumbing together. The entire code-behind looks like this:
1: namespace AcmePizza
2: { 3: /// <summary>
4: /// Interaction logic for PizzaSizeCircle.xaml
5: /// </summary>
6: public partial class PizzaSizeCircle : UserControl
7: { 8:
9: public PizzaSizeCircle()
10: { 11: InitializeComponent();
12: }
13:
14: public int PizzaSize
15: { 16: get
17: { 18: return (int)this.GetValue(PizzaSizeProperty);
19: }
20: set
21: { 22: this.SetValue(PizzaSizeProperty, value);
23:
24: }
25: }
26:
27: static void PizzaSizeChangedCallBack(DependencyObject property, DependencyPropertyChangedEventArgs args)
28: { 29: var control = (PizzaSizeCircle)property;
30: switch ((int)args.NewValue)
31: { 32: case 11:
33: control.circle.Width = 30;
34: control.circle.Height = 30;
35: control.layoutRoot.Width = 30;
36: control.layoutRoot.Height = 30;
37: control.label.Text = "11";
38: break;
39: case 13:
40: control.circle.Width = 50;
41: control.circle.Height = 50;
42: control.layoutRoot.Width = 50;
43: control.layoutRoot.Height = 50;
44: control.label.Text = "13";
45: break;
46: case 17:
47: control.circle.Width = 75;
48: control.circle.Height = 75;
49: control.layoutRoot.Width = 75;
50: control.layoutRoot.Height = 75;
51: control.label.Text = "17";
52: break;
53: default:
54: throw new ArgumentOutOfRangeException();
55: }
56: }
57:
58: public static readonly DependencyProperty PizzaSizeProperty =
59: DependencyProperty.Register("PizzaSize", typeof(int), typeof(PizzaSizeCircle), 60: new UIPropertyMetadata(17, new PropertyChangedCallback(PizzaSizeChangedCallBack)));
61:
62: }
63: }
The data template triggers are defined inside of our application object. Notice, for example, that we modify the pizzasize. Pizza size has been implemented as a dependency property. For the DependencyProperty callback event we make other modifications to the user control if the pizzasize changes. For example, we may wish to make the circular graphic display a wider diameter on the screen.
DataTemplate.Triggers
if IsDelivery = true, then pink rectangle
if Size = 11, then pizzasize = 11
if Size = 13, then pizzasize = 13
if Source = OrderSource.Internet, then sourceIcon = internetsource.ico
if Source = OrderSource.Phone, then sourceIcon = phonesource.ico
if Source = OrderSource.Fax, then sourceIcon = faxsource.ico
if Source = OrderSource.WalkIn, then sourceIcon = walkinsource.ico

Our project is a combination of objects. Since we are modeling a pizzeria, the business objects related to processing pizza orders. These data structures below represent both the business layer, the UI layer, and other useful enumerations.
Let’s start with our main window. Most of the time you will want the grid interface. Notice below we have a two row grid. The second row of the grid will hold incoming pizza orders. As you can see from the diagram below, the first row of the grid is used to display the name of the pizza company (Acme), an image of a smiling slice of pizza, a button to allow the user to process the next order, and the label “current orders.”
| Our user interface is mostly a grid with a small amount of controls |
We have two rows, and two columns in this grid. |
| Window Properties |
Notice we have some events wired up. I see the “Window_Loaded” event. The main window starts “Maximized.” |

A simple two row, two column grid. The first row has a couple of textblocks, an image, and a command button, which reads “Process Next Order.”
All the important action is in row 2of the grid. This is where wehave the <ItemsControl>.The <ItemsControl> is the way we display PizzaOrders in the main window. The <ItemsControl> allows us to link to a data source. And that data source that we link to is a thread safe data structure that 4 threads populate. Each thread represents a source of a PizzaOrder. For example, PizzaOrders can come from the internet, fax, phone, or WalkIn.
The ItemsControl will allow us to display a collection of user controls, where each user control contains a pizza order.
To be more accurate the pink pizza order in the image below is really just a canvas. The UserControl is the lower right graphic of the pink canvas (the orange circle below), which displays the PizzaSize, and whose size changes in diameter based on the size of the pizza. This example leverages data triggers and dependency properties to control the way graphic elements appear on the screen.

Here is where the task library begins. Notice the method calls:
Task.Factory.StartNew() with some lambda expressions. The window loaded event below essentially spawns off four tasks. Each of these fourth tasks generates random pizza orders 10 times. It is these random pizza orders that Kidd added to the ItemsControl collection. Random number generators are used to create pizza orders.
private void Window_Loaded(object sender, EventArgs e)
{ // launch four threads that mimic various sources
Task.Factory.StartNew(() => { OrdererThread(OrderSource.Fax); }); Task.Factory.StartNew(() => { OrdererThread(OrderSource.Internet); }); Task.Factory.StartNew(() => { OrdererThread(OrderSource.Phone); }); Task.Factory.StartNew(() => { OrdererThread(OrderSource.WalkIn); }); }
The execution sequence (not including the user clicking “Process Next Order”)
OrdererThread is spun off of the task factory 4 ways.
We would expect that Fax, Internet, Phone, WalkIn gets passed to OrdererThread.
Each of those threads generates a random order.
GenerateRandomOrder() just gets randomly called. |
Window_Loaded
OrdererThread , Order Source = Internet
OrdererThread , Order Source = Fax
GenerateRandomOrder(), Order Source = Fax
GenerateRandomOrder(), Order Source = Internet
OrdererThread , Order Source = Phone
GenerateRandomOrder(), Order Source = Phone
GenerateRandomOrder(), Order Source = Fax
GenerateRandomOrder(), Order Source = Internet
OrdererThread , Order Source = WalkIn
GenerateRandomOrder(), Order Source = WalkIn
GenerateRandomOrder(), Order Source = Phone
GenerateRandomOrder(), Order Source = Fax
GenerateRandomOrder(), Order Source = Phone
GenerateRandomOrder(), Order Source = WalkIn |
How does GenerateRandomOrder() get called?
Remember, 4 threads are spun off. Each of the threads generates 10 random orders as follows:
private void OrdererThread(OrderSource source)
{ System.Diagnostics.Debug.WriteLine("OrdererThread " + ", Order Source = " + source.ToString());
for ( int i = 0; i < 10; ++i )
{ // submit random order
m_orders.TryAdd( GenerateRandomOrder(source));
// sleep for a random period
Thread.Sleep(ConcurrentRandomNumberGenerator.Next(1000, 4001));
}
}
I added a Debug.WriteLine() to profile the code execution. But notice that the “for()” loop executes a random order 10 times. The thread then sleeps randomly for 1 to 4 seconds.
How the main user interface gets updated
Recall the “m_orders” variable.

Notice the special data structure that derives from IProducerConsumerCollection, called ObservableConcurrentCollection. Notice that ultimately we assign to:
this.DataContext = orders;
Understanding DataContext is Key
DataContext is how our user interface gets updated. That’s the beauty of WPF – you just assign to the DataContext and everything follows through with minimal code behind.

By looking at the XAML, we can see how some of it gets built. First, the second row in the grid spans 2 columns. Next, the <ItemsControl> is in the second row of the grid.
<ItemsControl x:Name="ordersList" ItemsSource="{Binding}" ItemTemplate="{StaticResource PizzaOrderTemplate}" Grid.Row="1" Grid.ColumnSpan="2" VerticalAlignment="Top" Margin="0,0,0,0">
<ItemsControl.ItemsPanel>
<ItemsPanelTemplate>
<WrapPanel/>
</ItemsPanelTemplate>
</ItemsControl.ItemsPanel>
<ItemsControl.ItemContainerStyle>
<Style>
<Setter Property="Control.Width" Value="205"/>
<Setter Property="Control.Height" Value="205"/>
<Setter Property="Control.Margin" Value="2.5"/>
</Style>
</ItemsControl.ItemContainerStyle>
</ItemsControl>
How to add the post-its to the main window?
These are the pizza orders that populate our main window. The layout and how these colored post-it notes appear on the window is largely defined in App.xaml.. the use of DataTemplates makes this possible. Because App.xaml has somewhat of a global scope, the look and feel of these pizza orders can be used elsewhere in the program.

Here is how this works.
<ItemsControl x:Name="ordersList" ItemsSource="{Binding}" ItemTemplate="{StaticResource PizzaOrderTemplate}"

Notice the Canvas allows us to do some absolute positioning. DataTriggers later control the attributes of the canvas, such as the color, the size of the pizza, the graphic image in the lower left corner, which can be a phone, internet, fax, walk-in etc.







.png)


![image71[1] image71[1]](http://brunoblogfiles.com/bruno/wpf/FastForwardVisualStudio2010and.NET4.0_11FC0/image711.png)

![image_thumb11[1] image_thumb11[1]](http://brunoblogfiles.com/bruno/wpf/FastForwardVisualStudio2010and.NET4.0_11FC0/image_thumb111.png)
![image_thumb41[1] image_thumb41[1]](http://brunoblogfiles.com/bruno/wpf/FastForwardVisualStudio2010and.NET4.0_11FC0/image_thumb411.png)


![image_thumb2[1] image_thumb2[1]](http://brunoblogfiles.com/bruno/wpf/FastForwardVisualStudio2010and.NET4.0_11FC0/image_thumb21.png)

![image_thumb31[1] image_thumb31[1]](http://brunoblogfiles.com/bruno/wpf/FastForwardVisualStudio2010and.NET4.0_11FC0/image_thumb311.png)


