블로그 이미지
Sunny's

calendar

1 2 3 4
5 6 7 8 9 10 11
12 13 14 15 16 17 18
19 20 21 22 23 24 25
26 27 28 29 30 31

Notice

2012. 4. 12. 09:25 .NET Framework


Once you have retrieved data from a web service you will need to do something with it. This HOWTO describes the various built-in methods .NET provides to use XML returned by a web service.

Overview

The .NET Framework provides excellent support for XML. Combined with the databinding support of WinForms and ASP.NET applications you have an easy and powerful set of tools. ASP.NET 2.0 takes databinding another step further by providing the DataSource control which lets you declaratively provide data access to data-bound UI controls.

Returned Data to a String

The simplest way to view the returned data is to get the response stream and put it into a string. This is especially handy for debugging. The following code gets a web page and returns the contents as a string.

C# String Sample

  1. public class StringGet
  2. {
  3. public static string GetPageAsString(Uri address)
  4. {
  5. string result = "";
  6. // Create the web request
  7. HttpWebRequest request = WebRequest.Create(address) as HttpWebRequest;
  8. // Get response
  9. using (HttpWebResponse response = request.GetResponse() as HttpWebResponse)
  10. {
  11. // Get the response stream
  12. StreamReader reader = new StreamReader(response.GetResponseStream());
  13. // Read the whole contents and return as a string
  14. result = reader.ReadToEnd();
  15. }
  16. return result;
  17. }
  18. }

Using XmlReader

XmlReader provides fast forward-only access to XML data. It also allows you to read data as simple-typed values rather than strings. XmlReader can load an XML document without having to use HttpRequest, though you won't have the same amount of control over the request. If you use HttpRequest, you can just pass the stream returned by the GetResponseStream() method to XmlReader. Fast write-only functions are provided by XmlTextWriter.

With .NET 2.0 you should create XmlReader instances using the System.Xml.XmlReader.Create method. For the sake of compatibility and clarity the next sample uses the .NET 1.1 creation method.

C# XmlReader Sample

  1. using System.Xml;
  2. // Retrieve XML document
  3. XmlTextReader reader = new XmlTextReader("http://xml.weather.yahoo.com/forecastrss?p=94704");
  4. // Skip non-significant whitespace
  5. reader.WhitespaceHandling = WhitespaceHandling.Significant;
  6. // Read nodes one at a time
  7. while (reader.Read())
  8. {
  9. // Print out info on node
  10. Console.WriteLine("{0}: {1}", reader.NodeType.ToString(), reader.Name);
  11. }

Using XmlDocument

XmlDocument gives more flexibility and is a good choice if you need to navigate or modify the data via the DOM. It also works as a source for the XslTransform class allowing you to perform XSL transformations.

C# XmlDocument Sample

  1. // Create a new XmlDocument
  2. XmlDocument doc = new XmlDocument();
  3. // Load data
  4. doc.Load("http://xml.weather.yahoo.com/forecastrss?p=94704");
  5. // Set up namespace manager for XPath
  6. XmlNamespaceManager ns = new XmlNamespaceManager(doc.NameTable);
  7. ns.AddNamespace("yweather", "http://xml.weather.yahoo.com/ns/rss/1.0");
  8. // Get forecast with XPath
  9. XmlNodeList nodes = doc.SelectNodes("/rss/channel/item/yweather:forecast", ns);
  10. // You can also get elements based on their tag name and namespace,
  11. // though this isn't recommended
  12. //XmlNodeList nodes = doc.GetElementsByTagName("forecast",
  13. // "http://xml.weather.yahoo.com/ns/rss/1.0");
  14. foreach(XmlNode node in nodes)
  15. {
  16. Console.WriteLine("{0}: {1}, {2}F - {3}F",
  17. node.Attributes["day"].InnerText,
  18. node.Attributes["text"].InnerText,
  19. node.Attributes["low"].InnerText,
  20. node.Attributes["high"].InnerText);
  21. }

Using XPathNavigator/XPathDocument

XPathDocument provides fast, read-only access to the contents of an XML document using XPath. Its usage is similar to using XPath with XmlDocument.

C# XPathDocument Sample

  1. using System.Xml.XPath;
  2. // Create a new XmlDocument
  3. XPathDocument doc = new XPathDocument("http://xml.weather.yahoo.com/forecastrss?p=94704");
  4. // Create navigator
  5. XPathNavigator navigator = doc.CreateNavigator();
  6. // Set up namespace manager for XPath
  7. XmlNamespaceManager ns = new XmlNamespaceManager(navigator.NameTable);
  8. ns.AddNamespace("yweather", "http://xml.weather.yahoo.com/ns/rss/1.0");
  9. // Get forecast with XPath
  10. XPathNodeIterator nodes = navigator.Select("/rss/channel/item/yweather:forecast", ns);
  11. while(nodes.MoveNext())
  12. {
  13. XPathNavigator node = nodes.Current;
  14. Console.WriteLine("{0}: {1}, {2}F - {3}F",
  15. node.GetAttribute("day", ns.DefaultNamespace),
  16. node.GetAttribute("text", ns.DefaultNamespace),
  17. node.GetAttribute("low", ns.DefaultNamespace),
  18. node.GetAttribute("high", ns.DefaultNamespace));
  19. }

Using a DataSet

Using a DataSet from the System.Data namespace lets you bind the returned data to controls and also access hierarchical data easily. A dataset can infer the structure automatically from XML, create corresponding tables and relationships between them and populate the tables just by calling ReadXml().

C# DataSet Sample

  1. using System.Data;
  2. public void RunSample()
  3. {
  4. // Create the web request
  5. HttpWebRequest request
  6. = WebRequest.Create("http://xml.weather.yahoo.com/forecastrss?p=94704") as HttpWebRequest;
  7. // Get response
  8. using (HttpWebResponse response = request.GetResponse() as HttpWebResponse)
  9. {
  10. // Load data into a dataset
  11. DataSet dsWeather = new DataSet();
  12. dsWeather.ReadXml(response.GetResponseStream());
  13. // Print dataset information
  14. PrintDataSet(dsWeather);
  15. }
  16. }
  17. public static void PrintDataSet(DataSet ds)
  18. {
  19. // Print out all tables and their columns
  20. foreach (DataTable table in ds.Tables)
  21. {
  22. Console.WriteLine("TABLE '{0}'", table.TableName);
  23. Console.WriteLine("Total # of rows: {0}", table.Rows.Count);
  24. Console.WriteLine("---------------------------------------------------------------");
  25. foreach (DataColumn column in table.Columns)
  26. {
  27. Console.WriteLine("- {0} ({1})", column.ColumnName, column.DataType.ToString());
  28. } // foreach column
  29. Console.WriteLine(System.Environment.NewLine);
  30. } // foreach table
  31. // Print out table relations
  32. foreach (DataRelation relation in ds.Relations)
  33. {
  34. Console.WriteLine("RELATION: {0}", relation.RelationName);
  35. Console.WriteLine("---------------------------------------------------------------");
  36. Console.WriteLine("Parent: {0}", relation.ParentTable.TableName);
  37. Console.WriteLine("Child: {0}", relation.ChildTable.TableName);
  38. Console.WriteLine(System.Environment.NewLine);
  39. } // foreach relation
  40. }

Further reading

Related information on the web is listed below.

posted by Sunny's
2011. 11. 9. 09:04 .NET Framework

The Win32_USBHubWMI class represents the management characteristics of a universal serial bus (USB) hub.

The following syntax is simplified from Managed Object Format (MOF) code and includes all of the inherited properties. Properties are listed in alphabetic order, not MOF order.

class Win32_USBHub : CIM_USBHub
{
  uint16   Availability;
  string   Caption;
  uint8    ClassCode;
  uint32   ConfigManagerErrorCode;
  boolean  ConfigManagerUserConfig;
  string   CreationClassName;
  uint8    CurrentAlternateSettings;
  uint8    CurrentConfigValue;
  string   Description;
  string   DeviceID;
  boolean  ErrorCleared;
  string   ErrorDescription;
  boolean  GangSwitched;
  datetime InstallDate;
  uint32   LastErrorCode;
  string   Name;
  uint8    NumberOfConfigs;
  uint8    NumberOfPorts;
  string   PNPDeviceID;
  uint16   PowerManagementCapabilities[];
  boolean  PowerManagementSupported;
  uint8    ProtocolCode;
  string   Status;
  uint16   StatusInfo;
  uint8    SubclassCode;
  string   SystemCreationClassName;
  string   SystemName;
  uint16   USBVersion;
};


아래 Win32 관련 클래스들정보를 참고 할수 있다..
USB 관련 클래스
 Win32_DiskDrive
 Win32_DiskPartition
 Win32_LogicalDisk
 Win32_USBHub

위정보를 통해 USB 관련 정보를 추출 및 제어 가능하다.

출처 : http://msdn.microsoft.com/en-us/library/windows/desktop/aa394506(v=VS.85).aspx

posted by Sunny's
2011. 10. 30. 22:37 .NET Framework

Defines a provider for push-based notification.

Namespace: System
Assembly: mscorlib (in mscorlib.dll)

Parameters

value
Type: T
The current notification information.

The IObserver(Of T) and IObservable(Of T) interfaces provide a generalized mechanism for push-based notification, also known as the observer design pattern. The IObservable(Of T) interface represents the class that sends notifications (the provider); the IObserver(Of T) interface represents the class that receives them (the observer). T represents the class that provides the notification information. In some push-based notifications, the IObserver(Of T) implementation and T can represent the same type.

The provider must implement a single method, Subscribe, that indicates that an observer wants to receive push-based notifications. Callers to the method pass an instance of the observer. The method returns an IDisposable implementation that enables observers to cancel notifications at any time before the provider has stopped sending them.

At any given time, a given provider may have zero, one, or multiple observers. The provider is responsible for storing references to observers and ensuring that they are valid before it sends notifications. The IObservable(Of T) interface does not make any assumptions about the number of observers or the order in which notifications are sent.

The provider sends the following three kinds of notifications to the observer by calling IObserver(Of T) methods:

  • The current data. The provider can call the IObserver(Of T).OnNext method to pass the observer a T object that has current data, changed data, or fresh data.

  • An error condition. The provider can call the IObserver(Of T).OnError method to notify the observer that some error condition has occurred.

  • No further data. The provider can call the IObserver(Of T).OnCompleted method to notify the observer that it has finished sending notifications.


public struct Location
{
   double lat, lon;

   public Location(double latitude, double longitude)
   {
      this.lat = latitude;
      this.lon = longitude;
   }

   public double Latitude
   { get { return this.lat; } }

   public double Longitude
   { get { return this.lon; } }
}


public class LocationTracker : IObservable<Location>
{
   public LocationTracker()
   {
      observers = new List<IObserver<Location>>();
   }

   private List<IObserver<Location>> observers;

   public IDisposable Subscribe(IObserver<Location> observer)
   {
      if (! observers.Contains(observer))
         observers.Add(observer);
      return new Unsubscriber(observers, observer);
   }

   private class Unsubscriber : IDisposable
   {
      private List<IObserver<Location>>_observers;
      private IObserver<Location> _observer;

      public Unsubscriber(List<IObserver<Location>> observers, IObserver<Location> observer)
      {
         this._observers = observers;
         this._observer = observer;
      }

      public void Dispose()
      {
         if (_observer != null && _observers.Contains(_observer))
            _observers.Remove(_observer);
      }
   }

   public void TrackLocation(Nullable<Location> loc)
   {
      foreach (var observer in observers) {
         if (! loc.HasValue)
            observer.OnError(new LocationUnknownException());
         else
            observer.OnNext(loc.Value);
      }
   }

   public void EndTransmission()
   {
      foreach (var observer in observers.ToArray())
         if (observers.Contains(observer))
            observer.OnCompleted();

      observers.Clear();
   }
}


public class LocationUnknownException : Exception
{
   internal LocationUnknownException()
   { }
}


using System;

public class LocationReporter : IObserver<Location>
{
   private IDisposable unsubscriber;
   private string instName;

   public LocationReporter(string name)
   {
      this.instName = name;
   }

   public string Name
   {  get{ return this.instName; } }

   public virtual void Subscribe(IObservable<Location> provider)
   {
      if (provider != null)
         unsubscriber = provider.Subscribe(this);
   }

   public virtual void OnCompleted()
   {
      Console.WriteLine("The Location Tracker has completed transmitting data to {0}.", this.Name);
      this.Unsubscribe();
   }

   public virtual void OnError(Exception e)
   {
      Console.WriteLine("{0}: The location cannot be determined.", this.Name);
   }

   public virtual void OnNext(Location value)
   {
      Console.WriteLine("{2}: The current location is {0}, {1}", value.Latitude, value.Longitude, this.Name);
   }

   public virtual void Unsubscribe()
   {
      unsubscriber.Dispose();
   }
}


using System;

class Program
{
   static void Main(string[] args)
   {
      // Define a provider and two observers.
      LocationTracker provider = new LocationTracker();
      LocationReporter reporter1 = new LocationReporter("FixedGPS");
      reporter1.Subscribe(provider);
      LocationReporter reporter2 = new LocationReporter("MobileGPS");
      reporter2.Subscribe(provider);

      provider.TrackLocation(new Location(47.6456, -122.1312));
      reporter1.Unsubscribe();
      provider.TrackLocation(new Location(47.6677, -122.1199));
      provider.TrackLocation(null);
      provider.EndTransmission();
   }
}
// The example displays output similar to the following:
//      FixedGPS: The current location is 47.6456, -122.1312
//      MobileGPS: The current location is 47.6456, -122.1312
//      MobileGPS: The current location is 47.6677, -122.1199
//      MobileGPS: The location cannot be determined.
//      The Location Tracker has completed transmitting data to MobileGPS.


출처 : http://msdn.microsoft.com/en-us/library/dd990377.aspx

posted by Sunny's
2011. 10. 27. 19:54 .NET Framework


  • Download source - 17.33 KB
  • Download demo - 8.99 KB
  • UsbManager_Demo

    Introduction

    This article describes how to use the .NET System.Management WMI (Windows Management Instrumentation) wrappers to enumerate and describe USB disk drives. It also includes a non-Interop solution for detecting drive state changes as they come online or go offline.

    Contents

    Background

    While writing iTuner, I needed to be able to enumerate USB disk drives (MP3 players) and allow the user to select one with which iTuner could synchronize iTunes playlists. In order to select the correct device, the user needs some basic identifying information beyond just drive letter such as volume name, manufacturer's model name, and available disk space. As an added feature, I wanted the UI to update automatically as USB drives come online or go offline. Finally, I wanted to accomplish this through a tidy, simple interface that did not add tremendous complexity to the main application.

    Caveat: The UsbManager.GetAvailableDisks method can be run in any application type. However, the StateChanged event will not be fired unless running in the context of a WPF or Windows Forms application. This is because the event handler relies on Windows message processing to intercept these state changes as explained below.

    Using the Code

    As an application developer and consumer of this API, you first need an instance of the UsbManager class. This class exposes a very simple interface:

    class UsbManager : IDisposable
    {
        public UsbManager ();
        public event UsbStateChangedEventHandler StateChanged;
        public UsbDiskCollection GetAvailableDisks ();
    }
    
    class UsbDiskCollection : ObservableCollection<UsbDisk>
    {
        public bool Contains (string name);
        public bool Remove (string name);
    }
    
    class UsbDisk
    {
        public ulong FreeSpace { get; }
        public string Model { get; }
        public string Name { get; }
        public ulong Size { get; }
        public string Volume { get; }
        public string ToString ();
    }
    1. Instantiate a new UsbManager using its parameterless constructor.
    2. Wire up an event handler to the StateChanged event.
    3. If desired, call GetAvailableDisks to retrieve a list of current USB disks.

    The UsbDisk class abstracts the information pertaining to a particular USB disk. It includes only the most recognizable fields that a typical end user might use to differentiate drives such as the drive letter (Name), volume name, and manufacturer's model name. It also specifies the available free space and total disk size, both specified in bytes. While other information such as serial numbers, partition or sector data might be of interest to developers, they're quite esoteric to end users.

    That's it! Happy coding! OK, keep reading if you want to understand how it's all put together.

    Inside the Code

    Developing this API was first and foremost an exercise in discovering the WMI classes and their relationships. Unfortunately, WMI does not have a single WMI_USBDiskDrive class with all the properties we want. But the information is there. I started by using the WMI Explorer utility from KS-Soft. It's free and available for download on their Web site.

    A Walk Around the WMI Classes

    The first WMI class that draws your attention is Win32_DiskDrive. Drives are listed with creative and obvious names like "\\PHYSICALDRIVE0". We can filter these by looking at only those with an InterfaceType property value of "USB". Win32_DiskDrive also specifies the Model and Size of the drive. There are lots of other properties, but none are very interesting in this case. Here's the WMI query that retrieves the DeviceID and Model name for USB drives:

    select DeviceID, Model from Win32_DiskDrive where InterfaceType='USB'

    My next stop was the Win32_LogicalDisk class. This gets a bit more interesting right off the bat because instances are listed as drive letters like "C:", "D:", and "S:". We can also fetch the FreeSpace and VolumeName properties. Here's the WMI query:

    select FreeSpace, Size, VolumeName from Win32_LogicalDisk where Name='S:'

    We now need a way to associate Win32_DiskDrive and Win32_LogicalDisk so we can marry these bits of information together. You might think there would be some shared field that allows you join the two classes. No such luck. And that's exactly where the Web came to the rescue and I discovered a bit of code tucked away on MSDN that demonstrates how to associate these classes. We can use the associators operator to discover associations between various classes. Given a Win32_DiskDrive instance, we can use its DeviceID property to determine the Win32_DiskPartition instance associated via Win32_DiskDriveToDiskPartition:

    associators of {Win32_DiskDrive.DeviceID='\\PHYSICALDRIVE1'}
          where AssocClass = Win32_DiskDriveToDiskPartition

    Then using Win32_DiskPartition.DeviceID, we can determine the Win32_LogicalDisk instance associated via Win32_LogicalDiskToPartition:

    associators of {Win32_DiskPartition.DeviceID='Disk #0, Partition #1'}
          where AssocClass = Win32_LogicalDiskToPartition

    Implementing the WMI Queries Using System.Management

    To execute a WMI query, we can use the System.Management.ManagementObjectSearcher class. This class always has the same pattern: search, get, enumerate as shown here:

    ManagementObjectSearcher searcher = 
        new ManagementObjectSearcher("select * from Win32_DiskDrive");
    
    ManagementObjectCollection items = searcher.Get();
    
    foreach (ManagementObject item in items)
    {
    }

    Given the cascading calls needed to query the four WMI classes, we would end up with a fairly ugly nesting of foreach loops. In order to clean this up and make the logic more obvious, I created a simple extension method for the ManagementObjectSearcher class. This extension adds a First() method to the ManagementObjectSearcher class that invokes its Get method, enumerates the resultant collection and immediately returns the first item in that collection:

    public static ManagementObject First (this ManagementObjectSearcher searcher)
    {
        ManagementObject result = null;
        foreach (ManagementObject item in searcher.Get())
        {
            result = item;
            break;
        }
        return result;
    }

    Combine this helper extension with the WMI queries above and we end up with a straightforward code in UsbManager.GetAvailableDisks(). Yes, we still have a nested structure, but testing for null is much more clear than the alternative!

    public UsbDiskCollection GetAvailableDisks ()
    {
        UsbDiskCollection disks = new UsbDiskCollection();
    
        // browse all USB WMI physical disks
        foreach (ManagementObject drive in
            new ManagementObjectSearcher(
                "select DeviceID, Model from Win32_DiskDrive " +
                 "where InterfaceType='USB'").Get())
        {
            // associate physical disks with partitions
            ManagementObject partition = new ManagementObjectSearcher(String.Format(
                "associators of {{Win32_DiskDrive.DeviceID='{0}'}} " +
                      "where AssocClass = Win32_DiskDriveToDiskPartition",
                drive["DeviceID"])).First();
    
            if (partition != null)
            {
                // associate partitions with logical disks (drive letter volumes)
                ManagementObject logical = new ManagementObjectSearcher(String.Format(
                    "associators of {{Win32_DiskPartition.DeviceID='{0}'}} " + 
                        "where AssocClass= Win32_LogicalDiskToPartition",
                    partition["DeviceID"])).First();
    
                if (logical != null)
                {
                    // finally find the logical disk entry
                    ManagementObject volume = new ManagementObjectSearcher(String.Format(
                        "select FreeSpace, Size, VolumeName from Win32_LogicalDisk " +
                         "where Name='{0}'",
                        logical["Name"])).First();
    
                    UsbDisk disk = new UsbDisk(logical["Name"].ToString());
                    disk.Model = drive["Model"].ToString();
                    disk.Volume = volume["VolumeName"].ToString();
                    disk.FreeSpace = (ulong)volume["FreeSpace"];
                    disk.Size = (ulong)volume["Size"];
    
                    disks.Add(disk);
                }
            }
        }
    
        return disks;
    }

    Intercepting Driver State Changes

    Now that we can enumerate the currently available USB disk drives, it would be nice to know when one of these goes offline or a new drive comes online. This is the purpose of the UsbManager.DriverWindow class.

    The DriverWindow class extends System.Windows.Forms.NativeWindow and is a private class encapsulated by UsbManager. The WndProc method of NativeWindow provides a convenient location to intercept and process Windows messages. The Windows message we need is WM_DEVICECHANGE and its LParam value must be DBT_DEVTYP_VOLUME. The WParam value is also important and we look for two DBT values (and an optional third).

    • DBT_DEVICEARRIVAL - broadcast when a device or piece of media has been inserted and becomes available
    • DBT_DEVICEREMOVECOMPLETE - broadcast when a device or piece of media has been physically removed
    • DBT_DEVICEQUERYREMOVE - broadcast to request permission to remove a device or piece of media; we do not process this message but it provides an opportunity to deny removal of a device

    DBT_DEVICEARRIVAL and DBT_DEVICEREMOVECOMPLETE both deliver a DEV_BROADCAST_VOLUME struct. This is actually a DEV_BROADCAST_HDR whose dbcv_devicetype is set to DBT_DEVTYP_VOLUME, so we know we can cast the packet to a DEV_BROADCAST_VOLUME.

    [StructLayout(LayoutKind.Sequential)]
    public struct DEV_BROADCAST_VOLUME
    {
        public int dbcv_size;       // size of the struct
        public int dbcv_devicetype; // DBT_DEVTYP_VOLUME
        public int dbcv_reserved;   // reserved; do not use
        public int dbcv_unitmask;   // Bit 0=A, bit 1=B, and so on (bitmask)
        public short dbcv_flags;    // DBTF_MEDIA=0x01, DBTF_NET=0x02 (bitmask)
    }

    The dbcv_unitmask field is a bitmask where each of the first 26 low-order bits correspond to a Windows drive letter. Apparently, it is possible to see a device associated with more than one drive letter but we only care about the first available for our use.

    DriverWindow fires its own StateChanged event to signal UsbManager. UsbManager then decides if it needs to retrieve information - which it does for new arrivals - and then fires its own StateChanged event to signal consumers.

    The StateChanged Event

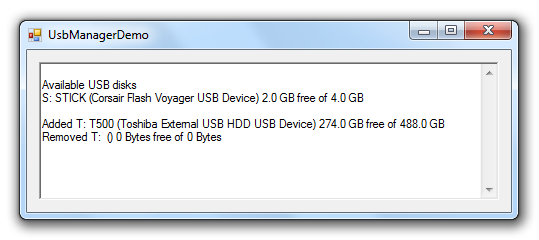
    The demo app attached to this article shows all the power of UsbManager in just a few lines of code. It first enumerates all existing USB disk drives and displays them in a TextBox. It then wires up a handler to the UsbManager.StateChanged event. This event is defined as follows:

    public event UsbStateChangedEventHandler StateChanged

    Take a look at the StateChanged implementation and you'll notice that the add and remove statements have been extended. This allows us to instantiate a DriverWindow instance only when consumers are listening and then dispose it off when all consumers have stopped listening.

    Your handler must be declared as a UsbStateChangedEventHandler as follows:

    public delegate void UsbStateChangedEventHandler (UsbStateChangedEventArgs e);

    And the UsbStateChangedEventArgs is declared as:

    public class UsbStateChangedEventArgs : EventArgs
    {
        public UsbDisk Disk;
        public UsbStateChange State;
    }
    • The State property is an enum specifying one of Added, Removing, or Removed.
    • The Disk property is a UsbDisk instance. If State is Added, then all properties of Disk should be populated. However, if State is Removing or Removed, then only the Name property is populated since we can't detect attributes of a device that no longer exist.

    Conclusion

    If you found this article helpful and enjoy the iTuner application, please consider donating to support continual improvements of iTuner and, hopefully, more helpful articles. Thanks!

    출처 : http://www.codeproject.com/KB/cs/UsbManager.aspx

    posted by Sunny's
    2011. 10. 27. 19:03 .NET Framework


    출처 : http://msdn.microsoft.com/en-us/library/windows/desktop/aa394173(v=vs.85).aspx

    The Win32_LogicalDiskWMI class represents a data source that resolves to an actual local storage device on a computer system running Windows.

    The following syntax is simplified from Managed Object Format (MOF) code and includes all of the inherited properties. Properties are listed in alphabetic order, not MOF order.

    Syntax

    class Win32_LogicalDisk : CIM_LogicalDisk
    {
      uint16   Access;
      uint16   Availability;
      uint64   BlockSize;
      string   Caption;
      boolean  Compressed;
      uint32   ConfigManagerErrorCode;
      boolean  ConfigManagerUserConfig;
      string   CreationClassName;
      string   Description;
      string   DeviceID;
      uint32   DriveType;
      boolean  ErrorCleared;
      string   ErrorDescription;
      string   ErrorMethodology;
      string   FileSystem;
      uint64   FreeSpace;
      datetime InstallDate;
      uint32   LastErrorCode;
      uint32   MaximumComponentLength;
      uint32   MediaType;
      string   Name;
      uint64   NumberOfBlocks;
      string   PNPDeviceID;
      uint16   PowerManagementCapabilities[];
      boolean  PowerManagementSupported;
      string   ProviderName;
      string   Purpose;
      boolean  QuotasDisabled;
      boolean  QuotasIncomplete;
      boolean  QuotasRebuilding;
      uint64   Size;
      string   Status;
      uint16   StatusInfo;
      boolean  SupportsDiskQuotas;
      boolean  SupportsFileBasedCompression;
      string   SystemCreationClassName;
      string   SystemName;
      boolean  VolumeDirty;
      string   VolumeName;
      string   VolumeSerialNumber;
    };
    ...
    posted by Sunny's
    2011. 10. 27. 14:16 .NET Framework

    NuGet이라고 VS2010 에 Add-In 되는 프로그램이고, 하는건 OpenSource Project 검색해서 Package 관련된 Dll을 프로젝트에 자동 설치 해준다.

    참조 : http://visualstudiogallery.msdn.microsoft.com/27077b70-9dad-4c64-adcf-c7cf6bc9970c

    posted by Sunny's
    2011. 8. 8. 10:28 .NET Framework


    간략한 설명
    Script Encoder는 사용하기 쉬운 명령줄 도구입니다. Script Encoder를 사용하면
    스크립트 디자이너가 자신의 최종 스크립트를 인코딩할 수 있어서 웹 호스트나 웹 클라이언트가 원본을 보거나 수정할 수 없게 됩니다. 그러나 이렇게
    인코딩하면 사용자의 코드를 쉽게 볼 수만 없을 뿐, 전문 해커들이 사용자가 어떻게 스크립트를 작성했는지 보는 것을 막지는 못합니다.

    개요


    Script Encoder는 사용하기 쉬운
    명령줄 도구입니다. Script Encoder를 사용하면 스크립트 디자이너가 자신의 최종 스크립트를 인코딩할 수 있어서 웹 호스트나 웹
    클라이언트가 원본을 보거나 수정할 수 없게 됩니다. 그러나 이렇게 인코딩하면 사용자의 코드를 쉽게 볼 수만 없을 뿐, 전문 해커들이 사용자가
    어떻게 스크립트를 작성했는지 보는 것을 막지는 못합니다.

    사용법


    c:\Program Files\Windows Script Encoder\screnc a.html b.html

    posted by Sunny's
    2011. 5. 19. 18:31 .NET Framework


    C# Driver

    The MongoDB C# Driver is the 10gen-supported C# driver for MongoDB.

    There have been several other C# drivers developed by the community in the past. This is the official C# Driver supported by 10gen. It is similar in many ways to the various drivers that came before it, but it is not a direct replacement for any of them. Most people have found it easy to convert to using the official C# Driver, but you should expect to have to make some changes. Version 1.0 of the official C# driver does not yet support LINQ, so if LINQ is important to you then you might choose to wait a bit before switching to the official C# driver.

    Download

    The C# Driver is hosted at github.com. Instructions for downloading the source code are at: Download Instructions

    You can also download binary builds in either .msi or .zip formats from:
    http://github.com/mongodb/mongo-csharp-driver/downloads.

    Build

    The current version of the C# Driver has been built and tested using

    • Visual Studio 2010
    • Visual Studio 2008

    posted by Sunny's
    2010. 11. 25. 13:42 .NET Framework

    어떤 기술이 많이 이야기가 될 때에는 기존의 문제들을 그 기술로 인해서 해결할 가능성이 있기 때문에 그런 경우가 있다고 봅니다. 몇 년 사이에 많이 이야기 되고 있는 클라우드 컴퓨팅 역시 마찬가지로, 빠른 속도로 IT가 발달하면서 서비스 인프라에 대한 관리 부담은 심각한 문제가 되고 있습니다. 또한, 예측 하기 힘든 상황에서 사용자들이 늘어남으로 인해서 서버가 폭주하고, 서비스가 중단되는 사례를 주변에서 어렵지 않게 볼 수가 있습니다. 비즈니스 적인 측면으로 보자면 이와 같은 서비스 중단은 공급자에게 신뢰의 손상과 큰 이익 손실을 불러 일으킬 수 있으며, 서비스 이용자들에게는 큰 불편을 주게 됩니다.

    여기에서는 이 같은 서버 폭주에 대한 해결책으로 마이크로소프트의 클라우드 플랫폼인 Windows Azure에 대해서 간단히 알아보고 이를 이용해서 개발 환경의 구축 및 간단한 애플리케이션을 제작해 하는 과정을 알아 보겠습니다.

    . 박중석(한국마이크로소프트 개발자 전도사)

    목차

    01. Windows Azure 알아보기
    02. Windows Azure
    개발 환경 구축하기
    03. Windows Azure
    로 개발 하기
    04. Windows Azure
    로 클라우드에 배포 하기
    05.
    마치며

    01. Windows Azure 알아보기


    Windows Azure는 마이크로소프트에서 서비스 하고 있는 클라우드 플랫폼입니다. 클라우드라고 하면 흔히들 퍼블릭 클라우드나 프라이빗 클라우드로 구분을 지어서 이야기를 하곤 하는 데, 이를 클라우드 제공자가 어떤 서비스를 하기 위한 목적 인지로 나누어 생각해보면 Windows Azure는 마이크로소프트가 구축한 퍼블릭 클라우드 서비스라고 할 수 있습니다.

    , Windows Azure 플랫폼을 이용하면 기존에 특정 서비스가 동작하기 위해서 개별적으로 서버를 구축하고, 관리 했던 번거로움 없이 단지 개발 하려고 하는 서비스 자체에만 집중해서 개발하고 클라우드 에는 완성된 애플리케이션을 올리고 서비스 할 수 있습니다. 클라우드 플랫폼이 지향하는 확장 성을 전세계에 있는 마이크로소프트 데이터 센터를 통해서 가능하게 하고, 또한 기존에 개발자들이 애플리케이션을 개발하던 경험(언어, 도구, 디버깅 등)을 그대로 활용할 수 있도록 했다는 장점이 있습니다.

    <그림1> Windows Azure Platform 구성 요소

    이를 위해 클라우드 운영체제 인 Windows Azure 를 비롯, 데이터베이스인 SQL Azure와 기존 On-Premises Cloud 를 연동해주는 AppFabric 까지가 Windows Azure를 이루는 구성요소입니다. 그러면, 지금부터 Windows Azure 개발 환경을 구축하고 매우 간단히 애플리케이션을 만들고 이를 클라우드에 배포하는 과정을 진행해 보려고 합니다.


    02. Windows Azure 개발 환경 구축하기

    Windows Azure 개발 환경을 구축하기 위해서는 필요한 운영체제는 Windows Vista SP1, Windows Server 2008, Windows 7 중에 하나가 PC에 설치되어 있으면 됩니다. 그리고 Windows Azure 개발을 하기 위해서는 Visual Studio 2008 SP1이나 2010을 설치하고 최신 버전의 Windows Azure Tools 을 설치하면 됩니다.

    해당 개발 툴의 라이선스가 없다면 Visual Studio 2010 시험 판 이나 무료로 사용할 수 있는 Visual Studio Web Developer Express 2010를 설치해도 Windows Azure 개발을 할 수 있습니다. Visual Web Developer Express 2010과 최신 버전의 Windows Azure Tools 은 마이크로소프트의 웹 플랫폼 인스톨러(Web Platform Installer)를 이용하면 한번에 쉽게 설치할 수 있습니다. (http://www.microsoft.com/express/Web)

    <그림 2> 웹 플랫폼 인스톨러 설치한 후 개발자 도구에서 Visual Studio 2010을 선택한 화면

    웹 플랫폼 인스톨러는 현재 사용자의 PC에 해당하는 애플리케이션이나 개발도구가 설치되어 있는지를 확인할 수 있으며, 특정 애플리케이션이 동작하기 위해서 미리 ���치되어야 하는 프로그램도 자동으로 확인하고 설치를 해주기 때문에, 설치를 매우 편리하게 합니다. 또한, 설치한 프로그램의 업데이트가 있을 경우에도 웹 플랫폼 인스톨러를 통해서 쉽게 다운로드 후 최신 버전을 설치할 수 있습니다.

    <그림 3> 웹 플랫폼 인스톨러를 통한 Visual Studio 2010 Windows Azure Tools 설치 화면

    03. Windows Azure로 개발 하기

    편의 상 개발 툴은 Visual Studio 2010을 이용해서 진행하도록 하겠습니다. 먼저 Windows Azure 애플리케이션을 작성하고 구동하기 위해서는 개발 툴을 관리자 모드로 실행을 합니다.

    <그림 4> Visual Studio 2010을 관리자 권한으로 실행

    File New Project 에서 Visual C# - Cloud Windows Azure Cloud Service 를 선택하고 Name 에 편의 상 'HelloAzure' 라고 입력하고, OK 버튼을 누릅니다. Windows Azure Tools 을 설치하지 않았다면, OK 버튼을 누르면 Windows Azure Tools 의 설치 안내 화면이 나오게 됩니다.

    <그림 5> Visual Studio 에서 Cloud 서비스 프로젝트를 선택

    이제 원하는 클라우드 서비스 프로젝트를 추가해야 하는데, 클라우드에서 동작하는 프로젝트는 크게 Web Role Worker 롤로 나누어 집니다. Web Role은 서비스가 웹 상에 노출되어서 서비스 되며, Worker 롤은 시스템 서비스와 같이 내부 프로세스로 동작을 하게 됩니다. 여기에서는 간단한 서비스를 만들기 위해서 아무것도 추가하지 않은 상태로 OK 버튼을 누릅니다.

    <그림 6> 클라우드 서비스 프로젝트에 추가할 프로젝트 선택하는 화면

    Visual Studio의 우측 Solution Explorer 를 보면 HelloAzure 라는 프로젝트가 생긴 것을 볼 수 있으며 그 아래 Role 이라는 폴더와 ServiceConfiguration.cscfg 파일과 ServiceDefinition.csdef 라는 파일을 볼 수 있습니다. HelloAzure는 클라우드에 올릴 프로젝트가 패키징 될 프로젝트 이며, 각각의 서비스 파일들은 설정을 정의하고 구성하는데 쓰이게 됩니다.

    <그림 7> Solution Explorer 에서 Windows Azure 프로젝트 구성 화면

    이 솔루션에 Add New Project를 통해서 Visual C# - Web ASP.NET Empty Web Application을 선택 하고 이름은 HelloWebRole 정한 후에 OK 버튼을 클릭합니다.

    <그림 8> Windows Azure 에 올릴 ASP.NET Empty 웹 애플리케이션 선택

    HelloWebRole이라고 하는 빈 ASP.NET 웹 프로젝트가 추가가 되었고, 여기에 Add New Item을 통해서 Web Form을 선택하고, 파일 이름은 기본으로 로딩되도록 Default.aspx로 정한 뒤, Add 버튼을 누릅니다.

    <그림 9> Default.aspx 라는 이름의 Web Form 페이지 추가

    Default.aspx 파일의 <div> 태그 안에 'Hello Azure!' 라고 입력을 하고, 잘 작동하는지 Default.aspx 파일 위에서 마우스 오른쪽 클릭을 한 후에 View in Browser로 실행해 봅니다. 잠시 후 Visual Studio에 내장된 가상 웹 서버가 동작하면서 Hello Azure! localhost위에서 나오는 것을 보실 수 있습니다.

    <그림 10> 웹 페이지에 Hello Azure 문구 입력

    이제 이 애플리케이션을 클라우드로 올려보도록 하겠습니다. HelloAzure 프로젝트의 Role 폴더에서 마우스 오른쪽 버튼을 누른 후 Add Web Role Project in Solution 을 선택 합니다. 조금 전에 작성한 HelloWebRole 프로젝트를 확인할 수 있으며 OK 버튼을 눌러서 이 프로젝트를 추가 합니다.

    <그림 11> 같은 솔루션의 프로젝트 중에 클라우드에 올릴 것 선택

    Role 폴더에 HelloWebRole 프로젝트가 추가된 것을 확인 할 수 있으며, 이제 추가된 HelloWebRole위에서 마우스 오른쪽 버튼을 눌러서 Property 를 선택 합니다. 해당 웹 애플리케이션이 클라우드에 올라가서 동작하기 위한 설정을 할 수 있으며, 보시면 이중에 서비스 될 Instance count VM size가 각각 1 Small로 되어 있고 이를 변경할 수 있는 것을 확인 합니다.

    <그림 12> 클라우드에서 구동될 서비스의 환경 설정

    클라우드에서 서버 사용량이 늘어날 때 이와 같이 설정 값을 변경하는 것으로 서비스를 하는 Instance 의 개수를 늘릴 수 있고, 서비스가 진행되는 머신의 성능(CPU, RAM, HDD)도 변경할 수 있게 됩니다. 테스트를 위해서 Instance 의 개수를 2로 변경을 하고서, HelloAzure 프로젝트 위에서 마우스 오른쪽 클릭 후 Debug Start New Instance를 선택 하면, Debugging 모드로 HelloAzure 페이지가 Cloud 가상(Simulation) 환경에서 시작 됩니다.

    <그림 13> 가상 클라우드 환경에서 구동되는 Hello Azure 서비스

    작업 표시줄의 트레이에서 파란색 윈도우 아이콘으로 표시된 Development Fabric위에서 마우스 우측 버튼을 누르면 가상 클라우드에서 해당 애플리케이션이 어떻게 동작을 하는지를 확인 할 수 있습니다. 여기에서 Show Development Storage UI Show Development Fabric UI를 각각 선택하면 로컬 PC의 가상 환경에서 동작하는 클라우드 애플리케이션의 상태를 확인 할 수 있습니다. 이 중 Development Storage 는 클라우드에서 파일이나 메시지등을 저장하는 용도로 사용되는 공간을 클라우드에 올리기 전에 로컬 환경에서 테스트를 동일하게 테스트 해볼 수 있습니다.

    <그림 14> 가상 클라우드 환경의 Development Storage UI 화면

    Development Fabric의 경우는 Role 설정에서 적용한 개수 대로 Instance가 떠서 각각의 서비스가 시작되고 동작하는 것을 확인할 수 있기 때문에, 개발의 편리성을 크게 높여준다고 할 수 있습니다. 또한 가상 클라우드 환경에서도 물론 기존 애플리케이션 개발처럼 코드 사이에 중단 점을 설정하고, 해당하는 부분의 디버깅을 할 수 있습니다.

    <그림 15> 가상 클라우드 환경의 Development Fabric UI 화면

    04. Windows Azure로 클라우드에 배포 하기

    1) Windows Azure 계정 만들기

    작성한 애플리케이션을 Windows Azure 에 업로드 하기 위해서는 먼저 Windows Azure를 사용할 수 있도록 구매를 해야 합니다. 자신에게 맞는 각각의 시나리오 별로 구매를 할 수 있지만, 여기에서는 무료로 사용할 수 있는 Introductory Special 의 사용권을 구매 하겠습니다. (MSDN 계정이 있으신 분은 MSDN 계정 사용자 혜택으로 일정기간 무료로 사용할 수 있는 옵션을 확인 하시길 바랍니다.) 브라우저로 Microsoft Online Service Customer Portal로 갑니다. (https://mocp.microsoftonline.com)

    국가 설정을 하는 화면에서는 현재 한국에는 Windows Azure가 출시가 되지 않았기 때문에, 국가를 미국 등 현재 Windows Azure가 출시된 국가를 선택하고 Continue 버튼을 누른 후에, Windows Azure Platform 중에 View service details를 선택 한 후에 Windows Azure Platform Introductory Special에서 Buy Now버튼을 클릭합니다.

    <그림 16> Windows Azure 구매를 할 수 있는 Microsoft Online Service Customer Portal

    이후에 사용할 수 있는 Live ID 를 입력하시면, 사용자 정보를 입력 하는 화면이 나오게 되며, 알고 계시는 해당 지역의 주소를 입력 하시면, Windows Azure를 이용할 회사의 정보를 입력 하고 구매 화면이 나오게 됩니다. 체크 박스를 선택한 후에 Checkout 버튼을 누르면 신용 카드(Credit card) 번호 및 구매 요청서 번호(Purchase Order No.)를 입력 할 수 있습니다.

    <그림 17> Windows Azure 계정의 사용자 정보 입력

    처음에 선택한 국가에서 결제가 가능한 신용 카드 정보를 입력하면 해당 계정으로 Windows Azure를 이용할 준비가 끝나게 됩니다. 결제 전에 반드시 주의하실 점은 해외 결제 시에 1$ 정도의 수수료가 있을 수도 있으며, 실제 사용 시에는 무료로 제공하는 서비스 범위 안에서만 비용이 청구 되지 않습니다. (주소지가 신용카드의 Billing Address와 일치하지 않으면 등록 진행이 되지 않을 수 있습니다.)

    Windows Azure Introductory Special의 경우는 한정된 Resource로 한 달에 25시간 동안 한 개의 Instance Windows Azure 상에 올리는 것이 가능하므로, 실제 서비스 운영의 목적으로 사용하기 보다는 구현한 클라우드 애��리케이션을 테스트 하는 용도로서 활용을 하시는 것이 적절 합니다. 사용 시간 및 허용 범위를 초과하면 등록 시 사용한 신용카드로 비용이 청구되므로 매우 주의가 필요합니다.

    2) Windows Azure 패키지 만들기

    계정을 만들고 난 후에는 클라우드에 배포를 하기 위해서는 HelloAzure 프로젝트 위에서 마우스 오른쪽 버튼을 클릭하시고, Publish를 선택 합니다. 이중 Create Service Package Only는 배포할 패키지만 생성하는 것이고, Deploy your Cloud Service to Windows Azure는 생성한 패기지를 Visual Studio 내에서 자동으로 배포까지 진행 하는 것 입니다.

    배포를 자동하화 하기 위해서는 인증서을 만들고 진행을 하면 되며, 여기에서는 패키지만 만들도록 하겠습니다. Create Service Package Only를 선택 후 OK 버튼을 클릭합니다.

    <그림 18> 클라우드 서비스를 배포 하기 위한 패키지 작성 화면

    배포를 하기 위한 패키지(HelloAzure)가 만들어지고 자동으로 해당 패키지가 생성된 폴더가 팝업으로 뜨게 됩니다. 여기에서 HelloAzure 패키지 파일은 클라우드에서 올라가서 동작을 하게 될 서비스 파일이며, ServiceConfiguration은 이것이 어떻게 동작을 할지에 대한 XML로 된 설정 파일 입니다. 이 설정 파일을 이용하면 서버의 사용량에 따라서 클라우드에 올라간 서비스 개수를 쉽게 변경해서 사용량에 맞도록 조정이 가능 합니다.

    <그림 19> 클라우드에 올릴 수 있는 패키지 파일과 설정 파일

    3) 클라우드에 배포하기

    클라우드에 서비스를 올리기 위해서는 패키지된 파일을 Windows Azure 포털 사이트에 업로드를 해야 합니다. Visual Studio 에서 한번에 올라가도록 자동화를 할 수도 있지만 여기에서는 웹 사이트에서 접속해서 수동으로 업로드 하겠습니다. 먼저 Windows Azure 포털 사이트(http://windows.azure.com) 에 접속하고, 조금 전에 등록한 Live ID로 사이트에 로그인 합니다. 그러면 자신이 등록한 계정이 화면에 보이게 됩니다.

    <그림 20> Windows Azure를 사용할 수 있도록 등록 된 계정 목록

    등록한 계정을 선택하면 서비스를 올릴 수 있는 페이지가 나오게 되며, 새로운 서비스를 등록 하기 위해서 New Service 를 클릭하면, Storage Account Hosted Service가 나오게 됩니다. 전자는 클라우드 서비스에서 사용할 저장소를 위한 계정이며, 후자는 실제 클라우드 서비스가 올라갈 공간 입니다. 이번에 올릴 서비스는 특별히 저장소를 사용하지 않기 때문에 Hosted Services를 선택합니다.

    <그림 21> Windows Azure Storage Account Hosted Services

    Service Label Service Description 을 구분할 수 있는 대로 입력하고 나면, 실제 Windows Azure에 올린 서비스를 접근할 수 있는 고유한 URL을 넣어주어야 합니다. 하단의 Hosted Service Affinity Group 설정은 서비스를 전세계의 어느 지역을 대상으로 할 것인지를 선택 하는 것이며, 이전에 올린 서비스와 같이 연동된다면 이를 그룹화 하면 됩니다. 이제 Create 버튼을 눌러서 서비스를 올릴 공간을 생성 합니다.

    <그림 22> 클라우드 서비스를 접근할 수 있는 URL과 배포할 위치 설정

    이제 클라우드에 서비스를 배포 할 수 있고, 해당 서비스가 어떤 상태인지 확인할 수 있는 화면이 나오게 됩니다. Production 공간에 있는 Deploy 버튼을 클릭한 후에 나오는 페이지에 패키징 된 파일과 설정 파일을 각각 업로드 하고, 서비스를 개시할 수 있습니다. Run 버튼을 누르면 해당 서비스가 Deploy 되는 과정을 실시간으로 볼 수 있으며, Deploy 된 상태에 따라서 Initializing Busy 단계를 거친 후에 완료인 Ready 단계가 됩니다.

    <그림 23> 클라우드 서비스의 배포 및 상태 확인을 위한 페이지

    모니터링 API를 통해서 서버가 폭주가 되는지 여부를 확인 후 필요하다면 서비스 개수를 늘리기 위해서는 실 시간으로Hosted Service 페이지의 Configure 메뉴나 Windows Azure개발용 API를 이용해서 쉽게 해당 서비스의 설정을 변경할 수 있습니다. 그리고 설정의 변경 시에 서비스가 중단 되는 일 없이 진행을 할 수 있도록 Production 공간 외에 Staging 공간이 있어서 Staging에 배포를 한 후에 문제가 없는 것을 확인 후 손쉽게 이를 교체할 수 있도록 되어 있습니다.

    <그림 24> 실시간으로 클라우드 서비스의 설정을 변경

    05. 마치며

    지금까지 서버 폭주에 대한 해결책으로서의 마이크로소프트 클라우드 플랫폼 Windows Azure에 대해서 살펴 보았습니다. Windows Azure를 이용한 클라우드 서비스는 유연한 인프라 관리를 가능하게 함으로서, 투자를 줄일 수 있어 비즈니스의 위험성을 줄여주며, 나아가 비즈니스 자체에 더욱 집중할 수 있습니다. 또한 Windows Azure는 기존의 개발자들의 경험을 그대로 활용할 수 있고, 이는 상황에 따라서 클라우드와 On-Premise 간의 이동을 쉽게 할 수 있습니다. 아직 Windows Azure가 국내에 정식으로 출시가 되지 않아서 국내 대상의 서비스로 활용 하기에는 어려움이 있지만, 글로벌 비즈니스를 고려하는 업체라면 강력한 클라우드 플랫폼으로서 좋은 선택이 될 것으로 생각 합니다.

    출처 : http://blogs.msdn.com/b/eva/archive/2010/11/08/windows-azure.aspx
    posted by Sunny's
    2010. 10. 22. 19:38 .NET Framework

    static void Main(string[] args)
    {
            string str = "abcwDW2";

            // 날짜 형식 "yyyy-MM-dd"
            string sParttern = @"^(19[0-9]{2}|2[0-9]{3})-(0[1-9]|1[012])-([123]0|[012][1-9]|31)$";  

            // 숫자와 영문 소문자,대문자만 입력가능합니다.(글자제한100)");
            //string sParttern = @"^[0-9a-zA-Z]{1,100}$";

            Regex regex = new System.Text.RegularExpressions.Regex(sParttern );

            Boolean ismatch = regex.IsMatch(str);
            if (!ismatch)
            {
                Console.WriteLine("날짜 형식이 아닙니다.");
            }
    }


    영문 소문자, 대문자와 숫자만 가능하도록 하는 유효성 체크에 사용될 만한 예제입니다.

    posted by Sunny's