블로그 이미지
Sunny's

calendar

1 2 3 4
5 6 7 8 9 10 11
12 13 14 15 16 17 18
19 20 21 22 23 24 25
26 27 28 29 30 31

Notice

2010. 3. 9. 15:03 .NET Framework

이 기사는 Visual Studio 2008 시험판 버전을 기준으로 합니다. 여기에 포함된 모든 정보는 변경될 수 있습니다.
이 기사에서 다루는 내용:
  • HTTP 메시지 기본 사항
  • URI에 정보 추가
  • WCF 및 HTTP
  • WCF를 사용한 RSS 및 ATOM
이 기사에서 사용하는 기술:
Windows Communication Foundation
Microsoft® .NET Framework 3.0의 구성 요소의 하나로 처음 모습을 드러냈을 때 WCF(Windows® Communication Foundation)에는 다양한 전송 방식을 통한 SOAP 메시징 및 POX(Plain Old XML)에 사용되는 범용 개체 모델이 포함되어 있었습니다. WCF는 WS-* 웹 서비스 표준에 대한 심층적인 지원도 포함하고 있으므로 다른 최신 서비스 플랫폼과도 무리 없이 상호 운용할 수 있습니다. .NET Framework 3.0의 WCF는 확장성이 뛰어나며, 메시지 로깅, 작업 추적, 서비스 조정, 인스턴스 관리, 스레딩 제어 등의 강력한 관리 기능도 제공합니다.
.NET Framework 3.5의 WCF는 .NET Framework 3.0의 확장 지점을 기반으로 하여 웹 규칙에 부합하는 서비스 구축을 위한 최상의 지원을 제공합니다. 여기에는 사용하기 쉬운 HTTP 프로그래밍 모델, JSON(JavaScript Object Notation) 메시징 기능, 배포된 콘텐츠를 손쉽게 만들고 소비할 수 있게 해주는 새로운 배포 API가 포함됩니다. 이러한 기능 집합을 갖춘 WCF는 이제 ASP.NET AJAX 컨트롤, SilverlightTM 클라이언트, 그리고 브라우저까지 모든 종류의 웹 클라이언트에 서비스를 연결하는 데 있어 최적의 서비스 플랫폼입니다. 이러한 기능은 부분 신뢰 시나리오(예: ASP.NET 보통 신뢰)에서도 작동하므로 광범위하게 사용되는 호스팅 환경에서 WCF 서비스를 호스트할 수 있습니다. 또한 서비스 준비와 실행에 소요되는 시간을 크게 줄여 주는 새로운 도구가 Visual Studio® 2008에 통합되어 완성도를 더욱 높여 줍니다.
웹 중심 통신과 SOAP 및 WS-* 표준을 하나의 서비스 스택 및 개체 모델로 결합하는 기능은 .NET Framework 3.5에 포함된 WCF의 장점 중 하나입니다. 이는 SOAP 및 WS-*를 사용하여 엔터프라이즈 경계 내에서 또는 경계를 넘어 통신하는 서비스를 구축하고, 웹 프로토콜을 사용하여 외부적으로 통신하도록 이러한 서비스를 구성할 수 있음을 의미합니다. 실질적으로 WCF가 서비스의 복잡한 연결 구성을 도맡아 처리하므로 개발자는 서비스가 제공하는 기능에 더욱 주력할 수 있습니다.
이 기사에서는 .NET Framework 3.5에서 WCF가 제공하는 몇 가지 새로운 웹 중심 기능에 대해 설명합니다. HTTP와 웹의 중요한 아키텍처 원칙에 대한 기본적인 내용부터 시작한 후 WCF의 새로운 프로그래밍 모델을 살펴보고 마지막으로 새로운 배포 API에 대해 알아보겠습니다.

HTTP 메시지 기본 사항
여러분들은 아마 거의 매일 웹을 사용할 텐데, 웹이 움직이는 핵심 원리에 대해서는 얼마나 생각하십니까? 아키텍처 개념에 대한 이야기는 필자의 성격에 맞지 않지만 웹의 기반이 되는 핵심 개념 중에는 쉽게 이해하기 어려운 부분이 있습니다. 개인적으로 웹의 프로토콜에 부합하는 서비스를 구축할 때는 가장 먼저 이러한 원칙부터 이해해야 한다고 생각합니다. 많은 서적에서 이 주제를 전문적으로 다루고 있는 점을 감안하여 이 기사에서는 가장 핵심적인 부분만 언급하겠습니다.
HTTP는 웹의 전송 수단입니다. HTTP는 요청/응답 MEP(메시지 교환 패턴)를 요구합니다. 이 패턴은 브라우저에서 웹 페이지를 탐색할 때마다 발생합니다. 즉, 리소스를 요청하면 해당 리소스가 포함된 하나의 응답이 반환됩니다. HTTP 전송은 메서드라고도 하는 몇 가지 동사를 정의하는데, 이러한 동사는 요청/응답 MEP에 GET, POST, PUT, DELETE 등의 기능을 추가합니다. HTTP 동사 간의 몇 가지 차이점을 살펴보기 위해 HTTP POST를 예로 들어 보겠습니다. 다음은 단순화된 형태입니다.
POST /myservice/PostAlbum HTTP 1.1
HOST: www.cloudsample.net
<albumInfo>
  <albumId>15</albumId>
</albumInfo>
수신 응용 프로그램에 전송되는 것은 하나의 메시지입니다. 여기에서 메시지는 으로 전송됩니다. 이 메시지에는 albumId 필드의 값이 들어 있는 페이로드도 포함되어 있습니다. 요약하자면 HTTP POST는 수신 응용 프로그램에 페이로드를 전송하는 수단이라고 할 수 있습니다.
이 예의 페이로드는 간단하므로 15라는 숫자로 전체 페이로드를 나타낼 수 있습니다. 작동을 위해서는 숫자 15가 albumId 필드의 값에 매핑된다는 사실을 수신 응용 프로그램에서 인식해야 합니다. 이 기능은 HTTP GET에서 제공되는 핵심 기능 중 하나입니다. 예를 들어 앞의 HTTP POST에서 HTTP GET으로 전환한 결과는 다음과 같습니다.
GET /myservice/GetAlbum/15 HTTP 1.1
HOST: www.cloudsamples.net
HTTP GET은 최적화된 HTTP POST이며 페이로드의 필요성을 제거할 수 있습니다. 사실상 URI가 페이로드입니다. 이는 메시지 크기를 줄이는 효과를 가져오고 따라서 전송 시간도 단축됩니다. 크기가 작은 메시지와 URI 사용에 따른 또 하나의 이점은 프록시 또는 브라우저와 같은 다른 응용 프로그램에서 동일한 리소스에 대한 이전 HTTP GET 메시지의 결과를 캐시하기가 더 쉽다는 점입니다. 이러한 이유로 HTTP GET은 다른 HTTP 동사보다 훨씬 더 자주 사용됩니다.
본질적으로 HTTP GET은 리소스에 대한 요청입니다. 이해를 돕기 위해 웹 사이트에 있는 흥미로운 리소스를 친구에게 전자 메일로 보내려는 경우를 가정해 보십시오. 여러분은 전자 메일을 받은 친구가 링크를 클릭하여 여러분이 보는 것과 똑같은 페이지를 볼 수 있으리라 생각합니다. 따라서 의 리소스가 갑자기 MSNBC의 최신 기사로 바뀐다면 깜짝 놀랄 것입니다. 사실 HTTP GET에 사용되는 URI는 리소스의 표현이며, 일반적으로 리소스는 변경되지 않을 것으로 간주됩니다.
HTTP GET이 나타내는 의미에 대해서는 명확한 결론이 나오지만 다른 HTTP 동사의 경우에는 그렇지 않습니다. 수신 응용 프로그램에 HTTP DELETE 메시지를 보낼 경우의 영향을 생각해 보십시오. 수신 응용 프로그램은 상태를 바꾸거나 어떤 작업을 수행해야 할까요? HTTP DELETE는 대개 무언가를 감하는 상태 변경이나 작업과 연관되지만 해당 상태 변경의 구체적인 사항은 정의되지 않습니다. HTTP PUT의 경우도 마찬가지입니다. 일반적으로 HTTP PUT은 무언가를 더하는 상태 변경이나 작업과 연관이 있지만 구체적인 변경 형태는 응용 프로그램에 따라 다릅니다.

추가 정보 표현
HTTP GET을 수신하는 응용 프로그램은 URI에 포함된 정보를 사용하여 응답으로 보낼 리소스를 결정합니다. 예를 들어 다음 URI를 살펴보겠습니다.
contoso.com/artists/Flaming+Hammer/HitMe
contoso.com/artists/Northwind/Overdone
이 예에서 Contoso Corporation에는 음악 관련 리소스를 서비스하는 응용 프로그램이 있습니다. 이러한 예를 통해 다음과 같이 음악가와 앨범의 이름이 URI에 매핑되는 방식을 추론할 수 있습니다.
contoso.com/artists/[artist]/[album]
응용 프로그램에서 http://contoso.com/artists/Northwind/Overdone에 대한 HTTP GET 메시지를 수신하면 Northwind의 Overdone 앨범과 관련된 리소스를 반환해야 합니다. URI에는 일정한 패턴이 있습니다. 즉, 기본 정보(contoso.com/artists)와 음악가 및 앨범의 값이 들어가는 URI 세그먼트(또는 "홀")로 구성됩니다.
같은 종류의 정보를 쿼리 문자열 매개 변수에 포함하는 경우도 많습니다. 형식은 이전 예제와 다르지만 최종 결과는 동일합니다. 다음은 쿼리 문자열 매개 변수를 사용한 몇 가지 URI 홀입니다.
contoso.com/artists/Flaming+Hammer?album=HitMe
contoso.com/artists/Northwind?album=Overdone
이 예의 URI와 쿼리 문자열은 다음 구문을 사용합니다.
contoso.com/artists/[artist]?album=[album]
HTTP 전송은 추가 정보를 표현하기 위한 확장 가능한 헤더 집합도 사용합니다. 이 정보는 캐싱, 메시지의 데이터 형식, 전송 응용 프로그램의 이름, 콘텐츠의 길이, 호스트 운영 체제 등에 관한 정보일 수 있습니다. 그림 1은 몇 가지 일반적인 헤더가 포함된 HTTP GET 메시지(1-8행)와 응답 메시지(9-14행)를 보여 줍니다.
1    GET /PictureServices/Feed.svc/picture/Pictures;Bridge.jpg HTTP/1.1
2    Accept: image/gif, image/x-xbitmap, image/jpeg, image/pjpeg, 
       application/x-ms-application, application/vnd.ms-xpsdocument, 
       application/xaml+xml, application/x-ms-xbap, 
       application/vnd.ms-excel, application/vnd.ms-powerpoint, 
       application/msword, application/x-shockwave-flash, 
       application/x-silverlight, */*
3    Accept-Language: en-us
4    UA-CPU: x86
5    Accept-Encoding: gzip, deflate
6    User-Agent: Mozilla/4.0 (compatible; MSIE 7.0; Windows NT 6.0;SLCC1; 
       .NET CLR 2.0.50727; InfoPath.2; .NET CLR 1.1.4322; 
       .NET CLR 3.5.20706; .NET CLR 3.0.590; MS-RTC LM 8)
7    Host: www.cloudsamples.net
8    Proxy-Connection: Keep-Alive

9    HTTP/1.1 200 OK
10   Content-Type: image/jpeg
11   Server: Microsoft-IIS/7.0
12   X-Powered-By: ASP.NET
13   Date: Sat, 15 Sep 2007 18:57:11 GMT
14   Content-Length: 106333

HTTP GET 요청의 Accept 헤더는 클라이언트에서 수신해야 하는 데이터의 형식을 나타냅니다. 긴 값 목록을 통해 볼 수 있듯이 클라이언트에서 수신할 수 있는 데이터의 종류는 다양합니다(이미지, Office 문서, Silverlight 응용 프로그램 등). HTTP GET에 대한 응답에는 Content-Type 헤더(10행의 image/jpeg) 값에 기술된 형식의 데이터가 포함됩니다. 이 간단한 메커니즘을 통해 전송 응용 프로그램과 수신 응용 프로그램은 데이터 형식을 조정할 수 있습니다. 헤더를 통한 데이터 형식 조정은 SOAP 웹 서비스의 WSDL(웹 서비스 기술 언어) 및 XSD(XML 스키마 정의) 문법만큼 명확하지는 않지만 웹에 사용하기에는 충분합니다.

REST와 웹
지금까지 HTTP 전송의 핵심적인 부분 일부를 연구하면서 웹을 느슨하게 연결하는 몇 가지 중요 원칙도 함께 살펴보았습니다. 지난 2000년 Roy Fielding이라는 학생이 박사 학위 논문에서 이러한 원칙을 다른 요소과 함께 REST(Representational State Transfer)라는 하나의 아키텍처 스타일로 체계화했습니다. Roy의 논문은 ics.uci.edu/~fielding/pubs/dissertation/top.htm에서 볼 수 있습니다.
REST 아키텍처 스타일은 지금까지 여러 서적과 소프트웨어 회의, 그리고 무수히 많은 블로그에서 세부적으로 다룬 주제입니다. 여기서 REST의 모든 측면에 대해 설명하긴 어렵지만 다음과 같은 세 가지 핵심 문장으로 요약할 수 있습니다.
  • URI를 포용한다.
  • HTTP GET은 특수하다.
  • Content-Type은 데이터 모델이다.
이 기사에서는 설명을 위해 위의 세 가지 사항을 웹의 기본 원칙으로 간주하겠습니다. 응용 프로그램에 이 세 가지 원칙을 적용하면 상호 운용성과 응용 프로그램 기능의 대상 범위를 크게 향상시킬 수 있습니다. 상호 운용성과 대상 범위는 대부분의 웹 서비스 이니셔티브를 견인하는 핵심 요소입니다. 궁극적으로 웹 서비스는 구조화된 메시징 체계를 통해 기능을 제공하는 수단입니다. 사실 웹의 원칙(HTTP 요청/응답)은 가능한 메시징 체계의 하위 집합을 기술하는 것입니다. 거의 모든 플랫폼, 응용 프로그램, 운영 체제 및 사용자는 웹의 원칙을 이해하고 있으므로 웹 서비스 응용 프로그램에 이러한 원칙을 적용하면 대상 범위와 상호 운용성을 높일 수 있습니다.
REST와 WS-* 간의 선택은 상호 배타적이 아니므로 웹의 원칙은 WS-*에 별다른 영향을 미치지 않습니다. 둘 중 하나만으로는 모든 통신 요구 사항을 만족할 수 없으므로 구축하는 모든 서비스에 어느 하나를 일률적으로 적용하는 것은 좋지 않습니다. 예를 들어 REST는 중개자에 메시지를 전송하는 데에는 적합하지 않고, 이 부문에선 WS-*가 훨씬 더 뛰어납니다. 반대로 브라우저와 같이 단순한 클라이언트와 상호 작용하는 데에는 WS-* 응용 프로그램이 그다지 적합하지 않은 반면 REST 응용 프로그램이 빛을 발합니다.

WCF를 사용한 HTTP 프로그래밍
이러한 웹의 기본 사항을 기초로 .NET Framework 3.5에서 WCF를 사용하여 웹의 원칙에 부합하는 응용 프로그램을 구축하는 과정을 살펴보겠습니다. 먼저 HTTP 프로그래밍 모델과 프로세스의 몇 가지 새로운 구성 요소를 시스템 전반에 걸쳐 상향식으로 파악해 보겠습니다.
"URI를 포용"하려면 URI 작성과 구문 분석에 익숙해져야 합니다. 수동으로 처리할 경우 이 작업은 실수 발생 가능성이 높고 지루한 작업입니다. 다행히 WCF의 새 HTTP 기능을 위한 기본 구성 요소인 새로운 System.UriTemplate 및 System.UriTemplateMatch 형식이 URI를 생성하고 구문 분석하는 어려운 작업을 처리해 줍니다.
UriTemplate 형식은 앞서 설명한 URI 홀을 정의하는 기본 구성 요소입니다. UriTemplate 형식의 생성자는 URI의 홀을 나타내는 문자열을 받습니다. 인스턴스화된 UriTemplate 개체는 인스턴스화에서 정의된 홀에 텍스트 값을 바인딩하기 위한 두 개의 인스턴스 메서드를 제공합니다. 이 두 메서드는 홀에 값이 채워진 URI를 반환합니다.
UriTemplate 개체는 System.Uri 개체의 홀 값을 추출하는 Match라는 인스턴스 메서드도 제공합니다. Match 인스턴스 메서드는 두 개의 System.Uri 개체를 받습니다. 첫 번째 Uri는 기준 주소이며 두 번째 Uri는 일치시킬 대상입니다. System.UriTemplateMatch 개체는 Match 메서드에서 반환됩니다. UriTemplateMatch 개체에는 UriTemplate 인스턴스화 시점에 정의된 홀의 값 컬렉션이 포함되어 있습니다.
그림 2의 코드는 UriTemplate 및 UriTemplateMatch 형식을 사용하여 Uri를 왕복 전달하는 방법을 보여 줍니다. 이 코드의 결과는 다음과 같습니다.
// 템플릿으로의 URI 바운드 만들기
Uri baseAddress = new Uri(@"http://localhost:2000");
UriTemplate template = new UriTemplate("{artist}?album={album}");
Uri boundUri = template.BindByPosition(baseAddress, "Northwind", 
    "Overdone");
Console.WriteLine(boundUri.ToString());
            
// 음악가 세그먼트 검색
UriTemplateMatch match = template.Match(baseAddress, boundUri);
String bandName = match.BoundVariables["artist"];
Console.WriteLine("the name of the artist is  {0}", bandName);
(참고: 프로그래머 주석은 예제 프로그램 파일에는 영문으로 제공되며 기사에는 이해를 돕기 위해 번역문으로 제공됩니다.)
http://localhost:2000/Northwind?album=Overdone
the name of the artist is  Northwind
System.UriTemplate 및 System.UriTemplateMatch 형식에는 네임스페이스에 일반적인 WCF System.ServiceModel 모니커가 없습니다. WCF 응용 프로그램 내에서는 이 모니커의 기능을 사용할 필요가 없기 때문입니다. 이 모니커는 URI를 만들거나 구문 분석할 때 상당히 유용합니다.
UriTemplate 및 UriTemplateMatch 형식은 원래 사용하기 쉽지만 WCF 팀은 WCF 서비스에서 이 형식을 더욱 쉽게 사용할 수 있게 만들고자 했습니다. URI 세그먼트와 쿼리 문자열 매개 변수를 응용 프로그램 기능에 매핑하는 간단하고 직관적인 방법을 구현하는 것을 목표로 했습니다. 다음 코드의 모델이 이러한 조건에 부합합니다.
[ServiceContract]
public interface IPictureService
{
  [OperationContract]
  [WebGet(UriTemplate = "picture/{pictureId}")]
  Stream GetPicture(String pictureId);

  [OperationContract]
  [WebGet(UriTemplate = "picture/t/{pictureId}")]
  Stream GetPictureThumbnail(String pictureId);
}
UriTemplate은 WebGetAttribute에 대한 인스턴스 속성으로 노출되고, WebGetAttribute는 다시 서비스 계약에 적용됩니다. 여기서 중괄호 사이의 토큰은 메서드 매개 변수의 이름에 매핑됩니다. 이 샘플에는 매개 변수가 하나밖에 나오지 않지만 여러 매개 변수를 추가하여 원하는 순서에 따라 정렬하고, 쿼리 문자열 매개 변수로 추가하거나 와일드카드를 사용할 수도 있습니다.
런타임에 UriTemplate 속성의 값이 UriTemplate 생성자에 전달됩니다. Client 런타임과 Dispatcher는 모두 이러한 방식으로 UriTemplate 속성을 사용합니다. Dispatcher는 들어오는 메시지를 작업에 연결하는 데 이 속성을 사용하고 Client는 프록시의 메서드가 올바른 URI에 전송되도록 하는 데 사용합니다. 이는 서비스에 "URI를 포용"하기 위한 쉽고 간단하고 효과적인 방법입니다.

WCF 계약의 HTTP 동사
.NET Framework 3.5의 WCF를 사용하여 HTTP 프로그래밍을 수행하면 서비스 계약의 작업을 HTTP 동사에 쉽게 매핑할 수 있습니다. 이름에서 쉽게 알 수 있듯이 WebGetAttribute를 작업에 적용하면 HTTP GET을 통해 해당 작업을 사용할 수 있습니다. 이전 코드 조각에서 살펴보았듯이 WebGetAttribute는 UriTemplate이라는 인스턴스 속성을 정의합니다.
WebGetAttribute 형식에는 다른 인스턴스 속성도 있습니다. 그 중 가장 중요한 속성은 RequestFormat과 ResponseFormat입니다. 이름이 암시하는 바와 같이 이 두 속성의 값은 작업에 대한 메시지 형식을 지정합니다. RequestFormat과 ResponseFormat 속성은 Xml과 Json, 두 개의 값을 갖는 열거 형식인 WebMessageFormat 형식입니다. WCF 인프라는 이 두 속성의 값을 사용하여 적절한 메시지 인코더로 채널 스택을 설정합니다. WebMessageFormat.Xml의 속성 값은 XML 인코더를 사용하는 채널 스택으로 이어집니다. 값을 WebMessageFormat.Json으로 설정하면 .NET Framework 3.5에 포함된 JSON 인코더를 사용하는 채널 스택이 설정됩니다. HTTP 메시지 교환의 양쪽 모두에 대한 속성이 모두 있으므로 응용 프로그램에서 XML 메시지를 수신하고 JSON 메시지를 반환하거나 그 반대로 할 수 있습니다.
HTTP 동사와 관련된 또 다른 특성은 WebInvokeAttribute입니다. 작업에 이 특성을 적용하면 HTTP GET을 제외한 모든 HTTP 동사를 통해 해당 작업을 사용할 수 있습니다. HTTP GET과 다른 모든 동사 간의 개체 모델 분리는 다른 HTTP 동사와 HTTP GET 간의 사용 빈도 차이를 반영합니다. WebInvokeAttribute 개체 모델은 WebGetAttribute와 유사하지만 Method라는 인스턴스 속성을 포함합니다. 이 속성의 값은 특정 HTTP 동사를 작업에 연결합니다. Method 속성은 String 형식이므로 값을 모든 표준 HTTP 동사는 물론 비표준 HTTP 동사로도 설정할 수 있습니다. 그림 3은 서비스 계약에 WebInvokeAttribute를 사용하는 방법을 보여 줍니다.
[ServiceContract]
public interface IPictureService
{
  [OperationContract]
  [WebGet(UriTemplate = "picture/{pictureId}")]
  Stream GetPicture(String pictureId);

  [OperationContract]
  [WebGet(UriTemplate = "picture/t/{pictureId}")]
  Stream GetPictureThumbnail(String pictureId);
  
  [OperationContract]
  [WebInvoke(UriTemplate="update", Method="POST")]
  void UpdatePictureInfo(PictureInfo info);
}

UpdatePictureInfo 메서드에는 PictureInfo 형식의 매개 변수가 있습니다. 런타임에는 PictureInfo 개체의 직렬화된 버전이 HTTP POST 메시지의 페이로드입니다. 이 방법으로 데이터를 구문 분석하면 응용 프로그램에서 다른 방법으로는 URI에 표현할 수 없는 복잡한 데이터 형식을 제공할 수 있습니다.
.NET Framework 3.5의 WCF는 HTTP 헤더와의 상호 작용도 용이하게 합니다. 요청 및 응답 HTTP 헤더는 System.ServiceModel.Web.WebOperationContext 형식을 통해 제공됩니다. WebOperationContext 형식은 .NET Framework 3.0의 WCF에 도입된 System.ServiceModel.OperationContext 형식의 확장으로, 사용 패턴이 유사합니다. 이 두 가지 형식은 모두 서비스 개체의 구현에 사용하기 위해 도입되었습니다. WebOperationContext 형식이 제공하는 멤버는 HTTP 헤더 값의 읽기 및 설정을 간소화하고 서비스 개체에 액세스하는 데 사용되는 URI에 대한 정보를 검색합니다. HTTP 헤더는 컬렉션으로 저장되며 자주 사용되는 헤더는 개별 속성으로 제공됩니다. 다음 예에서는 웹의 데이터 모델을 따르기 위해 HTTP 응답에 대한 Content-Type 헤더를 설정하는 방법으로 WebOperationContext 형식을 사용하는 방법을 보여 줍니다.
public Stream GetPicture(string pictureId)
{
  // 스트림 가져오기(생략됨)
  Stream stream;

  // 콘텐츠 형식을 image/jpeg로 설정
  WebOperationContext.Current.OutgoingResponse.ContentType = 
    "image/jpeg";

  return stream;
}

바인딩 및 호스팅
지금까지 응용 프로그램 기능에 URI 세그먼트를 매핑하고 HTTP 동사에 작업을 매핑하고 HTTP 헤더와 상호 작용하는 방법을 살펴보았습니다. 이제 이러한 기능을 작동하는 하나의 서비스로 연결하는 방법을 알아보겠습니다. 이를 위해서는 WCF에 새로 추가된 몇 가지 형식에 대해서도 알아두어야 합니다.
.NET Framework 3.0의 WCF에는 끝점의 전송 및 프로토콜을 통한 추상화인 바인딩 개념이 도입되었습니다. .NET Framework 3.0에는 폭넓은 전송 및 프로토콜에 대한 지원이 포함된 여러 가지 바인딩이 제공되었습니다.
.NET Framework 3.5의 WCF에는 System.ServiceModel.WebHttpBinding이라는 새로운 바인딩이 포함되어 있습니다. 이 바인딩은 웹 원칙의 추상화이며 .NET Framework 3.0의 바인딩 형식과 동일한 사용 모델을 따르므로 다른 바인딩과 마찬가지로 끝점에 추가할 수 있습니다.
.NET Framework 3.0의 WCF에는 끝점 동작이라는 개념도 도입되었습니다. 동작은 메시징 인프라의 실행 경로를 확장하는 방법입니다. .NET Framework에서는 몇 가지 동작이 기본 제공되며 직접 만들기도 쉽습니다.
.NET Framework 3.5의 WCF에는 System.ServiceModel.Description.WebHttpBehavior라는 새로운 끝점 동작이 포함되어 있습니다. 이 동작은 여러 가지 작업을 수행합니다. 수신 응용 프로그램의 경우 이 동작은 수신된 메시지가 서비스 개체의 적절한 메서드에 발송되도록 하는 필터링 인프라를 설정하는 등의 역할을 수행합니다. .NET Framework 3.0에서 WCF는 SOAP 작업과 대상 주소의 조합을 발송 키로 사용했습니다. WebHttpBehavior에 의해 설정되는 필터링 메커니즘은 UriTemplate 일치 및 HTTP 동사의 키로 기존 메커니즘을 확장합니다.
그림 4는 WebHttpBinding과 WebHttpBehavior를 사용하여 웹의 원칙을 따르는 수신 응용 프로그램을 작성하는 방법을 보여 줍니다. 이 방식의 이점은 이러한 끝점 중 하나를 기존 ServiceHost에 추가할 수 있으며, 이를 통해 SOAP/WS-* 끝점과 REST 끝점을 모두 갖는 단일 ServiceHost를 만들 수 있다는 것입니다.
ServiceHost host = new ServiceHost(typeof(IPictureContract), 
    new Uri("http://localhost:5000"));
// WebHttpBinding 인스턴스화
WebHttpBinding binding = new WebHttpBinding();

// WebHttpBinding을 사용하여 끝점 추가
ServiceEndpoint ep = host.AddServiceEndpoint(
    typeof(IPictureContract),  binding, String.Empty);

// 끝점에 WebHttpBehavior 추가
ep.Behaviors.Add(new WebHttpBehavior());

// 수신 시작을 위해 ServiceHost 열기
host.Open(); 

전송 응용 프로그램도 동일한 사용 모델을 따르지만 ChannelFactory<T> 개체에 대한 끝점 동작 컬렉션에 WebHttpBehavior를 추가해야 합니다. 일반적인 WCF 사용법에 따라 이러한 옵션은 구성 파일에서도 제공됩니다.
.NET Framework 3.5의 WCF는 경우에 따라 WebHttpBinding 또는 WebHttpBehavior를 추가할 필요가 없도록 사용이 간편한 이 모델을 더 심층적으로 사용하기도 합니다. 새로운 API에는 이 용도로 사용되는 System.ServiceModel.Web.WebServiceHost와 System.ServiceModel.Web.WebServiceHostFactory라는 두 가지 형식이 있습니다. WebServiceHost 형식은 모든 끝점에 WebHttpBehavior를 자동으로 추가하고 런타임에 모든 끝점이 동작과 호환되는지 확인하는 추가 유효성 검사를 실행합니다. 덕분에 끝점에 WebHttpBehavior를 추가할 필요가 없습니다.
WebServiceHostFactory 형식은 IIS 호스트 시나리오에서 필수 또는 구성 파일 호스팅 정보의 필요성을 제거하도록 고안되었습니다. .NET Framework 3.0의 WCF에는 IIS에서 WCF 서비스를 호스트하기 위한 활성화 대상으로 .svc 파일이 추가되었습니다. 이러한 파일에는 ASP.NET의 페이지 지시어와 유사한 지시어가 포함되어 있습니다. .svc 파일 지시어의 Factory 속성에 WebServiceHostFactory를 추가하면 ServiceHost가 생성되고, WebHttpBinding에 적절한 계약을 사용하는 끝점이 추가되고, 해당 끝점에 WebHttpBehavior가 추가되고, ServiceHost가 열립니다.
<%@ ServiceHost 
  Language="C#" 
  Service="PictureService" 
  Factory="System.ServiceModel.Web.WebServiceHostFactory" %>
서비스에 대한 web.config 파일에는 WCF 관련 항목이 없습니다.

새로운 배포 API
RSS 피드를 생각해 보십시오. 필자와 비슷한 독자들은 즉시 뉴스 피드나 블로그를 떠올릴 것입니다. 배포(RSS 및 ATOM은 배포 형식임)는 훨씬 더 많은 것을 표현할 수 있습니다. 개념적으로 말하면 배포된 콘텐츠는 데이터 집합을 표현하는 수단에 불과합니다. 이 데이터 집합은 시드니의 50마일 반경 내에 서식하는 웜뱃의 수, 100달러를 초과하는 최근 10건의 구매 주문, Contoso에서 지난달에 생산한 부메랑의 수 등 어떠한 정보라도 될 수 있습니다.
.NET Framework 3.5는 배포된 콘텐츠를 만들고 소비하기 위한 풍부한 지원을 포함하고 있습니다. RSS 2.0 형식과 ATOM 1.0 형식의 생성 및 소비, 배포 확장을 추가하기 위한 다양한 방법, 그리고 추가 형식을 구현하는 기능까지 지원합니다. 이 프로그래밍 모델에서는 개발자가 배포 형식의 세부 사항에 신경 쓸 필요가 없으므로 사용하기도 그만큼 더 쉽습니다.
버전 3.5 이전에는 .NET Framework로 배포된 콘텐츠를 만들거나 소비하는 표준화된 방법이 없었습니다. WCF 팀에서 새로운 배포 기능을 작성했지만 이는 WCF에 종속되지 않습니다. 사실 모든 배포 관련 형식은 System.ServiceModel.Web.dll 어셈블리에 포함되어 있기는 하지만 System.Syndication 네임스페이스의 일부입니다. AppDomain을 호스트하는 모든 프로세스(ASP.NET, WPF 응용 프로그램, NT 서비스 등)에서 .NET Framework 3.5의 배포 기능을 사용할 수 있습니다. 이는 HTTP뿐만 아니라 모든 전송 방식에서 배포된 콘텐츠를 서비스하고 소비할 수 있음을 의미합니다. 그러나 WCF의 HTTP 프로그래밍 모델과 함께 사용할 경우 기존 SOAP/WS-* 서비스에도 배포를 추가할 수 있습니다.
새 배포 API에는 개별 배포 피드와 피드의 항목을 추상화하는 형식과 해당 피드를 특정 형식으로 변환할 수 있는 형식이 포함되어 있습니다. System.Syndication.SyndicationFeed 형식은 배포 피드의 형식 중립적인 표현입니다. SyndicationFeed에는 SyndicationItem 개체의 목록이 들어 있습니다. SyndicationItem 개체는 피드의 항목에 대한 표현일 뿐이므로 SyndicationItem 개체 집합이 없는 SyndicationFeed는 빈 콩깍지와 같습니다.
SyndicationFeed에 SyndicationItem 개체 집합이 채워지면 SyndicationFeedFormatter<T>가 해당 피드를 특정 형식으로 변환할 수 있습니다. SyndicationFeedFormatter<T>에서는 Rss20FeedFormatter와 Atom10FeedFormatter, 두 가지 형식이 파생됩니다. 이름에서 짐작할 수 있듯이 이 두 형식은 SyndicationFeed 인스턴스를 각각 RSS 2.0 형식과 ATOM 1.0 형식으로 변환합니다.

SyndicationFeed 생성
SyndicationFeed 개체는 두 가지 방법으로 만들 수 있습니다. 인스턴스화한 후 멤버를 수동으로 채우거나, 기존 피드로 전체 SyndicationFeed를 채울 수 있습니다. 두 방법 모두 수행하기 쉽고 개발자는 특정 연결 형식에 신경 쓸 필요가 없습니다. 다음 코드는 SyndicationFeed 개체를 수동으로 만드는 방법을 보여 줍니다.
SyndicationFeed feed = new SyndicationFeed();
feed.Title.Text = "The Cybertopian Chronicle";
Title은 설정 가능한 여러 가지 속성 중 하나일 뿐이므로 더 자세한 내용은 설명서를 참조하십시오.
기존 피드를 읽어 해당 피드의 콘텐츠를 기반으로 특정 작업을 수행해야 하는 경우가 많습니다. 새로운 배포 API에서는 SyndicationFeed를 인스턴스화하고 기존 피드를 사용하여 자동으로 상태를 채울 수 있습니다. 기존 피드, 또는 이 피드를 읽도록 설정된 XmlReader의 URI만 시작하면 됩니다. 다음 코드는 웹의 기존 피드에 연결하여 일부 정보를 추출하는 방법을 보여 줍니다.
Uri feedUri = new Uri("http://blogs.msdn.com/justinjsmith/atom.xml");
SyndicationFeed feed = SyndicationFeed.Load(feedUri);
Console.WriteLine(feed.Title.Text);

// "The Cybertopian Chronicle" 출력
SyndicationItem 형식에는 35개 이상의 멤버가 있습니다. 이러한 멤버 중 다수는 항목 식별자, 마지막 업데이트 시간, 게시 날짜, 제목, 실제 콘텐츠 등의 필드를 설정 또는 검색하는 것과 관련된 속성입니다. SyndicationItem에 저장된 콘텐츠를 손쉽게 확장할 수 있게 해주는 멤버도 많이 있습니다. RSS와 ATOM에는 많은 확장이 있으며(Microsoft Simple List Extensions, Yahoo Media RSS, GeoRSS 등), SyndicationFeed와 SyndicationItem 모두 기존 RSS 또는 ATOM 확장을 포함할 수 있습니다.
피드에는 많은 항목이 포함될 수 있고, 이러한 항목들을 한 번에 로드하는 것은 대용량 피드에서 적절하지 않습니다. SyndicationFeed는 SyndicationItem 개체 집합을 IEnumerable<SyndicationItem>로 제공하여 이러한 문제를 해결합니다. 이러한 구현은 .NET Framework 2.0의 반복기 기능을 활용하므로 많은 수의 SyndicationItem 개체를 손쉽게 처리할 수 있습니다. 또한 LINQ를 사용하여 SyndicationItem 개체 집합을 반복할 수도 있습니다. 이렇게 하면 피드에서 정보를 추출하는 데 필요한 코드의 양이 대폭 감소됩니다.
배포 API는 SyndicationFeed를 RSS 2.0 및 ATOM 1.0 형식으로 변환하는 여러 가지 형식을 정의합니다. 사실 SyndicationFeed를 하나 만들어 SyndicationItem 개체로 채운 다음 RSS와 ATOM으로 제공할 수도 있습니다. 그림 5는 ATOM 1.0 피드를 검색하여 RSS 2.0으로 변환하고 새로운 RSS 표현을 콘솔에 출력하는 방법을 보여 줍니다.
// ATOM 피드 읽기
Uri feedUri = new Uri("http://blogs.msdn.com/justinjsmith/atom.xml");
SyndicationFeed feed = SyndicationFeed.Load(feedUri);

// RSS로 변환
Rss20FeedFormatter formatter = new Rss20FeedFormatter(feed);
XmlWriter writer = XmlWriter.Create(Console.Out, null);

// 콘솔로 쓰기
formatter.WriteTo(writer);
writer.Flush();

배포 API를 WCF의 HTTP 프로그래밍 모델과 함께 사용하면 사용자 지정된 URI의 피드를 제공하고 해당 URI의 구성에 따라 RSS 또는 ATOM을 반환할 수 있습니다. 그림 6은 수신된 HTTP GET의 쿼리 문자열 매개 변수를 사용하여 RSS 또는 ATOM 피드를 반환하는 작업을 서비스 계약에서 정의하는 방법을 보여 줍니다. 작업 계약에 SyndicationFeedFormatter<SyndicationFeed>가 사용된 것을 볼 수 있습니다. Rss20FeedFormatter와 Atom10FeedFormatter는 모두 SyndicationFeedFormatter<TSyndicationFeed>에서 파생됩니다.
[ServiceKnownType(typeof(Atom10FeedFormatter))]
[ServiceKnownType(typeof(Rss20FeedFormatter))]
[ServiceContract]
interface IPictureService {
  [OperationContract]
  [WebGet(UriTemplate="Pictures?format={format}")]
  SyndicationFeedFormatter<SyndicationFeed> Feed(String format);
}

class PictureService : IPictureService {

  public SyndicationFeedFormatter<SyndicationFeed> Feed(String format){
    // 배포 피드 만들기
    SyndicationFeed feed = new SyndicationFeed();

    // 피드에 항목 추가(생략됨)

    // 인수를 확인하고 올바른 형식으로 반환
    if(format.ToLower() == "rss"){
      return new Rss20FeedFormatter(feed);
    }
    return new Atom10FeedFormatter(feed);

  }

}


결론
요약하자면, 지금까지 HTTP 전송에 대한 몇 가지 기본 사항, 이러한 기본 사항과 웹 원칙 간의 관계, WCF를 사용하여 이러한 원칙을 응용 프로그램에 적용하는 방법, 새로운 배포 API를 사용하여 RSS 및 ATOM 피드를 서비스하고 소비하는 방법 등을 살펴보았습니다. www.cloudsamples.net/pictureservices에서 PictureServices라는 샘플 응용 프로그램을 실행해 보면 이러한 새로운 기능이 실제로 어떻게 작동하는지 확인할 수 있습니다. 이 샘플을 온라인으로 실행하고 소스 코드를 탐색하고 전체 샘플을 다운로드할 수 있습니다. 그림 7은 작동 중인 PictureServices를 보여 줍니다.
그림 7 The PictureServices Feed (더 크게 보려면 이미지를 클릭하십시오.)
간단히 말해, PictureServices는 로컬 컴퓨터 또는 Flickr 피드에서 사진을 검색할 수 있는 응용 프로그램입니다. 이 응용 프로그램은 단순한 공급자 모델을 사용하며, 현재 공급자는 Windows 데스크톱 검색, 파일 시스템의 폴더, 그리고 Flickr입니다. PictureServices는 공급자에서 파일을 검색하면 해당 사진을 배포하고 로컬로 서비스합니다. 사용자는 브라우저에서 피드를 클릭하고 개별 사진을 검색할 수 있습니다. 샘플에는 이 외에도 많은 내용이 포함되어 있으므로 잘 살펴보시기 바랍니다. 기사에 언급된 기술에 대한 자세한 내용은 이 기사의 "추가 리소스" 보충 기사를 참조하십시오.

Justin Smith는 Microsoft에서 웹 서비스 전문 기술 전도사로 일하고 있습니다. WCF 및 BizTalk 서비스가 전문 분야인 Justin은 Inside Windows Communication Foundation(Microsoft Press, 2007)의 저자이자 소프트웨어 개발 회의에 자주 서는 연설자이기도 합니다. 저자의 블로그 blogs.msdn.com/justinjsmith를 방문해 보십시오.

출처 : http://msdn.microsoft.com/ko-kr/magazine/cc135976.aspx
posted by Sunny's
2010. 3. 9. 14:31 .NET Framework
1. HTTP Error 404.3 이 나옴.
2. IIS7에 .svc에 대한 mime이 등록되어 있지 않은 문제.

실행창에서 "\%windir%\Microsoft.NET\Framework\v3.0\Windows Communication Foundation\ServiceModelReg.exe -i" 를 실행.
http://olsv.blogspot.com/2009/05/registering-svc-mime-map-on-iis-for-wcf.html
posted by Sunny's
2010. 3. 4. 13:20 .NET Framework

Summary

When installing NetAdvantage on your machine, you may run into an error that says either “Error 1606. Could not access network location %SystemDrive%\inetpub\wwwroot\” or “Error 1606. Could not access network location \inetpub\wwwroot\”
.

Additional Information

To work around this error, a registry key needs to be modified. Please note that Infragistics strongly recommends you back up your registry before making any changes.

1) Type "regedit" in the Run From Start Menu dialog box to open the "Registry Editor".
2) Find the following key: HKEY_LOCAL_MACHINE\SOFTWARE\Microsoft\InetStp\PathWWWRoot
3) Change the value of this registry key from "%SystemDrive%\inetpub\wwwroot" or " \inetpub\wwwroot\" to "C:\inetpub\wwwroot". If your default website in IIS is instead stored in a different location, set the value of this registry key to that path instead.

출처 : http://devcenter.infragistics.com/Support/KnowledgeBaseArticle.aspx?ArticleID=10058

posted by Sunny's
2010. 2. 22. 19:23 .NET Framework

Versions Supported:  2008,2010

Keyboard Shortcut:  N/A

Menu Command:  File -> Export Template.


Are you always adding the same extra files to project templates?  Ever just wish you could have it all just "be" there?  Well you can with the Export Template Wizard!  It slices, it dices, er.okay it just makes templates but it really rocks!  How do you use it?  Just set up an existing project template the way you want it.  In this example, I always want a larry, curly, and moe class files with my console apps:


image_thumb 


Now go to File -> Export Template.  (NOTE: it will prompt you to save changes if you haven't already)

image_thumb2


You get the Export Template Wizard.  The first screen is where you choose to make a Project or Item template:

image_thumb5


I selected "Project template" for this example then clicked on "Next >" to get this dialog:

image_thumb11


Pay particular attention to the two choices at the bottom:  "Automatically import the template into Visual Studio" and "Display an explorer window on the output files folder".


Clicking "Finish" opens up my Exported Templates (output) folder:

image_thumb14


And when I go to create a new application, I see this in the dialog:

image_thumb19


And there you go:  instant template! 

Obviously there is lot more you can do and I would suggest starting here for more information on how to leverage this feature:

http://msdn.microsoft.com/en-us/library/ms185318.aspx

posted by Sunny's
2009. 12. 29. 14:23 .NET Framework

# 프로그램 소스 파일

해당 클래스로 양력을 음력으로 변환할 수 있는 범위는 양력 1800-01-25 ~ 2050-01-22 까지이고,

음력을 양력으로 변환할 수 있는 범위는 음력 1800-01-01 ~ 2049-12-08 까지이다.


다음 링크에서 c로 구현된 소스를 구해 일부 버그를 수정하고 변환 범위 확장 및 양력->음력 변환 기능 추가, 음력 간지 계산 기능을 추가해서 c#으로 다시 작성했다.


링크(http://openwrld.egloos.com/1417170)


천문연구원의 음력/양력 변환 데이터와 대조 확인 완료했으며 위 변환 범위 내에서 문제 없음을 확인했다.


변환 클래스(Lunar)의 코드는 다음과 같다.


using System;
using System.Collections.Generic;
using System.Text;

namespace Solar2Lunar
{
/// <summary>
/// 양력<->음력 변환 클래스<br/>
/// 변환이 가능한 양력 범위(1800-01-25 ~ 2050-01-22)<br/>
/// 변환이 가능한 음력 범위(1800-01-01 ~ 2049-12-08)<br/>
/// 다음 링크에 있는 알고리즘을 C#코드로 수정해서 작성했음을 밝힌다.<br/>
/// http://openwrld.egloos.com/1417170<br/>
/// </summary>
public class Lunar
{
#region 음력데이터

/// <summary>
/// 음력 달의 특징<br/>
/// 1: 평달 (작은달)<br/>
/// 2: 평달 (큰달)<br/>
/// 3: 윤달 (작은달 + 작은달)<br/>
/// 4: 윤달 (작은달 + 큰달)<br/>
/// 5: 윤달 (큰달 + 작은달)<br/>
/// 6: 윤달 (큰달 + 큰달)<br/>
/// 작은달=29, 큰달=30<br/>
readonly int[,] LUNAR_FEATURES = {{2,1,2,5,2,1,2,1,2,1,2,1}, // 1800
{1,2,2,1,2,1,2,2,1,2,1,2}, // 1801
{1,1,2,1,2,1,2,2,2,1,2,1}, // 1802
{2,3,2,1,2,1,2,2,1,2,2,1}, // 1803
{2,1,1,2,1,1,2,2,1,2,2,2}, // 1804
{1,2,1,2,1,3,2,1,2,2,2,1}, // 1805
{2,2,1,2,1,1,1,2,1,2,2,1}, // 1806
{2,2,2,1,1,2,1,1,2,1,2,2}, // 1807
{1,2,2,1,5,2,1,2,1,1,2,1}, // 1808
{2,2,1,2,2,1,2,1,2,1,1,2}, // 1809
{1,2,1,2,2,1,2,2,1,2,1,2}, // 1810
{1,1,5,2,1,2,2,1,2,2,1,2}, // 1811
{1,1,2,1,2,1,2,1,2,2,2,1}, // 1812
{2,1,2,1,1,1,2,1,2,2,2,1}, // 1813
{2,5,2,1,1,1,2,1,2,2,1,2}, // 1814
{2,2,1,1,2,1,1,2,1,2,1,2}, // 1815
{2,2,1,2,1,5,1,2,1,2,1,2}, // 1816
{2,1,2,2,1,2,1,2,1,1,2,1}, // 1817
{2,1,2,2,1,2,2,1,2,1,1,2}, // 1818
{1,2,1,5,2,2,1,2,2,1,2,1}, // 1819
{1,2,1,2,1,2,1,2,2,2,1,2}, // 1820
{1,1,2,1,1,2,1,2,2,2,1,2}, // 1821
{2,1,5,1,1,2,1,2,2,1,2,2}, // 1822
{2,1,2,1,1,1,2,1,2,1,2,2}, // 1823
{2,1,2,1,2,1,4,1,2,1,2,2}, // 1824
{2,1,2,1,2,1,1,2,1,2,1,2}, // 1825
{2,1,2,2,1,2,1,1,2,1,2,1}, // 1826
{2,1,2,2,4,1,2,1,2,1,2,1}, // 1827
{2,1,2,1,2,2,1,2,1,2,1,2}, // 1828
{1,2,1,2,1,2,1,2,2,1,2,2}, // 1829
{1,1,2,3,2,1,2,2,1,2,2,2}, // 1830
{1,1,2,1,1,2,1,2,1,2,2,2}, // 1831
{1,2,1,2,1,1,2,1,5,2,2,2}, // 1832
{1,2,1,2,1,1,2,1,2,1,2,2}, // 1833
{1,2,2,1,2,1,1,2,1,2,1,2}, // 1834
{1,2,2,1,2,5,1,2,1,2,1,2}, // 1835
{1,2,1,2,2,1,2,1,2,1,2,1}, // 1836
{2,1,2,1,2,1,2,2,1,2,1,2}, // 1837
{1,2,1,5,1,2,2,1,2,2,1,2}, // 1838
{1,2,1,1,2,1,2,1,2,2,2,1}, // 1839
{2,1,2,1,1,2,1,2,1,2,2,2}, // 1840
{1,2,4,1,1,2,1,2,1,2,2,1}, // 1841
{2,2,1,2,1,1,2,1,2,1,2,1}, // 1842
{2,2,2,1,2,1,4,1,2,1,2,1}, // 1843
{2,2,1,2,1,2,1,2,1,2,1,2}, // 1844
{1,2,1,2,2,1,2,1,2,1,2,1}, // 1845
{2,1,2,1,5,2,1,2,2,1,2,1}, // 1846
{2,1,1,2,1,2,1,2,2,2,1,2}, // 1847
{1,2,1,1,2,1,2,1,2,2,2,1}, // 1848
{2,1,2,3,2,1,2,1,2,1,2,2}, // 1849
{2,1,2,1,1,2,1,1,2,2,1,2}, // 1850
{2,2,1,2,1,1,2,3,2,1,2,2}, // 1851
{2,1,2,2,1,1,2,1,2,1,1,2}, // 1852
{2,1,2,2,1,2,1,2,1,2,1,2}, // 1853
{1,2,1,2,1,2,5,2,1,2,1,2}, // 1854
{1,1,2,1,2,2,1,2,2,1,2,1}, // 1855
{2,1,1,2,1,2,1,2,2,2,1,2}, // 1856
{1,2,1,1,5,2,1,2,1,2,2,2}, // 1857
{1,2,1,1,2,1,1,2,2,1,2,2}, // 1858
{2,1,2,1,1,2,1,1,2,1,2,2}, // 1859
{2,1,6,1,1,2,1,1,2,1,2,2}, // 1860
{1,2,2,1,2,1,2,1,2,1,1,2}, // 1861
{2,1,2,1,2,2,1,5,2,1,1,2}, // 1862
{1,2,2,1,2,1,2,2,1,2,1,2}, // 1863
{1,1,2,1,2,1,2,2,1,2,2,1}, // 1864
{2,1,1,2,4,1,2,2,1,2,2,1}, // 1865
{2,1,1,2,1,1,2,2,1,2,2,2}, // 1866
{1,2,1,1,2,1,1,2,1,2,2,2}, // 1867
{1,2,2,3,2,1,1,2,1,2,2,1}, // 1868
{2,2,2,1,1,2,1,1,2,1,2,1}, // 1869
{2,2,2,1,2,1,2,1,1,5,2,1}, // 1870
{2,2,1,2,2,1,2,1,2,1,1,2}, // 1871
{1,2,1,2,2,1,2,1,2,2,1,2}, // 1872
{1,1,2,1,2,4,2,1,2,2,1,2}, // 1873
{1,1,2,1,2,1,2,1,2,2,2,1}, // 1874
{2,1,1,2,1,1,2,1,2,2,2,1}, // 1875
{2,2,1,1,5,1,2,1,2,2,1,2}, // 1876
{2,2,1,1,2,1,1,2,1,2,1,2}, // 1877
{2,2,1,2,1,2,1,1,2,1,2,1}, // 1878
{2,2,4,2,1,2,1,1,2,1,2,1}, // 1879
{2,1,2,2,1,2,2,1,2,1,1,2}, // 1880
{1,2,1,2,1,2,5,2,2,1,2,1}, // 1881
{1,2,1,2,1,2,1,2,2,1,2,2}, // 1882
{1,1,2,1,1,2,1,2,2,2,1,2}, // 1883
{2,1,1,2,3,2,1,2,2,1,2,2}, // 1884
{2,1,1,2,1,1,2,1,2,1,2,2}, // 1885
{2,1,2,1,2,1,1,2,1,2,1,2}, // 1886
{2,2,1,5,2,1,1,2,1,2,1,2}, // 1887
{2,1,2,2,1,2,1,1,2,1,2,1}, // 1888
{2,1,2,2,1,2,1,2,1,2,1,2}, // 1889
{1,5,2,1,2,2,1,2,1,2,1,2}, // 1890
{1,2,1,2,1,2,1,2,2,1,2,2}, // 1891
{1,1,2,1,1,5,2,2,1,2,2,2}, // 1892
{1,1,2,1,1,2,1,2,1,2,2,2}, // 1893
{1,2,1,2,1,1,2,1,2,1,2,2}, // 1894
{2,1,2,1,5,1,2,1,2,1,2,1}, // 1895
{2,2,2,1,2,1,1,2,1,2,1,2}, // 1896
{1,2,2,1,2,1,2,1,2,1,2,1}, // 1897
{2,1,5,2,2,1,2,1,2,1,2,1}, // 1898
{2,1,2,1,2,1,2,2,1,2,1,2}, // 1899
{1,2,1,1,2,1,2,5,2,2,1,2}, // 1900
{1,2,1,1,2,1,2,1,2,2,2,1}, // 1901
{2,1,2,1,1,2,1,2,1,2,2,2}, // 1902
{1,2,1,2,3,2,1,1,2,2,1,2}, // 1903
{2,2,1,2,1,1,2,1,1,2,2,1}, // 1904
{2,2,1,2,2,1,1,2,1,2,1,2}, // 1905
{1,2,2,4,1,2,1,2,1,2,1,2}, // 1906
{1,2,1,2,1,2,2,1,2,1,2,1}, // 1907
{2,1,1,2,2,1,2,1,2,2,1,2}, // 1908
{1,5,1,2,1,2,1,2,2,2,1,2}, // 1909
{1,2,1,1,2,1,2,1,2,2,2,1}, // 1910
{2,1,2,1,1,5,1,2,2,1,2,2}, // 1911
{2,1,2,1,1,2,1,1,2,2,1,2}, // 1912
{2,2,1,2,1,1,2,1,1,2,1,2}, // 1913
{2,2,1,2,5,1,2,1,2,1,1,2}, // 1914
{2,1,2,2,1,2,1,2,1,2,1,2}, // 1915
{1,2,1,2,1,2,2,1,2,1,2,1}, // 1916
{2,3,2,1,2,2,1,2,2,1,2,1}, // 1917
{2,1,1,2,1,2,1,2,2,2,1,2}, // 1918
{1,2,1,1,2,1,5,2,2,1,2,2}, // 1919
{1,2,1,1,2,1,1,2,2,1,2,2}, // 1920
{2,1,2,1,1,2,1,1,2,1,2,2}, // 1921
{2,1,2,2,3,2,1,1,2,1,2,2}, // 1922
{1,2,2,1,2,1,2,1,2,1,1,2}, // 1923
{2,1,2,1,2,2,1,2,1,2,1,1}, // 1924
{2,1,2,5,2,1,2,2,1,2,1,2}, // 1925
{1,1,2,1,2,1,2,2,1,2,2,1}, // 1926
{2,1,1,2,1,2,1,2,2,1,2,2}, // 1927
{1,5,1,2,1,1,2,2,1,2,2,2}, // 1928
{1,2,1,1,2,1,1,2,1,2,2,2}, // 1929
{1,2,2,1,1,5,1,2,1,2,2,1}, // 1930
{2,2,2,1,1,2,1,1,2,1,2,1}, // 1931
{2,2,2,1,2,1,2,1,1,2,1,2}, // 1932
{1,2,2,1,6,1,2,1,2,1,1,2}, // 1933
{1,2,1,2,2,1,2,2,1,2,1,2}, // 1934
{1,1,2,1,2,1,2,2,1,2,2,1}, // 1935
{2,1,4,1,2,1,2,1,2,2,2,1}, // 1936
{2,1,1,2,1,1,2,1,2,2,2,1}, // 1937
{2,2,1,1,2,1,4,1,2,2,1,2}, // 1938
{2,2,1,1,2,1,1,2,1,2,1,2}, // 1939
{2,2,1,2,1,2,1,1,2,1,2,1}, // 1940
{2,2,1,2,2,4,1,1,2,1,2,1}, // 1941
{2,1,2,2,1,2,2,1,2,1,1,2}, // 1942
{1,2,1,2,1,2,2,1,2,2,1,2}, // 1943
{1,1,2,4,1,2,1,2,2,1,2,2}, // 1944
{1,1,2,1,1,2,1,2,2,2,1,2}, // 1945
{2,1,1,2,1,1,2,1,2,2,1,2}, // 1946
{2,5,1,2,1,1,2,1,2,1,2,2}, // 1947
{2,1,2,1,2,1,1,2,1,2,1,2}, // 1948
{2,2,1,2,1,2,3,2,1,2,1,2}, // 1949
{2,1,2,2,1,2,1,1,2,1,2,1}, // 1950
{2,1,2,2,1,2,1,2,1,2,1,2}, // 1951
{1,2,1,2,4,2,1,2,1,2,1,2}, // 1952
{1,2,1,1,2,2,1,2,2,1,2,2}, // 1953
{1,1,2,1,1,2,1,2,2,1,2,2}, // 1954
{2,1,4,1,1,2,1,2,1,2,2,2}, // 1955
{1,2,1,2,1,1,2,1,2,1,2,2}, // 1956
{2,1,2,1,2,1,1,5,2,1,2,2}, // 1957
{1,2,2,1,2,1,1,2,1,2,1,2}, // 1958
{1,2,2,1,2,1,2,1,2,1,2,1}, // 1959
{2,1,2,1,2,5,2,1,2,1,2,1}, // 1960
{2,1,2,1,2,1,2,2,1,2,1,2}, // 1961
{1,2,1,1,2,1,2,2,1,2,2,1}, // 1962
{2,1,2,3,2,1,2,1,2,2,2,1}, // 1963
{2,1,2,1,1,2,1,2,1,2,2,2}, // 1964
{1,2,1,2,1,1,2,1,1,2,2,2}, // 1965
{1,2,5,2,1,1,2,1,1,2,2,1}, // 1966
{2,2,1,2,2,1,1,2,1,2,1,2}, // 1967
{1,2,2,1,2,1,5,2,1,2,1,2}, // 1968
{1,2,1,2,1,2,2,1,2,1,2,1}, // 1969
{2,1,1,2,2,1,2,1,2,2,1,2}, // 1970
{1,2,1,1,5,2,1,2,2,2,1,2}, // 1971
{1,2,1,1,2,1,2,1,2,2,2,1}, // 1972
{2,1,2,1,1,2,1,1,2,2,2,1}, // 1973
{2,2,1,5,1,2,1,1,2,2,1,2}, // 1974
{2,2,1,2,1,1,2,1,1,2,1,2}, // 1975
{2,2,1,2,1,2,1,5,2,1,1,2}, // 1976
{2,1,2,2,1,2,1,2,1,2,1,1}, // 1977
{2,2,1,2,1,2,2,1,2,1,2,1}, // 1978
{2,1,1,2,1,6,1,2,2,1,2,1}, // 1979
{2,1,1,2,1,2,1,2,2,1,2,2}, // 1980
{1,2,1,1,2,1,1,2,2,1,2,2}, // 1981
{2,1,2,3,2,1,1,2,2,1,2,2}, // 1982
{2,1,2,1,1,2,1,1,2,1,2,2}, // 1983
{2,1,2,2,1,1,2,1,1,5,2,2}, // 1984
{1,2,2,1,2,1,2,1,1,2,1,2}, // 1985
{1,2,2,1,2,2,1,2,1,2,1,1}, // 1986
{2,1,2,2,1,5,2,2,1,2,1,2}, // 1987
{1,1,2,1,2,1,2,2,1,2,2,1}, // 1988
{2,1,1,2,1,2,1,2,2,1,2,2}, // 1989
{1,2,1,1,5,1,2,2,1,2,2,2}, // 1990
{1,2,1,1,2,1,1,2,1,2,2,2}, // 1991
{1,2,2,1,1,2,1,1,2,1,2,2}, // 1992
{1,2,5,2,1,2,1,1,2,1,2,1}, // 1993
{2,2,2,1,2,1,2,1,1,2,1,2}, // 1994
{1,2,2,1,2,2,1,5,2,1,1,2}, // 1995
{1,2,1,2,2,1,2,1,2,2,1,2}, // 1996
{1,1,2,1,2,1,2,2,1,2,2,1}, // 1997
{2,1,1,2,3,2,2,1,2,2,2,1}, // 1998
{2,1,1,2,1,1,2,1,2,2,2,1}, // 1999
{2,2,1,1,2,1,1,2,1,2,2,1}, // 2000
{2,2,2,3,2,1,1,2,1,2,1,2}, // 2001
{2,2,1,2,1,2,1,1,2,1,2,1}, // 2002
{2,2,1,2,2,1,2,1,1,2,1,2}, // 2003
{1,5,2,2,1,2,1,2,1,2,1,2}, // 2004
{1,2,1,2,1,2,2,1,2,2,1,1}, // 2005
{2,1,2,1,2,1,5,2,2,1,2,2}, // 2006
{1,1,2,1,1,2,1,2,2,2,1,2}, // 2007
{2,1,1,2,1,1,2,1,2,2,1,2}, // 2008
{2,2,1,1,5,1,2,1,2,1,2,2}, // 2009
{2,1,2,1,2,1,1,2,1,2,1,2}, // 2010
{2,1,2,2,1,2,1,1,2,1,2,1}, // 2011
{2,1,6,2,1,2,1,1,2,1,2,1}, // 2012
{2,1,2,2,1,2,1,2,1,2,1,2}, // 2013
{1,2,1,2,1,2,1,2,5,2,1,2}, // 2014
{1,2,1,1,2,1,2,2,2,1,2,1}, // 2015
{2,1,2,1,1,2,1,2,2,1,2,2}, // 2016
{1,2,1,2,3,2,1,2,1,2,2,2}, // 2017
{1,2,1,2,1,1,2,1,2,1,2,2}, // 2018
{2,1,2,1,2,1,1,2,1,2,1,2}, // 2019
{2,1,2,5,2,1,1,2,1,2,1,2}, // 2020
{1,2,2,1,2,1,2,1,2,1,2,1}, // 2021
{2,1,2,1,2,2,1,2,1,2,1,2}, // 2022
{1,5,2,1,2,1,2,2,1,2,1,2}, // 2023
{1,2,1,1,2,1,2,2,1,2,2,1}, // 2024
{2,1,2,1,1,5,2,1,2,2,2,1}, // 2025
{2,1,2,1,1,2,1,2,1,2,2,2}, // 2026
{1,2,1,2,1,1,2,1,1,2,2,2}, // 2027
{1,2,2,1,5,1,2,1,1,2,2,1}, // 2028
{2,2,1,2,2,1,1,2,1,1,2,2}, // 2029
{1,2,1,2,2,1,2,1,2,1,2,1}, // 2030
{2,1,5,2,1,2,2,1,2,1,2,1}, // 2031
{2,1,1,2,1,2,2,1,2,2,1,2}, // 2032
{1,2,1,1,2,1,2,1,2,2,5,2}, // 2033
{1,2,1,1,2,1,2,1,2,2,2,1}, // 2034
{2,1,2,1,1,2,1,1,2,2,1,2}, // 2035
{2,2,1,2,1,4,1,1,2,2,1,2}, // 2036
{2,2,1,2,1,1,2,1,1,2,1,2}, // 2037
{2,2,1,2,1,2,1,2,1,1,2,1}, // 2038
{2,2,1,2,5,2,1,2,1,2,1,1}, // 2039
{2,1,2,2,1,2,2,1,2,1,2,1}, // 2040
{2,1,1,2,1,2,2,1,2,2,1,2}, // 2041
{1,5,1,2,1,2,1,2,2,1,2,2}, // 2042
{1,2,1,1,2,1,1,2,2,1,2,2}, // 2043
{2,1,2,1,1,2,3,2,1,2,2,2}, // 2044
{2,1,2,1,1,2,1,1,2,1,2,2}, // 2045
{2,1,2,2,1,1,2,1,1,2,1,2}, // 2046
{2,1,2,2,4,1,2,1,1,2,1,2}, // 2047
{1,2,2,1,2,2,1,2,1,2,1,1}, // 2048
{2,1,2,1,2,2,1,2,2,1,2,1}, // 2049
};
#endregion

/// <summary>
/// 음력 달의 특징<br/>
/// 0: 평달 (작은달)<br/>
/// 1: 평달 (큰달)<br/>
/// 2: 윤달 (작은달 + 작은달)<br/>
/// 3: 윤달 (작은달 + 큰달)<br/>
/// 4: 윤달 (큰달 + 작은달)<br/>
/// 5: 윤달 (큰달 + 큰달)<br/>
/// 작은달=29, 큰달=30<br/>
/// </summary>
private readonly int[] DAYS_OF_LUNAR_FEATURES = { 29, 30, 58, 59, 59, 60 };
private readonly int[] NORMAL_DAYS_OF_LEAP_MONTH = { 0, 0, 29, 29, 30, 30 };

/// <summary>
/// 양력 달의 날 수
/// </summary>
private readonly int[] SOLAR_DAYS_OF_MONTH = { 31, 28, 31, 30, 31, 30, 31, 31, 30, 31, 30, 31 };

/// <summary>
/// 10간
/// </summary>
private readonly string[] GAN = { "갑", "을", "병", "정", "무", "기", "경", "신", "임", "계" };

/// <summary>
/// 12지
/// </summary>
private readonly string[] JI = { "자", "축", "인", "묘", "진", "사", "오", "미", "신", "유", "술", "해" };

// 1800-01-25 (토) 1800-01-01 경신(庚申)년 무인(戊寅)월 갑인(甲寅)일
private readonly int[] SOLAR_BASIC_DATE = { 1800, 1, 25 }; // 년, 월, 일
private readonly int[] BASIC_GANJI = { 6, 8, 4, 2, 0, 2 }; // 경신년, 무인월, 갑인일


/// <summary>
/// 양력 달의 날 수 조회<br/>
/// 윤년일 경우 2월은 29일
/// </summary>
/// <param name="year"></param>
/// <param name="month"></param>
/// <returns></returns>
public int GetSolarDaysOfMonth(int year, int month)
{ // 월별 일수 계산
if (month != 2)
return SOLAR_DAYS_OF_MONTH[month - 1];

if (IsLeapYear(year))
return 29;
else
return 28;
}

/// <summary>
/// 윤년체크
/// </summary>
/// <param name="year"></param>
/// <returns></returns>
public bool IsLeapYear(int year)
{
if ((year % 400 == 0) || ((year % 100 != 0) && (year % 4 == 0)))
return true;
else
return false;
}

/// <summary>
/// 양력 해의 날 수 조회<br/>
/// 윤년일 경우 366일, 평년일 경우 365일
/// </summary>
/// <param name="year"></param>
/// <returns></returns>
public int GetSolarDaysOfYear(int year)
{
if (IsLeapYear(year))
return 366;
else
return 365;
}

/// <summary>
/// 특정 일자의 양력 날 수 조회
/// </summary>
/// <param name="year"></param>
/// <param name="month"></param>
/// <param name="day"></param>
/// <returns></returns>
public int GetSolarDays(int year, int month, int day)
{
int ret = 0;

for (int i = SOLAR_BASIC_DATE[0]; i < year; i++)
ret += GetSolarDaysOfYear(i);

for (int i = 1; i < month; i++)
ret += GetSolarDaysOfMonth(year, i);

ret += day;

for (int i = 1; i < SOLAR_BASIC_DATE[1]; i++)
ret -= GetSolarDaysOfMonth(SOLAR_BASIC_DATE[0], i);

ret -= SOLAR_BASIC_DATE[2];

return ret;
}

/// <summary>
/// 특정 일자의 음력 날 수 조회
/// </summary>
/// <param name="ly"></param>
/// <param name="lm"></param>
/// <param name="ld"></param>
/// <param name="leapMonth"></param>
/// <returns></returns>
public int GetLunarDays(int ly, int lm, int ld, bool leapMonth)
{
int ret = 0;

for (int i = SOLAR_BASIC_DATE[0]; i < ly; i++)
ret += GetLunarDaysOfYear(i);

for (int i = 1; i < lm; i++)
ret += GetLunarDaysOfMonth(ly, i);

// 윤달일 경우 동월 평달 날짜 더해 줌
if (leapMonth)
{
ret += NORMAL_DAYS_OF_LEAP_MONTH[LUNAR_FEATURES[ly - SOLAR_BASIC_DATE[0], lm - 1] - 1];
}

ret += ld;

return ret;
}

/// <summary>
/// 양력을 음력으로 변환
/// </summary>
/// <param name="year"></param>
/// <param name="month"></param>
/// <param name="day"></param>
/// <returns></returns>
public string ToLunarDate(int year, int month, int day)
{

int ly = 0, lm = 0, ld = 0;
return ToLunarDate(GetSolarDays(year, month, day), out ly, out lm, out ld);
}

/// <summary>
/// 양력을 음력으로 변환
/// </summary>
/// <param name="solarDays"></param>
/// <param name="ly"></param>
/// <param name="lm"></param>
/// <param name="ld"></param>
/// <returns></returns>
public string ToLunarDate(int solarDays, out int ly, out int lm, out int ld)
{
int lunarDays = 0;
ly = 0;
lm = 0;
ld = 0;
for (int y = 0; y < LUNAR_FEATURES.GetLength(0); y++)
{
for (int m = 0; m < 12; m++)
{
int lday = DAYS_OF_LUNAR_FEATURES[LUNAR_FEATURES[y, m] - 1];

if (lunarDays + lday > solarDays)
{
ly = y + SOLAR_BASIC_DATE[0];
lm = m + 1;
ld = solarDays - lunarDays + 1;
if (ld > NORMAL_DAYS_OF_LEAP_MONTH[LUNAR_FEATURES[y, m] - 1])
ld -= NORMAL_DAYS_OF_LEAP_MONTH[LUNAR_FEATURES[y, m] - 1];
return string.Format("{0:0000}-{1:00}-{2:00}", ly, lm, ld);
}

lunarDays += lday;
}
}

return string.Format("{0:0000}-{1:00}-{2:00}", ly, lm, ld);
}

/// <summary>
/// 음력을 양력으로 변환
/// </summary>
/// <param name="ly"></param>
/// <param name="lm"></param>
/// <param name="ld"></param>
/// <param name="leapMonth"></param>
/// <returns></returns>
public string ToSolarDate(int ly, int lm, int ld, bool leapMonth)
{
int year = 0, month = 0, day = 0;
return ToLunarDate(GetLunarDays(ly, lm, ld, leapMonth), out year, out month, out day);
}


/// <summary>
/// 음력을 양력으로 변환
/// </summary>
/// <param name="lunarDays"></param>
/// <param name="year"></param>
/// <param name="month"></param>
/// <param name="day"></param>
/// <returns></returns>
public string ToSolarDate(int lunarDays, out int year, out int month, out int day)
{
int solarDays = 0;
year = 0;
month = 0;
day = 0;

lunarDays += SOLAR_BASIC_DATE[2] - 1;

for (int y = 0; y < LUNAR_FEATURES.GetLength(0); y++)
{
for (int m = 0; m < 12; m++)
{
int lday = GetSolarDaysOfMonth(y + SOLAR_BASIC_DATE[0], m + 1);

if (solarDays + lday >= lunarDays)
{
year = y + SOLAR_BASIC_DATE[0];
month = m + 1;
day = lunarDays - solarDays;

return string.Format("{0:0000}-{1:00}-{2:00}", year, month, day);
}

solarDays += lday;
}
}
return string.Format("{0:0000}-{1:00}-{2:00}", year, month, day);
}

/// <summary>
/// 음력 연도의 간지 문자열 조회
/// </summary>
/// <param name="ly"></param>
/// <returns></returns>
public string GetYearGanji(int ly)
{
string gan = GAN[(ly - SOLAR_BASIC_DATE[0] + BASIC_GANJI[0]) % 10];
string ji = JI[(ly - SOLAR_BASIC_DATE[0] + BASIC_GANJI[1]) % 12];
return gan + ji;
}

/// <summary>
/// 음력 월의 간지 문자열 조회
/// </summary>
/// <param name="ly"></param>
/// <param name="lm"></param>
/// <returns></returns>
public string GetMonthGanji(int ly, int lm)
{
int lunarMonthes = (ly - SOLAR_BASIC_DATE[0]) * 12 + lm - 1;

string gan = GAN[(lunarMonthes + BASIC_GANJI[2]) % 10];
string ji = JI[(lunarMonthes + BASIC_GANJI[3]) % 12];
return gan + ji;
}

/// <summary>
/// 음력 날의 간지 문자열 조회
/// </summary>
/// <param name="totalDaySolar"></param>
/// <returns></returns>
public string GetDayGanji(int solarDays)
{
string gan = GAN[(solarDays + BASIC_GANJI[4]) % 10];
string ji = JI[(solarDays + BASIC_GANJI[5]) % 12];
return gan + ji;
}

/// <summary>
/// 음력 연도의 전체 날 수
/// </summary>
/// <param name="ly"></param>
/// <returns></returns>
public int GetLunarDaysOfYear(int ly)
{
int ret = 0;
for (int i = 0; i < 12; i++)
{
ret += DAYS_OF_LUNAR_FEATURES[LUNAR_FEATURES[ly - SOLAR_BASIC_DATE[0], i] - 1];
}

return ret;
}

/// <summary>
/// 음력 월의 날 수
/// </summary>
/// <param name="ly"></param>
/// <param name="lm"></param>
/// <returns></returns>
public int GetLunarDaysOfMonth(int ly, int lm)
{
return DAYS_OF_LUNAR_FEATURES[LUNAR_FEATURES[ly - SOLAR_BASIC_DATE[0], lm - 1] - 1];
}

/// <summary>
/// 양력 연도의 특정 월까지의 전체 날 수
/// </summary>
/// <param name="year"></param>
/// <param name="month"></param>
/// <returns></returns>
public int GetSolarDaysOfYear(int year, int month)
{
int ret = 0;
for (int i = 0; i < month; i++)
{
ret += GetSolarDaysOfMonth(year, i + 1);
}

return ret;
}
}
}

Lunar 클래스는 다음 처럼 사용한다.


Lunar lunar = new Lunar();
int ly = 2000;
int lm = 2;
int ld = 22;
bool leapMonth = false; // 윤달 여부

int year = 0;
int month = 0;
int day = 0;

string ret = lunar.ToSolarDate(lunar.GetLunarDays(ly, lm, ld, leapMonth), out year, out month, out day);
Console.WriteLine("평달 음력 {0}년 {1}월 {2}일은 양력 {3}년 {4}월 {5}일 입니다.",
ly, lm, ld,
year, month, day);

ret = lunar.ToLunarDate(lunar.GetSolarDays(year, month, day), out ly, out lm, out ld);
Console.WriteLine("양력 {0}년 {1}월 {2}일은 음력 {3}년 {4}월 {5}일 입니다.",
year, month, day,
ly, lm, ld);

 
끝.
posted by Sunny's
2009. 11. 11. 19:06 .NET Framework

One of our most senior developers on Excel Services, Shahar Prish, is busy writing posts in his blog on the new programmability features in the 2010 version of Excel Services. The first set of posts talk about REST and moving forward he will expand to the new JavaScript OM we added this release. Here are the links, if you care at all about building custom solutions for Excel and Excel Services they are a great read:

General posts about REST:

Welcome to the new Excel Services

So what does REST on Excel Services look like???

Discovery via the Excel Services REST APIs

Getting ranges via Excel Services REST as well as Charts and Discovery

Excel Services REST APIs – the basics

Advanced Excel Services REST API capabilities – passing parameters to a spreadsheet

How to seamlessly embed data from Excel Services spreadsheets into Word

The Excel Services Windows Gadget:

Introducing the Excel Services Windows 7 Gadget

Showing Excel ranges in the Excel Services Gadget

Bringing it all back home – using advanced REST functionality with the Excel Services Gadget

And the blog is starting to show how to actually code the gadget:

Coding the Excel Services Windows 7 Gadget – Part 1 - Settings


posted by Sunny's
2009. 11. 6. 15:19 .NET Framework
posted by Sunny's
2009. 11. 6. 13:17 .NET Framework

X축 데이터가 연도이고 Y축 데이터가 값이라고 가정합니다.
1년 간격으로 값이 입력된 로우셋을 Chart에 바인딩하는데 간혹 중간에 값이 입력되지 않았을 경우 어떻게 처리하면 될까요?

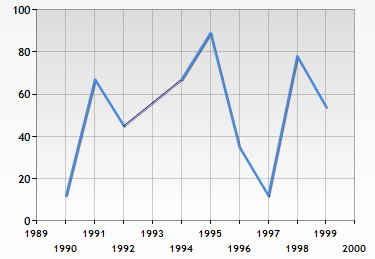
별다른 처리를 하지 않을 경우 평균 값으로 처리가 되기 때문에 마치 실제 데이터가 입력된 것 같은 오해를 불러일으키게 됩니다. 다음 그림을 보면 1993년도에 값이 없음에도 마치 있는 것과 같은 착각을 불러일으킵니다.

그림 1


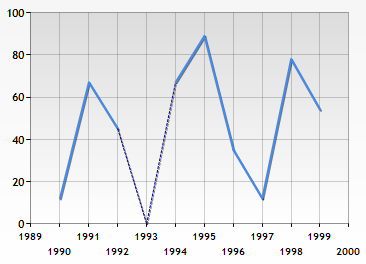
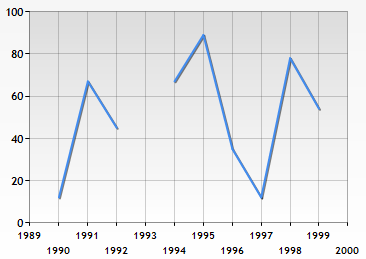
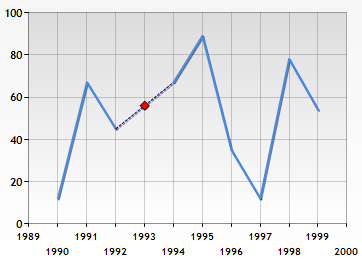
값이 없음을 다음 그림과 같이 명확하게 출력해 주어야 합니다.
사용자 삽입 이미지
사용자 삽입 이미지
사용자 삽입 이미지

값이 없음을 나타내는 여러가지 경우입니다.
위와 같이 출력하는 방법은 다음의 코드를 해당 Series에 적용하면 됩니다.

    1 chart.DataManipulator.Group("AVE", 5, IntervalType.Minutes, series);

    2 chart.DataManipulator.InsertEmptyPoints(5, IntervalType.Minutes, series);


예시한 그림과는 조금 다른 코드인데 간단히 설명하면 다음과 같습니다.
1번 라인은 데이터를 5분 간격으로 평균 값을 내어 데이터를 정규화합니다.
2번 라인에서 비로소 정규화한 데이터에서 특정 구간에 값이 없을 경우(간격은 5분입니다.) 빈 값을 추가하게 됩니닫.

빈 값을 위 세 가지(더 다양합니다.) 그림처럼 다르게 표현하는 방법은 Series의 EmptyPointStyle속성과 EmptyPointValue를 변경해서 구현합니다.

좀 더 자세한 정보는 다음 링크에서 WinFormSample을 직접 다운로드 받아 Working with Data 메뉴의 Empty Points 항목을 살펴보시기 바랍니다.

http://code.msdn.microsoft.com/mschart/Release/ProjectReleases.aspx?ReleaseId=1591

posted by Sunny's
2009. 11. 6. 13:15 .NET Framework
다음은 RichTextBox의 Text를 HTML로 변환하는 함수의 코드입니다.
이 소스코드 역시 해당 함수를 사용해서 HTML로 변환하였습니다.

public string ConvertRtbToHTML(RichTextBox rtb)
{
   
if (rtb.Text.Length == 0) return null;

   
string html = "";
   
string color;
   
string strChar;
   
bool isBold;
   
bool isItalic;
   
string fontName;
   
short size;
   
int originStart = 0;
   
int originLength = rtb.Text.Length;
   
int count =0;


    rtb.Select(0, 1);

    color = ColorTranslator.ToHtml(rtb.SelectionColor);
    isBold = rtb.SelectionFont.Bold;
    isItalic = rtb.SelectionFont.Italic;
    fontName = rtb.SelectionFont.FontFamily.Name;
    size = (
short)rtb.SelectionFont.Size;

   
// Include first 'style' parameters in the HTML
    html += "<span style=\"font-family: " + fontName + 
     
"; font-size: " + size + "pt; color: " 
                     + color + 
"\">";
   
// Include bold tag, if required
    if (isBold == true)
        html +=
"<b>";
   
   
// Include italic tag, if required
    if (isItalic == true)
        html +=
"<i>";
   
   
// Finally, add our first character
    html += rtb.Text.Substring(0, 1);

   
// Loop around all remaining characters
    for(count = 2 ;count <= rtb.Text.Length;count++)
    {
       
// Select current character
        rtb.Select(count - 1, 1);

        strChar = rtb.Text.Substring(count - 1, 1);

       
switch (strChar)
        {
           
case "\n":
               
// If this is a line break, add HTML tag
                html += "<br>";
               
break;
           
case "\t":
                html +=
"&nbsp;&nbsp;&nbsp;&nbsp;";
                strChar = 
"";
               
break;
           
case " ":
                html +=
"&nbsp;";
                strChar = 
"";
               
break;
           
case "<":
                html +=
"&lt;";
                strChar = 
"";
               
break;
           
case ">":
                html +=
"&gt;";
                strChar = 
"";
               
break;
           
case "&":
                html +=
"&amp;";
                strChar = 
"";
               
break;
        }


// Check/implement any changes in style
        if (rtb.SelectionColor.ToKnownColor().ToString() != color ||
           rtb.SelectionFont.FontFamily.Name != fontName || rtb.SelectionFont.Size != size)
           html +=
"</span><span style=\"font-family: " 
             + rtb.SelectionFont.FontFamily.Name +
             
"; font-size: " + rtb.SelectionFont.Size +
             
"pt; color: " +
             rtb.SelectionColor.ToKnownColor().ToString() + 
"\">";
   
       
// Check for bold changes
        if (rtb.SelectionFont.Bold != isBold)
        {
           
if (rtb.SelectionFont.Bold == false)
               html +=
"</b>";
           
else
               html += "<b>";
        }

       
// Check for italic changes
        if (rtb.SelectionFont.Italic != isItalic)
        {
               
if (rtb.SelectionFont.Italic == false)
                   html +=
"</i>";
               
else
                   html += "<i>";
        }

       
// Add the actual character
        html += strChar; //box.Text.Substring(intCount-1, 1);

       
// Update variables with current style

        color = rtb.SelectionColor.ToKnownColor().ToString();
        isBold = rtb.SelectionFont.Bold;
        isItalic = rtb.SelectionFont.Italic;
        fontName = rtb.SelectionFont.FontFamily.Name;
        size = (
short)rtb.SelectionFont.Size;
    }

   
// Close off any open bold/italic tags
    if (isBold == true) html += "";
   
if (isItalic == true) html += "";

   
// Terminate outstanding HTML tags
    html += "</span>"; //</html>";
    // Restore original RichTextBox selection
    rtb.Select(originStart, originLength);
   
   
//' Return HTML
    return html;
}

출처 : http://blog.jeidee.net/661
posted by Sunny's
2009. 11. 4. 10:46 .NET Framework

Data Access Application Block(DAAB)는 데이터베이스 관련작업을 단순화 하기 위한 어플리케이션 블록입니다.
DAAB는 SQL Server와 Oracle에 대해 작업할 수 있는 여러 클래스들을 포함하고 있습니다. 그리고 어플리케이션코드가 특정 데이터베이스를 "Cusomter" 또는 "Inventory"과 같이 ADO.NET 연결 문자열명을 통해서 참조할 수있게 해줍니다.
이와 같이 어플리케이션 코드는 데이터베이스의 named instance를 명시할 수 있게 되며 이 named instance를DatabaseFactory.CreateDatabase 메서드의 파라미터로 넘겨줌으로써 해당 데이터베이스로의 연결을 가지게됩니다.
각각의 named 데이터베이스는 구성파일에 저장된 연결 정보을 가지고 있으며, 구성 파일에서 이 설정을 변경함으로써, 개발자들은 어플리케이션이 코드의 재컴파일 없이도 다른 데이터베이스 구성을 사용할 수 있도록 할 수 있습니다.

개발자들은 데이터베이스 작업을 하기위해 반복적인 코딩을 수행해야 하고, 데이터베이스 타입을 변경하려면 적지않은 노력을 들여야 했습니다.

DAAB 사용을 하게 되면,
- ADO.NET 2.0이 제공하는 기능을 사용할 수 있습니다.
- 데이터베이스 관련 표준적인 작업을 위한 코드를 감소할 수 있습니다.
- 어플리케이션 내에서 일관된 데이터 접근 수행을 유지할 수 있습니다.
- 손쉽게 데이터베이스 타입을 변경할 수 있습니다.

아래는 "도움말"이 보여주는 EAAB 의 클래스 구성입니다. 참고합시다.


EAAB를 사용하는 일반적인 샘플을 봅니다.


//구성파일에 명시된 DEFAULT NAMED INSTANCE를 가져옵니다.

Database db = DatabaseFactory.CreateDatabase();

// SP 명령객체를 생성합니다.

DbCommand dbCommand = db.GetStoredProcCommand("GetProductsByCategory");


// 파라미터를 전달합니다.

// Retrieve products from category 7.

db.AddInParameter(dbCommand, "CategoryID", DbType.Int32, 7);


//명령을 수행하여 데이터셋을 가져옵니다.

DataSet productDataSet = db.ExecuteDataSet(dbCommand);


코드 상에서 굳이 연결 객체를 생성하고 연결문자열 전달하고, 연결 오픈해서, 명령객체 생성 후 파라미터 객체 생성후 명령객체에전달한 후, 명령객체의 연결객체를 지정한 후, 명령객체 실행하여, 데이터셋 객체를 가져오는 식의 반복적인 데이터베이스 관련작업을
위 처럼 간소화 할 수 있다는 점이 이점
또한 손쉽게 연결문자열을 구성파일에서 변경하여 재컴파일없이 다른 데이터베이스로 작업을 손쉽게 변경할 수 있다는 이점,
연결객체에 대한 OPEN/CLOSE 및 객체의 Disposing은 EAAB 내부적으로 처리해 주므로 이에 대해 신경쓸 필요없다는 이점,
그리고 이것이 Best Practice라는 이점.

그야말로 개발자들에게 하부의 데이터베이스 작업(코드)를 Transparent 하게 해주는 고마운 EAAB 입니다.

구성 생성하기
Enterprise Library Configuration을 실행합니다.
새로운 어플리케이션을 추가합니다.
Data Access Application Block을 추가합니다.


Connection Strings 하위에 named instance를 선택하고 그 이름을 의미있는 이름으로 변경합니다.
ProviderName으로 지정할 수 있는 옵션 중에서 SQL Server를 사용할 것이므로 System.Data.SqlClient로 선택합니다.


"Sales" Named instance 하위에 여러 파라미터들을 지정할 수 있습니다.
기본으로 생성된 파라미터 중에서 Database 는 사용할 데이터베이스명,
Server 는 사용할 데이터베이스 서버명으로 그 값을 지정해 둡니다.
SQL Server Login으로 접근토록 할 것이므로, Integrated Security는 삭제하고,
파라미터 User Id, Password 두개를 추가합니다.
그리고 그 값을 각각 사용할 데이터베이스 로그인과 암호로서 설정합니다.


Data Access Application Block 노드를 선택하고 DefaultDatabase 속성 값이 Sales로 선택된것을 확인한다. 이 속성값이 어플리케이션 코드에서 default named instance로 사용될 named instance입니다.

위와 같은 과정을 반복해서 여러 개의 named instance를 생성해 둘 수 있으며, 이 구성파일을 가지는 어플리케이션에서 사용할 수 있습니다.

어플리케이션 구성파일로 저장합니다.(app.config 또는 web.config) :

EAAB를 어플리케이션에서 사용

1. 어셈블리 참조 추가
Microsoft.Practices.EnterpriseLibrary.Data.dll
Microsoft.Practices.EnterpriseLibrary.Common.dll

2. Using 문 추가(optional)


using Microsoft.Practices.EnterpriseLibrary.Data;
using System.Data;

3. Database 객체 생성


//default named instance를 가져옴 ' Sales

Database db = DatabaseFactory.CreateDatabase();

또는

// 특정 named instance를 가져옴

Database db = DatabaseFactory.CreateDatabase("Sales");


만일 생성하고자하는 데이터베이스의 연결문자열을 알고 있다면, 어플리케이션 구성정보를 무시하고, 생성자를 통해 Database객체를 생성할 수 있습니다. Database 클래스는 추상 기본 클래스(abstract base class) 이므로, 이를상속한 클래스의 객체를 생성해야 합니다.
상속된 클래스로는 SqlDatabase, OracleDatabase가 있는데, SqlDatabase는SqlClientFactory 프로바이더, OracleDatabase는 OracleClientFactory 프로바이더를 사용하여SQL Server, Oracle 용으로 사용합니다.


// Assume the method GetConnectionString exists in your application and

// returns a valid connection string.

string myConnectionString = GetConnectionString();

SqlDatabase sqlDatabase = new SqlDatabase(myConnectionString);


SQL Server난 Oracle이 아닌 서버에 작업을 해야 하는 경우에는 GeneriicDatabase 객체를 생성할 수 있으며, 이를 사용할 때 반드시 DbProviderFactory 객체를 제공해야 합니다.


GenericDatabase db = new GenericDatabase(connectionString, OdbcFactory.Instance);


4. DbCommand 객체 생성
EAAB는 ADO.NET DbCommand 객체를 가져오기 위한 일관된 방법을 제공합니다.
이 객체를 이용해서 여러 output 파라미터를 결과로서 리턴하는 SP를 호출할 수 있으며, SP의 타임아웃 값을 명시할 수도 있습니다.

- SQL 구문을 위한 DbCommand 객체


Database db = DatabaseFactory.CreateDatabase();

string sqlCommand = "Select CustomerID, LastName, FirstName From Customers";

DbCommand dbCommand = db.GetSqlStringCommand(sqlCommand);


- SP를 위한 DbCommand 객체


Database db = DatabaseFactory.CreateDatabase();

DbCommand dbCommand = db.GetStoredProcCommand("GetProductsByCategory");


5. 연결관리

데이터베이스 연결을 매우 비싼 자원입니다. 즉 메모리나 cpu 등 컴퓨터의 자원을 많이 잡아먹는 종류의 자원입니다. 따라서 이를 사용하는 어플리케이션은 주의를 기울여서 사용하도록 해서, 시스템 성능을 보호할 의무가 있습니다.
데이터베이스 연결은 필요한 동안에만 open하여 사용하고, 가능한 한 빨리 close 하는 것이 가장 바람직합니다.
Database 객체의 메서드들은 각 호출 시 마다 데이터베이스 연결의 open/close를 처리합니다. 그러므로, 어플리케이션 코드는 연결을 관리하기 위한(open/close) 코드를 포함 할 필요가 없습니다.
(성능상의 이유로, ADO.NET은 연결을 CLOSE 하지 않고 연결 풀로 반환하므로, 우리는 Database 객체를 캐시할 필요가 없습니다.)


Database db = DatabaseFactory.CreateDatabase();


string sqlCommand = "Select ProductID, ProductName From Products";

DbCommand dbCommand = db.GetSqlStringCommand(sqlCommand);


// No need to open the connection; just make the call.

DataSet customerDataSet = db.ExecuteDataSet(dbCommand);


그러나 언제 연결을 close해야 할지 명확하지 않은 예외 케이스가 존재하는데 그 예가 ExcuteReader 메서드 입니다.이 메서드는 DbDataReader 객체를 리턴하게 되는데, 이는 필요시에 데이터의 특정 영역을 읽도록, 즉 데이터베이스 연결이필요하도록 디자인되었습니다. 다른 말로, 어플리케이션이 언제 이 객체가 더 이상 필요치 않게 될지 알 수 없다는 것입니다.
필요한 작업을 다 수행한 뒤, DbDataReader.close를 호출하여 연결을 Close해야 합니다.
그래서 이 메서드를 사용해야 하는 경우에는 아래 처럼 using() 구문을 사용해서 DbDataReader 객체가 Close 되도록 강제하여 dispose 되도록 해 주어야 합니다.


Database db = DatabaseFactory.CreateDatabase();


DbCommand dbCommand = db.GetSqlStringCommand("Select Name, Address From Customers");

using (IDataReader dataReader = db.ExecuteReader(dbCommand))

{

// Process results

}


또는


Database db = DatabaseFactory.CreateDatabase();

DbCommand dbCommand = db.GetStoredProcCommand("GetProductsByCategory");


IDataReader dataReader = null;


try

{

//...

dataReader = db.ExecuteReader(dbCommand);

}

catch(Exception ex)

{

// Process exception

}

finally

{

if (dataReader != null)

dataReader.Close();

}


5. Parameter Handling

- AddParameter : This method passes a parameter (input or output) to a stored procedure.
- AddInParameter : This method passes an input parameter to a stored procedure.
- AddOutParameter :. This method adds an output parameter to a stored procedure.
- GetParameterValue : This method finds the value of the specified parameter.
- SetParameterValue : This method sets the value of the specifiedparameter when you want to do multiple inserts using the sameconnection and command but with different parameter values.


주요 시나리오별 샘플 코드

여러 레코드를 조회하기 위해 DbDataReader 사용하기


Database db = DatabaseFactory.CreateDatabase();


using (IDataReader dataReader = db.ExecuteReader(CommandType.Text, "Select Name, Address, City From Customers" ))

{

customerGrid.DataSource = dataReader;

customerGrid.DataBind();

}


여러 레코드를 조회하기 위해 DataSet 사용하기


Database db = DatabaseFactory.CreateDatabase();


string sqlCommand = "GetProductsByCategory";

DbCommand dbCommand = db.GetStoredProcCommand(sqlCommand);


// Retrieve products from category 7.

int category = 7;

db.AddInParameter(dbCommand, "CategoryID", DbType.Int32, category);


DataSet productDataSet = db.ExecuteDataSet(dbCommand);


명령 수행과 Output 파라미터에 접근하기


Database db = DatabaseFactory.CreateDatabase();


string sqlCommand = "GetProductDetails";

DbCommand dbCommand = db.GetStoredProcCommand(sqlCommand);


db.AddInParameter(dbCommand, "ProductID", DbType.Int32, 3);

db.AddOutParameter(dbCommand, "ProductName", DbType.String, 50);

db.AddOutParameter(dbCommand, "UnitPrice", DbType.Currency, 8);


db.ExecuteNonQuery(dbCommand);


string results = string.Format(CultureInfo.CurrentCulture, "{0}, {1}, {2:C} ",

db.GetParameterValue(dbCommand, "ProductID"),

db.GetParameterValue(dbCommand, "ProductName"),

db.GetParameterValue(dbCommand, "UnitPrice"));


명령 수행과 Single-Item 결과 접근하기


Database db = DatabaseFactory.CreateDatabase();


string sqlCommand = "GetProductName";

int productId = 7;

DbCommand dbCommand = db.GetStoredProcCommand(sqlCommand, productId);


string productName = (string)db.ExecuteScalar(dbCommand);


Transaction 내에서 여러 건의 갱신 처리하기

ADO.NET 2.0에서는 TransactionScope 객체를 사용해서 트랜잭션 처리를 수행합니다. 아래의 코드는 사용하지 않았습니다. ' 추후 TransactionScope 객체에 대해 언급하겠습니다.


public bool Transfer(int transactionAmount, int sourceAccount, int destinationAccount)

{

bool result = false;


// Create the database object, using the default database service. The

// default database service is determined through configuration.

Database db = DatabaseFactory.CreateDatabase();


// Two operations, one to credit an account, and one to debit another

// account.

string sqlCommand = "CreditAccount";

DbCommand creditCommand = db.GetStoredProcCommand(sqlCommand);


db.AddInParameter(creditCommand, "AccountID", DbType.Int32, sourceAccount);

db.AddInParameter(creditCommand, "Amount", DbType.Int32, transactionAmount);


sqlCommand = "DebitAccount";

DbCommand debitCommand = db.GetStoredProcCommand(sqlCommand);


db.AddInParameter(debitCommand, "AccountID", DbType.Int32, destinationAccount);

db.AddInParameter(debitCommand, "Amount", DbType.Int32, transactionAmount);


using (DbConnection connection = db.CreateConnection())

{

connection.Open();

DbTransaction transaction = connection.BeginTransaction();


try

{

// Credit the first account.

db.ExecuteNonQuery(creditCommand, transaction);

// Debit the second account.

db.ExecuteNonQuery(debitCommand, transaction);


// Commit the transaction.

transaction.Commit();


result = true;

}

catch

{

// Roll back the transaction.

transaction.Rollback();

}

connection.Close();


return result;

}

}


데이터베이스 갱신을 위해 DataSet 사용하기
Database db = DatabaseFactory.CreateDatabase();


DataSet productsDataSet = new DataSet();


string sqlCommand = "Select Select ProductID, ProductName, CategoryID, UnitPrice, LastUpdate From Products";

DbCommand dbCommand = db.GetSqlStringCommand(sqlCommand);


string productsTable = "Products";


// Retrieve the initial data.

db.LoadDataSet(dbCommand, productsDataSet, productsTable);


// Get the table that will be modified.

DataTable table = productsDataSet.Tables[productsTable];


// Add a new product to existing DataSet.

DataRow addedRow = table.Rows.Add(new object[] {DBNull.Value, "New product", 11, 25});


// Modify an existing product.

table.Rows[0]["ProductName"] = "Modified product";


// Establish the Insert, Delete, and Update commands.

DbCommand insertCommand = db.GetStoredProcCommand("AddProduct");

db.AddInParameter(insertCommand, "ProductName", DbType.String, "ProductName", DataRowVersion.Current);

db.AddInParameter(insertCommand, "CategoryID", DbType.Int32, "CategoryID", DataRowVersion.Current);

db.AddInParameter(insertCommand, "UnitPrice", DbType.Currency, "UnitPrice", DataRowVersion.Current);


DbCommand deleteCommand = db.GetStoredProcCommand("DeleteProduct");

db.AddInParameter(deleteCommand , "ProductID", DbType.Int32, "ProductID", DataRowVersion.Current);


DbCommand updateCommand = db.GetStoredProcCommand("UpdateProduct");

db.AddInParameter(updateCommand, "ProductID", DbType.Int32, "ProductID", DataRowVersion.Current);

db.AddInParameter(updateCommand, "ProductName", DbType.String, "ProductName", DataRowVersion.Current);

db.AddInParameter(updateCommand, "LastUpdate", DbType.DateTime, "LastUpdate", DataRowVersion.Current);


// Submit the DataSet, capturing the number of rows that were affected.

int rowsAffected = db.UpdateDataSet(productsDataSet, "Products", insertCommand, updateCommand, deleteCommand,

Microsoft.Practices.EnterpriseLibrary.Data.UpdateBehavior.Standard);


여러 레코드를 XML (결과)로 가져오기


SqlDatabase dbSQL = DatabaseFactory.CreateDatabase("EntLibQuickStartsSql") as SqlDatabase;


// Use "FOR XML AUTO" to have SQL return XML data.

string sqlCommand = "SELECT ProductID, ProductName FROM Products FOR XML AUTO";

DbCommand dbCommand = dbSQL.GetSqlStringCommand(sqlCommand);


XmlReader productsReader = null;

StringBuilder productList = new StringBuilder();


try

{

productsReader = dbSQL.ExecuteXmlReader(dbCommand);


// Iterate through the XmlReader and put the data into our results.

while (!productsReader.EOF)

{

if (productsReader.IsStartElement())

{

productList.Append(productsReader.ReadOuterXml());

productList.Append(Environment.NewLine);

}

}

}

finally

{

// Close the Reader.

if (productsReader != null)

{

productsReader.Close();

}


// Explicitly close the connection. The connection is not closed

// when the XmlReader is closed.

if (dbCommand.Connection != null)

{

dbCommand.Connection.Close();

}

}


Enterprise Library Application Block은 이정도로 하고 마감합니다.
사실 Security, Offline, Smart Client Composite UI 등 다른 어플리케이션 블록이 존재합니다. Offline 블록은 enSimple 의 다른 글로서 소개 했고,
Security는 실효성이 조금 떨어지는 듯 하여, 배제했으며, Composite UI는 너무 방대하고, 또한 개발자가 이해하고적용해서 쓰기에는 너무 많은 것을 요구하는 듯 하여…(__!) 살짝 제껴두고 갑니다. 후에 필요성이 충분히 확인된다면… 그때가서 다시 ….
끝.

출 처 : http://ultteky.egloos.com/10024784
posted by Sunny's
prev 1 2 3 4 5 6 7 next