블로그 이미지
Sunny's

calendar

1 2 3 4
5 6 7 8 9 10 11
12 13 14 15 16 17 18
19 20 21 22 23 24 25
26 27 28 29 30 31

Notice

2010. 7. 30. 12:01 .NET Framework

 XML-RPC.NET library  :  http://xml-rpc.net/


The following code samples show how to use the XML-RPC.NET library and the .NET Framework to call MetaWeblog API methods exposed by Windows Live Space

MetaWeblogAPI C# Code Sample

MetaWeblogAPI VisualBasic .NET Code Sample


Example

This C# code example demonstrates how to use all of the methods supported by the MetaWeblog API. The example enables external programs to get and set the text and attributes of Weblog posts. The example uses the XML-RPC protocol for communication between client applications and the Weblog server.

using System;
using CookComputing.XmlRpc;
using System.Net;
 
namespace MetaWeblogApi
{
 
 
/// <summary>
/// This struct represents information about a user's blog.
/// </summary>
[XmlRpcMissingMapping(MappingAction.Ignore)]
struct UserBlog{
public string url;
public string blogid;
public string blogName;
}
 

/// <summary>
/// This struct represents information about a user.
/// </summary>
[XmlRpcMissingMapping(MappingAction.Ignore)]
struct UserInfo{
public string url;
public string blogid;
public string blogName;
public string firstname;
public string lastname;
public string email;
public string nickname;
}
 
 
/// <summary>
/// This struct represents the information about a category that could be returned by the
/// getCategories() method.
/// </summary>
[XmlRpcMissingMapping(MappingAction.Ignore)]
struct Category{
public string description;
public string title;
}
 
/// <summary>
/// This struct represents the information about a post that could be returned by the
/// editPost(), getRecentPosts() and getPost() methods.
/// </summary>
[XmlRpcMissingMapping(MappingAction.Ignore)]
struct Post {
public DateTime dateCreated;
public string description;
public string title;
public string postid;  
public string[] categories;
}
 
/// <summary>
/// This class can be used to programmatically interact with a Weblog on
/// MSN Spaces using the MetaWeblog API.
/// </summary>
[XmlRpcUrl("https://storage.msn.com/storageservice/MetaWeblog.rpc")]
class MsnSpacesMetaWeblog : XmlRpcClientProtocol {
 
 
/// <summary>
/// Returns the most recent draft and non-draft blog posts sorted in descending order by publish date.
/// </summary>
/// <param name="blogid"> This should be the string MyBlog, which indicates that the post is being created in the user’s blog. </param>
/// <param name="username"> The name of the user’s space. </param>
/// <param name="password"> The user’s secret word. </param>
/// <param name="numberOfPosts"> The number of posts to return. The maximum value is 20. </param>
/// <returns></returns>
[XmlRpcMethod("metaWeblog.getRecentPosts")]
public Post[] getRecentPosts(
string blogid,
string username,
string password,
int numberOfPosts){

return (Post[]) this.Invoke("getRecentPosts", new object[]{ blogid, username, password, numberOfPosts}); 
}
 

        /// <summary>
        /// Posts a new entry to a blog.
        /// </summary>
/// <param name="blogid"> This should be the string MyBlog, which indicates that the post is being created in the user’s blog. </param>
/// <param name="username"> The name of the user’s space. </param>
/// <param name="password"> The user’s secret word. </param>
/// <param name="post"> A struct representing the content to update. </param>
        /// <param name="publish"> If false, this is a draft post. </param>
        /// <returns> The postid of the newly-created post. </returns>
        [XmlRpcMethod("metaWeblog.newPost")]
public string newPost(
string blogid,
string username,
string password,
Post content,
bool publish){

return (string) this.Invoke("newPost", new object[]{ blogid, username, password, content, publish}); 
}
 
/// <summary>
/// Edits an existing entry on a blog.
/// </summary>
/// <param name="postid"> The ID of the post to update. </param>
/// <param name="username"> The name of the user’s space. </param>
/// <param name="password"> The user’s secret word. </param>
/// <param name="post"> A struct representing the content to update. </param>
/// <param name="publish"> If false, this is a draft post. </param>
/// <returns> Always returns true. </returns>
[XmlRpcMethod("metaWeblog.editPost")]
public bool editPost(
string postid,
string username,
string password,
Post content,
bool publish){

return (bool) this.Invoke("editPost", new object[]{ postid, username, password, content, publish}); 
}
 
/// <summary>
/// Deletes a post from the blog.
/// </summary>
/// <param name="appKey"> This value is ignored. </param>
/// <param name="postid"> The ID of the post to update. </param>
/// <param name="username"> The name of the user’s space. </param>
/// <param name="password"> The user’s secret word. </param>
/// <param name="post"> A struct representing the content to update. </param>
/// <param name="publish"> This value is ignored. </param>
/// <returns> Always returns true. </returns>
[XmlRpcMethod("blogger.deletePost")]
public bool deletePost(
string appKey,
string postid,
string username,
string password,
bool publish){

return (bool) this.Invoke("deletePost", new object[]{ appKey, postid, username, password,  publish}); 
}
 

/// <summary>
/// Returns information about the user’s space. An empty array is returned if the user does not have a space.
/// </summary>
/// <param name="appKey"> This value is ignored. </param>
/// <param name="postid"> The ID of the post to update. </param>
/// <param name="username"> The name of the user’s space. </param>
/// <returns> An array of structs that represents each of the user’s blogs. The array will contain a maximum of one struct, since a user can only have a single space with a single blog. </returns>
[XmlRpcMethod("blogger.getUsersBlogs")]
public UserBlog[] getUsersBlogs(
string appKey,
string username,
string password){
 
return (UserBlog[]) this.Invoke("getUsersBlogs", new object[]{ appKey,  username, password}); 
}
 
/// <summary>
/// Returns basic user info (name, e-mail, userid, and so on).
/// </summary>
/// <param name="appKey"> This value is ignored. </param>
/// <param name="postid"> The ID of the post to update. </param>
/// <param name="username"> The name of the user’s space. </param>
/// <returns> A struct containing profile information about the user.
/// Each struct will contain the following fields: nickname, userid, url, e-mail,
/// lastname, and firstname. </returns>
[XmlRpcMethod("blogger.getUserInfo")]
public UserInfo getUserInfo(
string appKey,
string username,
string password){
 
return (UserInfo) this.Invoke("getUserInfo", new object[]{ appKey,  username, password}); 
}
 
 
/// <summary>
/// Returns a specific entry from a blog.
/// </summary>
/// <param name="postid"> The ID of the post to update. </param>
/// <param name="username"> The name of the user’s space. </param>
/// <param name="password"> The user’s secret word. </param>
    /// <returns> Always returns true. </returns>
[XmlRpcMethod("metaWeblog.getPost")]
public Post getPost(
string postid,
string username,
string password){

return (Post) this.Invoke("getPost", new object[]{ postid, username, password}); 
}
 
/// <summary>
/// Returns the list of categories that have been used in the blog.
/// </summary>
/// <param name="blogid"> This should be the string MyBlog, which indicates that the post is being created in the user’s blog. </param>
/// <param name="username"> The name of the user’s space. </param>
/// <param name="password"> The user’s secret word. </param>
/// <returns> An array of structs that contains one struct for each category. Each category struct will contain a description field that contains the name of the category. </returns>
[XmlRpcMethod("metaWeblog.getCategories")]
public Category[] getCategories(
string blogid,
string username,
string password){
 
return (Category[]) this.Invoke("getCategories", new object[]{ blogid, username, password}); 
}
 
/// <summary>
/// The main entry point for the application.
/// </summary>
[STAThread]
static void Main(string[] args) {
 
MsnSpacesMetaWeblog mw = new MsnSpacesMetaWeblog();
string username = "!Space3*Pqc3*yUo00Y0!";
string password = "mYsEcReTwOrD";
mw.Credentials = new NetworkCredential(username, password);
 
try{
 
  // Space3Pqc3yUo00Y0
Post post = new Post();
post.categories = new string[]{"Test Posts"};
post.title = "Tets 3";
post.description = "This is my 3rd test post";
post.dateCreated = DateTime.Now;
 
string id = mw.newPost("MyBlog", username, password, post, true);
 
post.title = "Test 3 (typo fixed)";
 
mw.editPost(id, username, password, post, true);

post = mw.getPost(id, username, password);
Console.WriteLine("Just edited the post with the title '{0}' at '{1}'", post.title, post.dateCreated);
 
/* display list of categories used on the blog */
Category[] categories = mw.getCategories("MyBlog", username, password);

foreach(Category c in categories){
Console.WriteLine("Category: {0}", c.description);
}
 
/* display title of the ten most recent posts */
Post[] posts = mw.getRecentPosts("MyBlog", username, password, 10);
 
foreach(Post p in posts){
Console.WriteLine("Post Title: {0}", p.title);
}
 
mw.deletePost(String.Empty, id, username, password, true);
Console.WriteLine("The post entitled '{0}' has been deleted", post.title);
 
/* get info on user's blogs */
UserBlog[] blogs = mw.getUsersBlogs(String.Empty, username, password);

foreach(UserBlog b in blogs){
Console.WriteLine("The URL of '{0}' is {1}", b.blogName, b.url);
}
 
/* get info on the user */
UserInfo user = mw.getUserInfo(String.Empty, username, password);
Console.WriteLine("{0} {1} ({2}) is the owner of the space whose URL is {3}", user.firstname, user.lastname, user.email, user.url);

 
}catch(XmlRpcFaultException xrfe){
Console.WriteLine("ERROR: {0}", xrfe.FaultString);
}
 
Console.ReadLine();
}

}

}


posted by Sunny's
2010. 7. 30. 10:59 .NET Framework

Earlier this week the Visual Studio team released updated VS 2010 Keyboard Shortcut Posters.  These posters are print-ready documents (that now support standard paper sizes), and provide nice “cheat sheet” tables that can help you quickly lookup (and eventually memorize) common keystroke commands within Visual Studio.

image

This week’s updated posters incorporate a number of improvements:

  • Letter-sized (8.5”x11”) print ready versions are now available
  • A4-sized (210x297mm) print ready versions are now available
  • The goofy people pictures on them are gone (thank goodness)

The posters are in PDF format – enabling you to easily download and print them using whichever paper size is in your printer.

Download the Posters

You can download the VS 2010 Keybinding posters in PDF format here.

Posters are available for each language.  Simply look for the download that corresponds to your language preference (note: CSharp = C#, VB = VB, FSharp = F#, CPP = C++). 

Hope this helps,

Scott

출처 : http://weblogs.asp.net/scottgu/archive/2010/07/29/visual-studio-2010-keyboard-shortcuts.aspx

posted by Sunny's
2010. 7. 20. 18:33 .NET Framework


The initial Visual Studio Productivity Power Tools release included a bunch of really useful productivity enhancements – including a much faster “Add Reference” dialog, lots of code editor additions and enhancements, and some nice IDE improvements around document tab management.  You can learn more about these features in my previous blog post.

VS 2010 Productivity Power Tools Update

Yesterday we shipped an update to the VS 2010 Productivity Power Tools which adds some nice new features and enhancements.

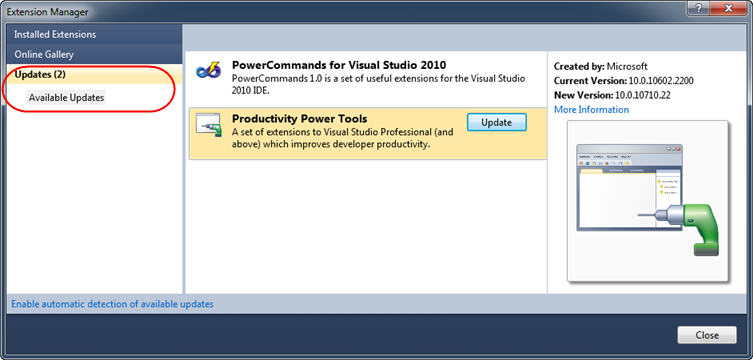
If you already have the VS 2010 Productivity Power Tools installed, you can update it to the latest release by choosing Visual Studio’s “Tools->Extension Manager” menu command.  This will bring up the VS 2010 Extension Manager – which allows you to browse and download new extensions.  If you click the “Updates” tab on the left-hand side of the dialog it also allows you to see any updates that are available for extensions you already have installed within your IDE.

Simply click the “Update” button for the Productivity Power Tools extension and it will download and install an update for it:

image

If you don’t already have the VS 2010 Productivity Power Tools installed, you can download and install it here.

Sean has a nice blog post that describes all of this week’s productivity power tool updates and additions.  Below are a few of the highlights:

Tools Options Support

The top feature request with the productivity power tools has been to have the ability to turn on/off individual features and extensions it provides. 

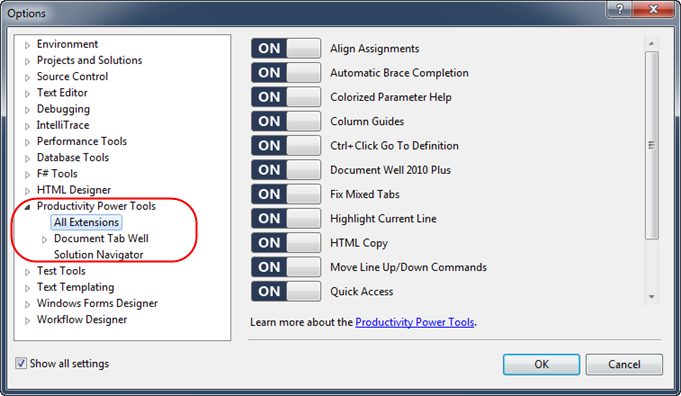
With last month’s release you couldn’t easily turn individual features on and off.  Starting with this week’s update you can use Tools->Options within VS 2010, and use a new Productivity Power Tools section to easily enable/disable each feature individually:

image

In addition to enabling/disabling individual features, you can also tweak/edit their settings (including color schemes and behavior).

Solution Navigator

Solution Navigator is a new VS 2010 tool window provided with this week’s update.  It acts like an enhanced Solution Explorer.  It merges functionality from Solution Explorer, Class View, Object Browser, Call Hierarchy, Navigate To, and Find Symbol References all into one tool window – and is pretty darn cool.  Here are just two scenarios of how you can take advantage of it:

File + Class Explorer in One

You can use the “Solution Navigator” to browse your project just like you would with the standard “Solution Explorer” tool window today.  Except instead of ending with only file sub-nodes, you can now expand them to see classes as well as individual methods and members within them. Clicking on one of the sub-nodes will navigate you immediately to the appropriate code block within the code editor.

For example, below we’ve expanded the \Controllers folder within an ASP.NET MVC project and drilled into the AccountController.cs file – which has a AccountController class within it.  We can now drill into that class within the “Solution Navigator” to see a listing of all of its members – and double-click any of them to jump to it within the code editor:

image

Filter Solution

You might have noticed the search box that is at the top of the Solution Navigator above.  You can search within it to quickly filter your solution view. 

For example, below I’ve entered the string “Log” – which causes the “Solution Navigator” to automatically filter to only show those files and members that contain the word “Log” in their names (everything else is hidden within the explorer).  Notice below how my filtered views displays a “view template” file named “LogOn.cshtml”, the three “LogXYZ” methods within my AccountController class, the LogOnModel class within the AccountModels.cs file, and several tests within my test project whose names contain Log:

image

You can double click any of the filtered files or members to immediately navigate to it within the code editor.

Quick Access

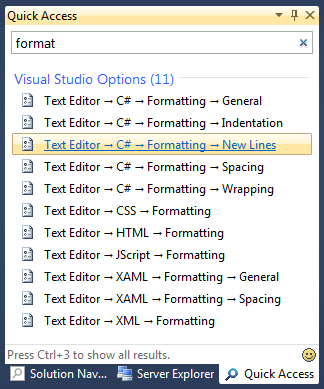
Quick Access is a new VS 2010 tool window that allows you to quickly search for and execute common tasks within the IDE.  Ever wondered where a particular menu command is located?  Or ever struggled to find a specific option within the Tools->Options dialog?  Just enter it within Quick Access and it will help you locate it:

image

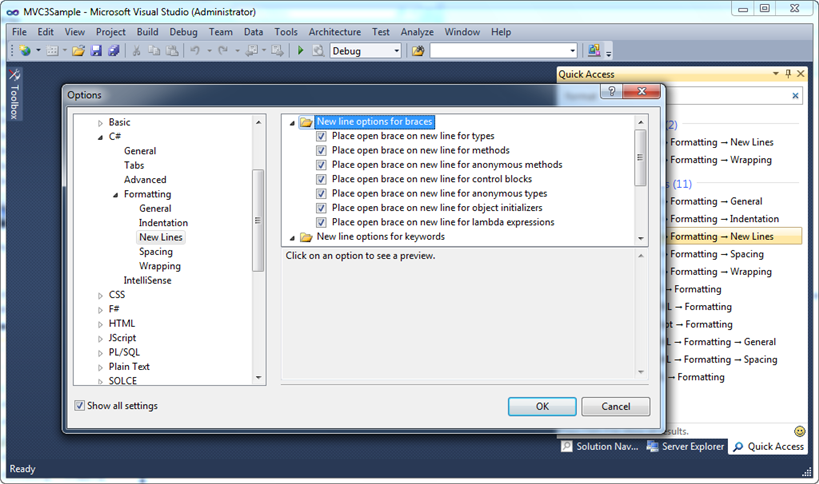
Clicking any of the items within the list will execute the command, or take you to the appropriate place in the IDE where it lives (in the case of Tools->Options settings):

image

Above I searched for “format” and brought up all the tools->options format settings.  Clicking the “Text Editor->C#->Formatting->New Lines” item within the list opens up the Tools-Options dialog to that exact option location.

Summary

I’ve only touched on a few of the improvements with this week’s update.  Read Sean’s blog post for even more details on the updates and improvements.

If you haven’t installed the free VS 2010 Productivity Power Tools, I highly recommend doing so – I think you’ll find some useful extensions that you’ll like.  If you already have last month’s release installed, you can easily update it to this week’s release to take advantage of even more cool features – as well as benefit from bug fixes and performance improvements.

Hope this helps,

Scott
출처 : http://weblogs.asp.net/scottgu/archive/2010/07/19/vs-2010-productivity-power-tools-update-with-some-cool-new-features.aspx

posted by Sunny's
2010. 7. 15. 18:36 .NET Framework
Spring .NET은 [이곳] 에서 다운 받으실 수 있습니다. 혹은 소스포지의 주소는 [이곳]입니다.

Spring .NET이란? ------------------------------------------------------------------------------------

- 객체의 라이프사이클을 관리하기 위해 의존성 주입(Dependency Injection)을 사용하는 경량(Lightweight) 컨테이너
- 엔터프라이즈급 .NET 어플리케이션 개발을 위한 어플리케이션 프레임워크

Core ------------------------------------------------------------------------------------------------

Spring .NET Framework의 Core에는 IoC(Inversion of Control) Container와 Base Functionality가 포함되어있습니다.

간단한 예제로 다음과 같은 의존성 부패(Dependency Rot) 문제가 있는 소스가 있습니다.
Public class Human 
{ 
    public Money money; 
    public Human() { this.money = GET_MONEY_OBJECT(); } 
} 
 
Public class Container 
{ 
    public Human Born() 
    { 
        return new Human(); 
    } 
}

위의 예제에서는 Human은 Money 인스턴스를 생성하는 방법에 종속됩니다. 다른 말로 Money객체의 생성 여부가 Human에게 달려있다는 것이죠.

Container 클래스 제작자는 Money가 Human안에서 생성되는지도 혹은 어떤식으로 사용되는지도 모를 수 있습니다.

그렇다면 DI(Dependency Injection)을 통한 제어 역전(IOC Container)을 사용하는 예제를 보여드리겠습니다.
Public class Human 
{ 
    protected Money money; 
    public Money pMoney { set { this.money = value; }}  
} 
 
Public class IoCContainer 
{ 
    public Human Born() 
    { 
        Human human = new Human(); 
        Money money = new Money(); 
        human.pMoney = money; 
        return human; 
    } 
}

정확하게 Money 인스턴스는 Born 메서드에서 생성되어 Human에 Set 됩니다. 이로서 Spring에서 말하는 느슨한 결합이 구현됩니다.

다음에서 이를 실제 적용한 예제를 만들어 보도록 합시다.

Hello.cs
using System; 
using System.Collections.Generic; 
using System.Text; 
 
Namespace HelloApp 
{ 
    class Hello 
    { 
        public string sayHello(string name) 
        { 
            return “안녕하세요?  + name + “씨!”; 
        } 
    } 
}

App.config
<?xml version=“1.0 encoding=“utf-8 ?> 
<configuration> 
    <spring> 
        <objects xmlns=“http://www.springframework.net”> 
            <object id=“MyHello” type=“HelloApp.Hello”/> 
        </objects> 
    </spring> 
</configuration>

Program.cs
using System; 
using System.Collections.Generic; 
using system.Text; 
using Spring.Context; 
using Spring.Context.Support; 
 
Namespace HelloApp 
{ 
    class Program 
    { 
        static void Main(string[] args) 
        { 
            IapplicationContext ctx = ContextRegistry.GetContext(); 
            Hello hello = (Hello) ctx.GetObject(“MyHello”); 
            string name = “홍길동”; 
            string result = hello.sayHello(name); 
            Console.WriteLine(result); 
        } 
    } 
}

결과
사용자 삽입 이미지

보시면 코드의 형태는 다를지 몰라도 자바의 그것과 매우 똑같습니다. XML에 객체들을 등록하고 컨텍스트에서 GetObject를 통해 존재하는 객체(Bean)을 가져오게 됩니다.

AOP ------------------------------------------------------------------------------------------------

관점지향프로그래밍(Aspect Oriented Programming)이라는 것은 처음 접했을때는 매우 이해하기 난해한 개념이었습니다.

물론 지금도 제가 완벽히 이해하고 있는지도 모를 실정이지만, Spring에 적용시켜 보면 무언이구나 하는 생각이 들긴 하는군요.

사용자 삽입 이미지

기존의 OOP는 객체간 위와 같은 느낌으로 얽혀 있습니다. 각종 include혹은 import를 사용하여 조립한다는 개념으로 서로 연결되죠.

이는 컴파일 순서에서 서로 얽히게 되며 강한 결합을 통해 서로 강하게 묶여있습니다. 그렇기 때문에 객체들의 추가/제거/교체/수정 등을 할 시에 많은 것을 고려해야 합니다.

위의 그림에서는 오른쪽 녹색 유틸리티 객체들의 내용이 수정, 추가되었거나 기능이 변경되었다면 그것을 사용하는 모든 왼쪽의 파란 메인 객체들의 소스또한 수정될지도 모릅니다.

사용자 삽입 이미지

하지만 위의 그림의 느낌은 어떤가요? 유틸리티 객체들은 메인 객체의 배경이 되며 얼마든지 수정/교체가 가능합니다.

하지만 그때에 메인 객체들의 소스는 수정되지 않습니다.  이것이 관점지향프로그래밍의 개념입니다.

예제를 통해 어떻게 구현하는 것인지 알아보도록 하겠습니다.

ConsoleLoggingAroundAdvice.cs
using System; 
using System.Collections.Generic; 
using System.Text; 
using AopAlliance.Intercept; 
 
namespace HelloAop 
{ 
    class ConsoleLoggingAroundAdvice : IMethodInterceptor { 
        public object Invoke(IMethodInvocation invocation) { 
            Console.WriteLine("수행전..."); 
            object retVal = invocation.Proceed(); 
            Console.WriteLine("수행후..."); 
            return retVal; 
        } 
    } 
}

ServiceCommand.cs
using System; 
using System.Collections.Generic; 
using System.Text; 
 
namespace HelloAop 
{ 
    class ServiceCommand : ICommand 
    { 
        public object Execute(object arg) 
        { 
            Console.WriteLine("\n명령 수행 : {0}", arg); 
            return null; 
        } 
    } 
}

Program.cs
using System; 
using System.Collections.Generic; 
using System.Text; 
using Spring.Aop.Framework; 
 
namespace HelloAop 
{ 
    class Program 
    { 
        static void Main(string[] args) { 
            ProxyFactory factory =  
                new ProxyFactory(new ServiceCommand()); 
            factory.AddAdvice(new ConsoleLoggingAroundAdvice()); 
            ICommand command = (ICommand)factory.GetProxy(); 
            command.Execute("이것은 인자입니다."); 
        } 
    } 
}


ProxyFactory를 이용하여 ServiceCommand를 프록시로 선언합니다. 그후에는 AddAdvice를 이용하여 미리 만들어둔 어드바디스를 추가합니다.

이후에 프록시를 생성하여 명령을 실행하면 "수행전... → 명령수행 : 이것은 인자입니다 → 수행후"가 출력됩니다.

입력되는 인자나 반환된 결과값을 검사하거나 다른 루틴을 얼마든지 추가할 수 있습니다.

위의 과정을 통해 실제로 ServiceCommand 객체의 소스에는 손대지 않고 기능을 추가, 변경 할 수 있게 되었습니다.

사용자 삽입 이미지

위의 그림과 같이 실제로는 별개의 객체들을 프록시로 한데 묶은 다음에 프록시가 메서드 실행 요청을 대리 수령하고 어드바이스를 참고하여 실체 명령을 수행하게 됩니다.

Spring .NET을 도입할 시 얻을 수 있는 장점 ---------------------------------------------------------------

- 중급 이상의 프로젝트 수행 시 각각의 프로그래머 간 개발 스타일이 통일 될 수 있다.
- 신입 개발자의 교육과정을 줄이고 Spring .NET을 할 줄 아는 개발자를 뽑아 바로 실무에 투입할 수 있다.
- 각각의 모듈/컴포넌트별로 종속성이 제거 되므로 업그레이드, 추가, 제거가 용이하다.


출처 : http://theeye.pe.kr/entry/spring_net_simple_overview
posted by Sunny's
2010. 6. 16. 19:33 .NET Framework
 

The MSDN team has been working some potential changes to the online MSDN Library designed to help streamline the navigation experience and make it easier to find the .NET Framework information you need.

To solicit feedback on the proposed changes while they are still in development, they’ve posted a preview version of some proposed changes to a new MSDN Library Preview site which you can check out.  They’ve also created a survey that leads you through the ideas and asks for your opinions on some of the changes.  We’d very much like to have as many people as possible people take the survey and give us feedback.

[In addition to blogging, I am also now using Twitter for quick updates and to share links. You can follow me at: twitter.com/scottgu]

Quick Preview of Some of the Changes

Below are some examples of a few of the changes being proposed:

Streamlined .NET Namespaces Navigation

The current MSDN Class Library lists all .NET namespaces in a flat-namespace (sorted alphabetically):

image

Two downsides of the above approach are:

  • Some of the least-used namespaces are listed first (like Microsoft.Aspnet.Snapin and Microsoft.Build.BuildEngine)
  • All sub-namespaces are listed, which makes the list a little overwhelming, and page-load times to be slow

The new MSDN Library Preview Site now lists “System” namespaces first (since those are the most used), and the home-page lists just top-level namespace groups – which makes it easier to find things, and enables the page to load faster:

image 

Class overview and members pages merged into a single topic about each class

Previously you had to navigate to several different pages to find member information about types:

image

Links to these are still available in the MSDN Library Preview Site TOC – but the members are also now listed on the overview page, which makes it easy to quickly find everything in one place:

image

Commonly used things are nearer the top of the page

One of the other usability improvements with the new MSDN Library Preview Site is that common elements like “Code Examples” and “Inheritance Hierarchy” (for classes) are now listed near the top of the help page – making them easy to quickly find:

image

Give Us Feedback with a Survey

Above are just a few of the changes made with the new MSDN preview site – there are many other changes also rolled into it.  The MSDN team is doing usability studies on the new layout and navigation right now, and would very much like feedback on it.

If you have 15 minutes and want to help vote on which of these ideas makes it into the production MSDN site, please visit this survey before June 30, play with the changes a bit, and let the MSDN team know what you think.

Important Note: the MSDN preview site is not a fully functional version of MSDN – it’s really only there to preview the new ideas themselves, so please don’t expect it to be integrated with the rest of MSDN, with search, etc.  Once the MSDN team gets feedback on some of the changes being proposed they will roll them into the live site for everyone to use.

Hope this helps,

Scott
출처 : http://weblogs.asp.net/scottgu/archive/2010/06/15/preview-of-msdn-library-changes.aspx

posted by Sunny's
2010. 6. 11. 14:15 .NET Framework
Using Cryptography Application Block

Enterprise Library 소개하는 시리즈에서 암호화 블록을 건너 뛰었나 보다…빨리 내 사이트에도 이런 거 말해주는 고마운 이가 있었음 조케따...-_-
이번 강좌도 쫌 길다.. 맘 단디 묵기 바란다.
암호화를 사용하는 이유는 굳이 설명하지 않아도 될 듯 하다. 엔터프라이즈 어플리케이션이든 그렇지 않든 민감하고도 중요한 정보들(사용자 관련 정보/회사 기밀 사항)은 암호화를 통해 보호해야만 한다.
Cryptography Application Block을 사용하는 방식은 역시나 매우 간단하며 역시나 구성파일로 암호화 알고리즘과 같은 암호화 방식을 변경할 수 있도록 설계되었다.

string  encData = Cryptographer.EncryptSymmetric("symmProvider", "SensitiveData");

// Decrypt the string
string readableString;
readableString = Cryptographer.DecryptSymmetric("symmProvider", encData);


일단 함 들이대자.

구성파일로 구성하기

Enterprise Library Configuration을 실행하고 아래의 화면 처럼 어플리케이션을 만들고 Cryptography Application Block 을 추가하면, Hash Providers와 Symmetric Providers가 존재한다. 즉 해시와 대칭형 암호화 두가지 종류의 암호화를 정의할 수 있다는 것이다.
해시 암호화는 조금 다른 의미를 지닌다고 알고 있다. 해시를 사용하는 목적은 네트웍을 통해 중요 정보 자체를 흘려보내고 싶지 않은 경우에 사용한다.
데이터에 대한 해시값은 원본 데이터를 기준으로 생성한 유일한 값으로서 동일한 원본 데이터를 입력하지 않으면 동일한 해시 값이 나올수 없다는 메커니즘으로서 암호화 기능을 부여한다. (자세한 건 암호화 관련 서적을 보시라 (-_-!!) )


해시 암호화 제공자를 하나 만들고 Type은 SHA256Managed를 선택하도록 한다.
도움말 님이 말해주듯이 MS에서 권고하는 해시/대칭형 암호화 알고리즘은
SHA256과 AES(Rijndael)이다.

대칭형 암호화 알고리즘 제공자를 만들고 Type은 RijndealManaged를 선택하도록 한다.


Type을 선택하고 나면 아래 화면이 표시되고, 여기서는 대칭형 암호화를 키를 생성하라고 한다. 새로운 키를 생성하도록 한다.


Generate를 선택해서 암호화 키를 생성하도록 한다.


생성한 암호화 키를 파일로 저장해야 한다. 아래에서 저장할 파일을 지정한다.


데이터 보호 모드를 결정하는 화면이 나오는데 여기서 user mode를 선택하면 현재 로그온한 사용자만이 아까 생성된 키로서 암/복호화를 할 수 있다는 뜻이고, Machine mode는 이 컴퓨터를 사용하는 모든 사용자는 아까 생성된 키로서 암/복호화를 할 수 있다는 뜻이다.


대칭형 암호화에서 가장 중요한 것은 이 키 파일에 대한 보호이다. 이 키 파일이 누출되면 암호화된 데이터를 누군가 획득하여 그대로 복호화할 수 있는 가능성이 있기 때문이다.
(컴퓨터가 다르면 키 파일을 획득해도 암호화된 데이터를 획득한 키 파일로서 복호화 할 수 없다.)

결과로 생성된 두 암호화 제공자이다.


어플리케이션 작성 과정

Microsoft.Practices.EnterpriseLibrary.Common.dll,
Microsoft.Practices.EnterpriseLibrary.Security.Cryptography.dll


어셈블리를 찹조 추가 합니다.

그리고 아래의 Using 문을 삽입합니다.(Optional)
using Microsoft.Practices.EnterpriseLibrary.Security.Cryptography;


대칭형 암호화를 이용해 데이터 암호화

구성을 하고 나면 사용하는 것은 매우 쉽다. 우리가 지정한 암호화 제공자의 이름 "MySymmProvider", "MyHashProvider"만 제공해 주면 우리가 구성 시에 정의했던 암호화 알고리즘을 사용해서 암호화가 이루어 지게 된다.

string encData = Cryptographer.EncryptSymmetric("MySymmProvider", "password"); 


아래는 byte 배열 형태로 데이터를 암호화 하는 코드이다.

byte[] valueToEncrypt = Encoding.Unicode.GetBytes("password");
byte[] encryptedContents = Cryptographer.EncryptSymmetric("MySymmProvider", valueToEncrypt);

// Clear the byte array memory that holds the password.
Array.Clear(valueToEncrypt, 0, valueToEncrypt.Length);


대칭형 암호화를 이용해 데이터 복호화

암호화에 사용한 암호화 제공자"MySymmProvider"를 사용해서 복호화할 수 있다.
string readableString; readableString 
= Cryptographer.DecryptSymmetric("MySymmProvider", encDataString);


//암호화돤 byte 배열 데이터에 대한 복호화
byte[] decDataBytes = Cryptographer.DecryptSymmetric("MySymmProvider", encDataBytes);
string plainText = (new UnicodeEncoding()).GetString(decDataBytes);


해시값 구하기

byte[] valueToHash = (new UnicodeEncoding()).GetBytes("password");
byte[] generatedHash = Cryptographer.CreateHash("MyHashProvider", valueToHash);

// Clear the byte array memory.
Array.Clear(valueToHash, 0, valueToHash.Length);


해시 값을 특정 데이터와 일치하는지 확인하기

// generatedHash contains a hash value for a previously hashed string.
byte[] stringToCompare = (new UnicodeEncoding()).GetBytes("TestValue");
bool comparisonSucceeded = Cryptographer.CompareHash("MyHashProvider", stringToCompare, generatedHash);


일치여부는 곧 제공된 텍스트 stringToCompare를 가지고 제공된 해시값 generatedHash이 생성되었었는지를 검증해 준다.

지금까지는 Cryptography Application Block을 구성하고 활용하는 방법을 보았다.
하지만, 현업에 적용해서 사용하려면 고려해야 할 것이 많을 것이다.
강력한 암호화 알고리즘일수록 그만큼 많은 비트의 암호화 키를 사용할 것이고, 또한 복잡한 계산을 수행할 것이므로 성능이 떨어진다고 보는게 맞을 것이다. 즉 암호화의 강도와 성능은 반비례한다고 봐야 한다. 그래서 이 둘 간의 타협점을 찾는 것이 보안 담당자와 시스템 개발자 간의 논쟁거리일거 같은데, 아직 싸우는 것은 못봤다.

필자가 현업에서 닥친 문제는 위의 타협의 문제가 아니라 바로 대칭형 키 파일의 배포 문제이다.
EL 도움말 님이 머라고 가이드 하고 있지만 암만 봐도 이건 내가 원하는 바가 아니다. 말하자면, 스마트 클라이언트 어플리케이션들이 배포가 되는 환경이고, 스마트 클라이언트 어플리케이션들은 서버 측 웹 서비스를 호출함으로써 비즈니스 로직을 호출하게 되는 구조이다.
그래서 클라이언트 측에서 암호화를 해서 서버측에 전달하면 서버 측에서 복호화를 해야 한다.
키 파일 생성 시에도 보았지만, user mode, machine mode는 둘다 한 컴퓨터 내를 가정하고 있다. 즉 컴퓨터가 다르면 동일한 키파일을 복사한다고 하더라도 A 컴퓨터에서 암호화한 데이터를 B 컴퓨터에서 (키 파일을 가지고) 복호화 할수 없다. 복잡한 알고리즘에 의해 머신/사용자의 고유정보를 섞기 때문일 것이다.

그래서 도움말 님 한테 물어보니까, 도움말 님이 아래처럼 하라고 한다. 그래서 해본다.


두 컴퓨터에서 동일한 대칭형 암호화 키를 사용하도록 하려면 암호화 키 파일을 배포해야 한다.

암호화 키 파일 배포하기(두 컴퓨터에서 동일한 대칭 암호화 키 사용하기)

테스트 시나리오
컴퓨터 A: 원본 암호화 파일 소유 (키 파일 위치 C:\SymmKey.key), TestApp
컴퓨터 B: 암호화 키 파일 배포 대상, TestApp
두 컴퓨터에서 동일한 어플리케이션 TestApp를 구동하고 A에서 암호화한 텍스트를 B에서 복호화 해보기로 한다.

컴퓨터 A에서,
Enterprise Configuration에서 아래처럼 키 파일을 export 한다.


그리고 export 할 (텍스트) 파일을 지정하고 암호를 입력한다.


ExportedKey.txt를 컴퓨터 B에게 복사한다.

컴퓨터 B에서,

대칭 암호화 제공자를 추가한다.
컴퓨터A에서 사용한 것과 동일한 암호화 알고리즘을 선택한다.

아래처럼 import key file 를 선택한다.


컴퓨터 A에서 복사해온 ExportedKey.txt 파일을 선택한다.
컴퓨터 A에서 export 할 때 사용한 암호를 입력한다.


대칭 암호화 키를 저장할 키 파일 위치를 지정한다.
여기서 컴퓨터A와 동일한 경로인 c:\SymmKey.key로 지정한다.


그리고 컴퓨터 A와 동일한 Machine Mode를 선택한다.(user mode로 해도되는지는 테스트 해봐야 안다. 해보시기 바란다! 안될거 같다..)


그리고 마지막으로 대칭 암호화 제공자 이름을 컴퓨터 A에서 지정한 것과 동일하게 변경한다.
위의 키 파일 경로와 이름을 컴퓨터 A와 동일하게 하는 것은 절대 그렇게 해야 하는 것이 아니라 단지 이 테스트를 위해 컴퓨터 B에서 구성파일 변경을 해야 하는 번거러움을 방지하기 위함이다. 착오 없길 바란다.


이제 테스트를 하자.. 두 컴퓨터에서 구동되는 TestApp는 동일한 어플리케이션으로서 내부 코드는 동일한 대칭 암호화 제공자 "MySymmProvider"를 사용해서 처리하도록 되어 있다.

컴퓨터 A에서 암호화 : enc를 눌러서 "password"라는 문자열을 암호화


암호화된 텍스트를 그대로 B의 어플리케이션 enc 옆에 있는 텍스트 박스에 붙여 놓고 복호화(dec) 함


이제 해봤다 잘 된다….자 그럼 된건가…? 아니다….(__!) 위의 방식대로 하려면 모든 클라이언트에 Enterprise Library 깔고, Enterprise Configuration 띄워서 어플리케이션 구성파일 열어서 키 import 해서 다시 암호화 제공자 만든 후에야 비로소 서버와 동일한 암호화 키를 사용해 암/복호화 할 수 있게된다. 즉 서버에서 온 암호화 데이터를 복호화 할 수 있고 그 반대도 수행할 수 있는 것이다. 누가 이 짓을 할 것인가?... 해결책이 아닌 것이다.

프로그래밍 적으로 위 테스트 컴퓨터 B에서 했던 작업을 수행할 수 있어야만 사용가능한 해결책이 된다. 가능할까? 도움말님이 그런다. "아 고거는 쪼매 어려분데…나도 해보진 않았어… 니가 해바바.."
도움말님이 무책임하게 던진 "Modifying the Key Management Code" 이라는 섹션을 보라..

위에서 했던 테스트는 웹팜 환경에서 서버 간에 공유되는 대칭 암호화 키를 안전하게 유지할 수 있는 방법이 될 수는 있으리라 본다.

클라이언트들까지 확대하려면… 아직은 잘 모르겠지만, 굳이 하려면 보안이 설정된(인증을 요구하는) 웹 서비스를 마련하여 암복호화 서비스를 제공해 주는 것도 하나의 방법이라고 할 수 있을 것이다. (성능이 문제 겠지만) 그러면 인증된 사용자만이 암/복호화가 가능한 것이 되므로 위안을 삼을 만 한다.

Enterprise Library 강좌는 여기까지…끝.
하려고 했는데, 궁금해서 잠이 안올거 같아 함 해봤다.
결국 아래와 같은 솔루션을 도출하게 되었다.

//컴퓨터 A(원본 키파일 소유자)에서 export 했던 파일의 Stream을 얻다.
System.IO.FileStream fs = System.IO.File.Open("C:\\ExportedKey.txt", System.IO.FileMode.Open);

//새로이 생성할 대칭 암호화 키 파일의 Stream을 얻다.(없으면 만들고, 있으면 덮어 쓰자..)
System.IO.FileStream fs2 = System.IO.File.Open("C:\\MySymmKeyFile.key", System.IO.FileMode.Create);

//export된 key 파일의 내용을 가지고 암호화 키를 복원한다.
//두번째 파라미터는 key export 할때 사용했던 암호
ProtectedKey symmKey =
Microsoft.Practices.EnterpriseLibrary.Security.Cryptography.KeyManager.RestoreKey(
((System.IO.Stream)fs),
"******",System.Security.Cryptography.DataProtectionScope.LocalMachine);

//복원한 암호화 키 Stream을 암호화 키 파일을 생성한다.(덮어쓴다. )
Microsoft.Practices.EnterpriseLibrary.Security.Cryptography.KeyManager.Write(
((System.IO.Stream)fs2), symmKey);
fs.Close();
fs2.Close();


위와 같이 하게되면 컴퓨터 A든 B든 상관없이 export된 key 파일(ExportedKey.txt)에서 대칭 암호화 키 스트림을 자기 컴퓨터 정보를 반영하여 복원을 한다. 복원된 암호화 키로서 TestApp 어플리케이션이 사용하는 암호화 키파일(C:\MySymmKeyFile.key)을 생성하거나 덮어쓰게 되니까, 컴퓨터 A와 컴퓨터 B는 이제 동일한 암호화 키를 사용하여 암/복호화를 상호간에 수행할 수 있게 된다. (이제 컴퓨터 B에는 ExportedKey.txt 파일만을 배포하면 된다.)


아 오늘 욕봤다..그럼 진짜 엔터프라이즈 라이브러리 시리즈 끝.


출처 : http://www.ensimple.net/enSimple/

posted by Sunny's
2010. 5. 7. 10:05 .NET Framework


This is the twenty-third in a series of blog posts I’m doing on the VS 2010 and .NET 4 release.

Today’s blog post covers some of the extensibility improvements made in VS 2010 – as well as a cool new "PowerCommands for Visual Studio 2010” extension that Microsoft just released (and which can be downloaded and used for free).

[In addition to blogging, I am also now using Twitter for quick updates and to share links. Follow me at: twitter.com/scottgu]

Extensibility in VS 2010

VS 2010 provides a much richer extensibility model than previous releases.  Anyone can build extensions that add, customize, and light-up the Visual Studio 2010 IDE, Code Editors, Project System and associated Designers.

VS 2010 Extensions can be created using the new MEF (Managed Extensibility Framework) which is built-into .NET 4.  You can learn more about how to create VS 2010 extensions from this this blog post from the Visual Studio Team Blog.

VS 2010 Extension Manager

Developers building extensions can distribute them on their own (via their own web-sites or by selling them). 

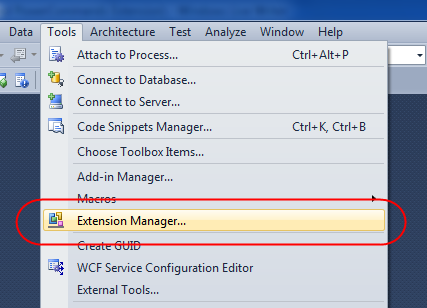
Visual Studio 2010 also now includes a built-in “Extension Manager” within the IDE that makes it much easier for developers to find, download, and enable extensions online.  You can launch the “Extension Manager” by selecting the Tools->Extension Manager menu option:

image

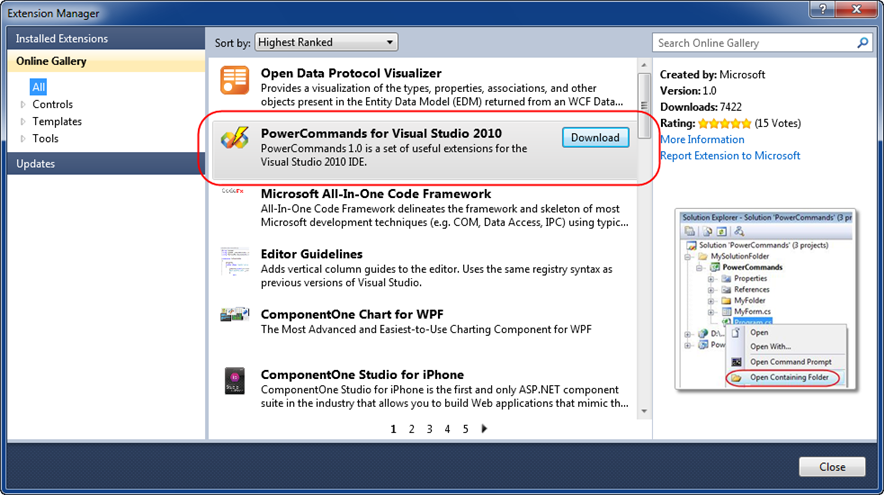
This loads an “Extension Manager” dialog which accesses an “online gallery” at Microsoft, and then populates a list of available extensions that you can optionally download and enable within your copy of Visual Studio:

image

There are already hundreds of cool extensions populated within the online gallery.  You can browse them by category (use the tree-view on the top-left to filter them).  Clicking “download” on any of the extensions will download, install, and enable it.

PowerCommands for Visual Studio 2010

This weekend Microsoft released the free PowerCommands for Visual Studio 2010 extension to the online gallery.  You can learn more about it here, and download and install it via the “Extension Manager” above (search for PowerCommands to find it).

The PowerCommands download adds dozens of useful commands to Visual Studio 2010.  Below is a screen-shot of just a few of the useful commands that it adds to the Solution Explorer context menus:

image

Below is a list of all the commands included with this weekend’s PowerCommands for Visual Studio 2010 release:

  • Enable/Disable PowerCommands in Options dialog
    This feature allows you to select which commands to enable in the Visual Studio IDE. Point to the Tools menu, then click Options. Expand the PowerCommands options, then click Commands. Check the commands you would like to enable.
    Note: All power commands are initially defaulted Enabled.

  • Format document on save / Remove and Sort Usings on save
    The Format document on save option formats the tabs, spaces, and so on of the document being saved. It is equivalent to pointing to the Edit menu, clicking Advanced, and then clicking Format Document. The Remove and sort usings option removes unused using statements and sorts the remaining using statements in the document being saved.
    Note: The Remove and sort usings option is only available for C# documents. Format document on save and Remove and sort usings both are initially defaulted OFF.
  • Clear All Panes
    This command clears all output panes. It can be executed from the button on the toolbar of the Output window.
  • Copy Path
    This command copies the full path of the currently selected item to the clipboard. It can be executed by right-clicking one of these nodes in the Solution Explorer:
    The solution node; A project node; Any project item node; Any folder.
  • Email CodeSnippet
    To email the lines of text you select in the code editor, right-click anywhere in the editor and then click Email CodeSnippet.
  • Insert Guid Attribute
    This command adds a Guid attribute to a selected class. From the code editor, right-click anywhere within the class definition, then click Insert Guid Attribute.
  • Show All Files
    This command shows the hidden files in all projects displayed in the Solution Explorer when the solution node is selected. It enhances the Show All Files button, which normally shows only the hidden files in the selected project node.
  • Undo Close
    This command reopens a closed document , returning the cursor to its last position. To reopen the most recently closed document, point to the Edit menu, then click Undo Close. Alternately, you can use the CtrlShiftZ shortcut.
    To reopen any other recently closed document, point to the View menu, click Other Windows, and then click Undo Close Window. The Undo Close window appears, typically next to the Output window. Double-click any document in the list to reopen it.
  • Collapse Projects
    This command collapses a project or projects in the Solution Explorer starting from the root selected node. Collapsing a project can increase the readability of the solution. This command can be executed from three different places: solution, solution folders and project nodes respectively.
  • Copy Class
    This command copies a selected class entire content to the clipboard, renaming the class. This command is normally followed by a Paste Class command, which renames the class to avoid a compilation error. It can be executed from a single project item or a project item with dependent sub items.
  • Paste Class
    This command pastes a class entire content from the clipboard, renaming the class to avoid a compilation error. This command is normally preceded by a Copy Class command. It can be executed from a project or folder node.
  • Copy References
    This command copies a reference or set of references to the clipboard. It can be executed from the references node, a single reference node or set of reference nodes.
  • Paste References
    This command pastes a reference or set of references from the clipboard. It can be executed from different places depending on the type of project. For CSharp projects it can be executed from the references node. For Visual Basic and Website projects it can be executed from the project node.
  • Copy As Project Reference
    This command copies a project as a project reference to the clipboard. It can be executed from a project node.
  • Edit Project File
    This command opens the MSBuild project file for a selected project inside Visual Studio. It combines the existing Unload Project and Edit Project commands.
  • Open Containing Folder
    This command opens a Windows Explorer window pointing to the physical path of a selected item. It can be executed from a project item node
  • Open Command Prompt
    This command opens a Visual Studio command prompt pointing to the physical path of a selected item. It can be executed from four different places: solution, project, folder and project item nodes respectively.
  • Unload Projects
    This command unloads all projects in a solution. This can be useful in MSBuild scenarios when multiple projects are being edited. This command can be executed from the solution node.
  • Reload Projects
    This command reloads all unloaded projects in a solution. It can be executed from the solution node.
  • Remove and Sort Usings
    This command removes and sort using statements for all classes given a project. It is useful, for example, in removing or organizing the using statements generated by a wizard. This command can be executed from a solution node or a single project node.
  • Extract Constant
    This command creates a constant definition statement for a selected text. Extracting a constant effectively names a literal value, which can improve readability. This command can be executed from the code editor by right-clicking selected text.
  • Clear Recent File List
    This command clears the Visual Studio recent file list. The Clear Recent File List command brings up a Clear File dialog which allows any or all recent files to be selected.
  • Clear Recent Project List
    This command clears the Visual Studio recent project list. The Clear Recent Project List command brings up a Clear File dialog which allows any or all recent projects to be selected.
  • Transform Templates
    This command executes a custom tool with associated text templates items. It can be executed from a DSL project node or a DSL folder node.
  • Close All
    This command closes all documents. It can be executed from a document tab.

How to temporarily disable extensions

Extensions provide a great way to make Visual Studio even more powerful, and can help improve your overall productivity.  One thing to keep in mind, though, is that extensions run within the Visual Studio process (DevEnv.exe) and so a bug within an extension can impact both the stability and performance of Visual Studio. 

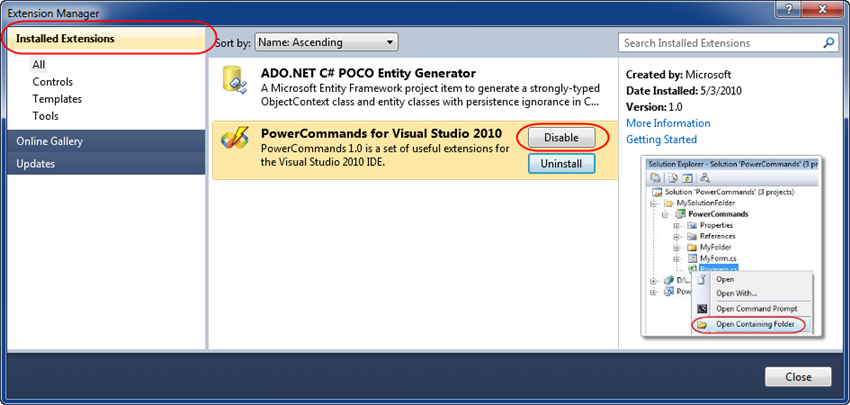
If you ever run into a situation where things seem slower than they should, or if you crash repeatedly, please temporarily disable any installed extensions and see if that fixes the problem.  You can do this for extensions that were installed via the online gallery by re-running the extension manager (using the Tools->Extension Manager menu option) and by selecting the “Installed Extensions” node on the top-left of the dialog – and then by clicking “Disable” on any of the extensions within your installed list:

image

posted by Sunny's
2010. 5. 7. 10:03 .NET Framework

This is the twenty-second in a series of blog posts I’m doing on the VS 2010 and .NET 4 release.

I’ve already covered some of the code editor improvements in the VS 2010 release.  In particular, I’ve blogged about the Code Intellisense Improvements, new Code Searching and Navigating Features, HTML, ASP.NET and JavaScript Snippet Support, and improved JavaScript Intellisense.  Today’s blog post covers a small, but nice, editor improvement with VS 2010 – the ability to use “Box Selection” when performing multi-line editing.  This can eliminate keystrokes and enables some slick editing scenarios.

[In addition to blogging, I am also now using Twitter for quick updates and to share links. Follow me at: twitter.com/scottgu]

Box Selection

Box selection is a feature that has been in Visual Studio for awhile (although not many people knew about it).  It allows you to select a rectangular region of text within the code editor by holding down the Alt key while selecting the text region with the mouse.  With VS 2008 you could then copy or delete the selected text.

VS 2010 now enables several more capabilities with box selection including:

  • Text Insertion: Typing with box selection now allows you to insert new text into every selected line
  • Paste/Replace: You can now paste the contents of one box selection into another and have the content flow correctly
  • Zero-Length Boxes: You can now make a vertical selection zero characters wide to create a multi-line insert point for new or copied text

These capabilities can be very useful in a variety of scenarios.  Some example scenarios: change access modifiers (private->public), adding comments to multiple lines, setting fields, or grouping multiple statements together.

Great 3 Minute Box-Selection Video Demo

Brittany Behrens from the Visual Studio Editor Team has an excellent 3 minute video that shows off a few cool VS 2010 multi-line code editing scenarios with box selection (note: enable your speakers as there is audio during the demo):


Watch it to learn a few ways you can use this new box selection capability to optimize your typing in VS 2010 even further:

Hope this helps,

Scott

posted by Sunny's
2010. 4. 22. 17:53 .NET Framework

SketchFlow는 Microsoft에서 나온 도구 중에서 가장 디자이너를 잘 이해하는 도구입니다. 디자이너의 행동 동선을 잘 파악해서 만들어진 도구로 스토리 보드를 작성하고 해당 스토리에 맞는 씬을 디자인하고 디자인되어 있는 컨셉을 프로토타입까지 만드는 작업을 하나의 도구 안에서 사용할 수 있게 했습니다. 
 SkectchFlow를 통해서 기획자, 디자이너, 개발자가 지역에 상관없이 완성된 컨셉과 프로토타입을 공유할 수 있으며 PC뿐만 아니라 MacOS도 함께 지원한다고 합니다. 
 위의 동영상에서는 90초만에 스토리보드 작성에서 부터 페이지 디자인, 그리고 피드백을 작성한 후에 관련된 문서 작성까지 보여줍니다.

본 동영상을 본 UI디자이너 중 한 명은 "SketchFlow를 사용하면 팀내의 의사 소통과 컨셉의 공유가 훨씬 분명해 질 것 같다. 컨셉의 무제한적인 복제와 온라인 협업이라는 측면에서는 대단히 유용한 도구가 될 수 있을 것 같다"고 했습니다.

 Microsoft는 Expression Studio라는 디자인 툴 패키지를 가지고 있으며 조만간 4.0 버전을 출시하면서 기능이 한층 더 강화 될 것이라고 이야기 하고 있습니다.
posted by Sunny's
2010. 3. 10. 16:50 .NET Framework

FAQ:Installing NetAdvantage for .NET on Windows Vista


The information in this article applies to:
ALL (vAll)
  Article Created: 
7/19/2006

Last Updated:
6/6/2008

Article Type
FAQ
  
Page Options
Average Rating:
7 out of 10

Rate this page
Print this page
E-mail this page
Add to Favorites

Summary

Starting with NetAdvantage for .NET 2006 Volume 3 for CLR 2.0, Infragistics supports the use of NetAdvantage on 32-bit versions of the Windows Vista operating system. Starting with NetAdvantage for .NET 2007 Volume 1 for CLR 2.0, Infragistics also supports the use of NetAdvantage on 64-bit versions of Vista. There are a number of points to consider, however.

Microsoft Visual Studio 2003 (and older) are not supported for use on Windows Vista. Because of this, all NetAdvantage for .NET CLR 1.x installs are also not supported on Windows Vista. You may still install the standalone version of AppStylist on Vista.

To successfully install NetAdvantage for .NET 2006 Volume 3, either User Account Control (UAC) must be disabled, or you must use the ".exe" file (instead of the ".msi") to install. UAC is enabled by default. Steps to disable UAC are provided below. To our knowledge, you may again enable UAC once the installation is complete, without affecting the behavior of the NetAdvantage for .NET toolset.

Administrator rights are required to install NetAdvantage for .NET, regardless of the version of the toolset you are installing. If you have UAC enabled, you must allow the installer to use administrative rights when the system requests them.

If you've installed Internet Information Services (IIS) 7 on Windows Vista, you must edit the system registry prior to running the NetAdvantage installer, whether for AppStylist 2006 Volume 3 for Windows Forms or for NetAdvantage for .NET 2006 Volume 3 for CLR 2.0. This step is not required for later versions of the NetAdvantage for .NET toolset.

Also, if you've installed IIS 7 on Windows Vista, regardless of the version of NetAdvantage for .NET or AppStylist you are installing, you must ensure that IIS 6 compatibility is enabled.

IMPORTANT: Also note that, for NetAdvantage for .NET 2006 Volume 3 for CLR 2.0, additional setup is required to run the ASP.NET Samples Browser in Vista, especially if you are using IIS 7.0. Please refer to the "Related Articles" section for more information.

Additional Information

If you attempt to install AppStylist 2006 Volume 3 for Windows Forms or NetAdvantage for .NET 2006 Volume 3 for CLR 2.0 without following the steps to update IIS, the typical error you will receive is:

Error 1606. Could not access network location %SystemDrive%\inetpub\wwwroot\.

If you attempt to install NetAdvantage for .NET 2006 Volume 3, NetAdvantage for Windows Forms 2006 Volume 3, or NetAdvantage for ASP.NET 2006 Volume 3 from the ".msi" file with UAC turned on, the installer may be unable to note that you are installing a licensed version (if installing with a license key), or to note when your trial period started (if installing as a trial). Either way, you may be unable to use the controls, since the licensing system of the toolset will interpret this as you attempting to use the controls after a trial period has expired. You may see a message similar to the below at design-time or compile-time:

NetAdvantage For Win Forms Trial Period Expired

For more information about the steps needed if using IIS 7.0 in Vista , please read the following blog entry by Scott Guthrie:
http://weblogs.asp.net/scottgu/archive/2006/09/19/Tip_2F00_Trick_3A00_-Using-IIS7-on-Vista-with-VS-2005.aspx
Please note that the above link was neither authored nor maintained by Infragistics.

Step-By-Step Example

Disable User Account Control (UAC)
Note: This task is only necessary for installing AppStylist 2006 Volume 3 for Window Forms or NetAdvantage for .NET 2006 Volume 3 for CLR 2.0. It is not required for later versions of either AppStylist or NetAdvantage for .NET.
1) Type "msconfig" in the Run From Start Menu to open "System Configuration".
2) Select the "Tools" Tab in System Configuration.
3) Select the "Disable UAC" tool and click on the "Launch" button.
4) Restart the computer. (This is required to reflect the updated settings.)

Optional) Once installation of NetAdvantage for .NET 2006 Volume 3 is completed, you should be able to enable UAC again, if you wish. The steps are the same as above, except you choose "Enable UAC" in step 3 instead. UAC seems to have no effect, whether enabled or disabled, on the behavior of NetAdvantage for .NET once the toolset is installed.

Edit the System Registry for Internet Information Services (IIS)
Note: This task is only necessary for installing AppStylist 2006 Volume 3 for Window Forms or NetAdvantage for .NET 2006 Volume 3 for CLR 2.0. It is not required for later versions of either AppStylist or NetAdvantage for .NET.

Please note that, as this involves modification of registry settings, Infragistics strongly recommends you back up your registry before making any changes.

1) Type "regedit" in the Run From Start Menu to open the "Registry Editor".
2) Find the following key: HKEY_LOCAL_MACHINE\SOFTWARE\Microsoft\InetStp\PathWWWRoot
3) Change the value of this registry key from "%SystemDrive%\inetpub\wwwroot" to "C:\inetpub\wwwroot". If your default website in IIS is instead stored in a different location, set the value of this registry key to that path instead.

If you are installing NetAdvantage 2006 Volume 3 for CLR 2.0 on a 64-bit version of Windows Vista, you will need to repeat steps 2 and 3 with the following registry key:
HKEY_LOCAL_MACHINE\SOFTWARE\Wow6432Node\Microsoft\InetStp\PathWWWRoot

Enable IIS 6.0 Compatibility
1) Open "Control Panel" and ensure "Control Panel Home" is the current view.
2) Click the "Uninstall a program" link from the Programs menu item.
3) Select "Turn Windows features on or off" from the Tasks menu.
4) Expand the "Internet Information Services" node, followed by the "Web Management Tools" node.
5) Check the "IIS 6 Management Compatibility" node. Ensure the nodes under this are checked as well.

IMPORTANT: For information on setting up the ASP.NET Samples Browser on Windows Vista for NetAdvantage for .NET 2006 Volume 3 for CLR 2.0, please refer to this related Knowledge Base article.


출처 : http://devcenter.infragistics.com/Support/KnowledgeBaseArticle.aspx?ArticleID=9983

posted by Sunny's
prev 1 2 3 4 5 ··· 7 next