블로그 이미지
Sunny's

calendar

1 2 3 4
5 6 7 8 9 10 11
12 13 14 15 16 17 18
19 20 21 22 23 24 25
26 27 28 29 30 31

Notice

2010. 11. 12. 09:45 ASP.NET

 This morning the ASP.NET team shipped the ASP.NET MVC 3 RC (release candidate). You can download it here.

ASP.NET MVC 3 is a pretty sweet release, and adds a ton of new functionality and refinements.  It is also backwards compatible with ASP.NET MVC V1 and V2 – which makes it easy to upgrade existing apps (read the release notes for the exact steps to do so).  You can learn more about some of the great capabilities in ASP.NET MVC 3 from previous blog posts I’ve done about it:

Today’s ASP.NET MVC 3 RC build includes several additional feature refinements (in addition to bug fixes, tooling improvements, perf tunings, etc).  This blog post covers the improvements specific to today’s release.  Please review my previous posts to learn more about the many, many other ASP.NET MVC 3 features and improvements introduced in prior previews/betas.

Razor Intellisense within Visual Studio

Colorization and intellisense support for Razor-based view templates is now supported within Visual Studio and the free Visual Web Developer Express. 

Intellisense works for HTML, C#, VB, JavaScript and CSS when editing within razor based view templates:

image

You get full C#/VB code intellisense – including against HTML helper methods (all of the existing Html helper methods in ASP.NET MVC also work just fine in Razor based views):

image

We also provide intellisense for Razor keywords and directives:

image

Note below how after setting the @model directive to be a Product, the strongly-typed HTML helpers (and the “Model” property within the template) are now typed correctly to provide intellisense for a “Product” class:

image

We are still doing final performance tuning on the editor (and have several optimizations that just missed today’s build).  If you encounter a scenario where intellisense either doesn’t seem to work or seems slower than it should be – please send us a repro so that we can verify that our latest builds have it fixed.

NuGet Package Manager

I blogged about a new, free, open source package manager last month - which at the time we were calling “NuPack”.  We’ve since renamed NuPack to NuGet. Today’s ASP.NET MVC 3 release automatically installs it as part of the setup.

You can use NuGet to easily download and install both commercial and open source libraries within your projects.  For example, to install NHibernate and a LINQ extension library that someone has built for it, I could type “install-package NHibernate.Linq” within the NuGet package manager console inside Visual Studio:

image

When I press enter NuGet will automatically download all of the libraries (and their dependencies) and setup my ASP.NET MVC 3 project to use them:

image

There are now hundreds of open source .NET libraries within the NuGet package feed, and the list will continue to grow over time. 

We think NuGet will enable all .NET developers (not just ASP.NET MVC ones) to be able to more easily leverage and share functionality across the community, and make building .NET  applications even better. 

Watch Scott Hanselman’s PDC Talk

Scott Hanselman gave the highest-rated talk at PDC this year, which he called “ASP.NET + Packaging + Open Source = Crazy Delicious”.  It is a “no slides” talk that demonstrates how to code an application from start to finish using ASP.NET MVC 3, Razor, NuGet, EF Code First, SQL CE and a bunch of other cool things.

image

You can watch the talk online or download it (by right-clicking and choosing “save as” from one of the links below):

- Low Bandwidth WMV Video (about 258 megs)

- Low Bandwidth MP4 Video (about 120 megs)

I highly recommend watching it – it is both entertaining, and demonstrates how all the pieces of the ASP.NET MVC 3 stack (and especially NuGet) fit together.

Partial Page Output Caching

ASP.NET MVC has supported output caching of full page responses since V1.  With ASP.NET MVC V3 (starting with today’s RC) we are also enabling support for partial page output caching – which allows you to easily output cache regions or fragments of a response as opposed to the entire thing.  This ends up being super useful in a lot of scenarios.

Output caching just a region of a page is really easy to-do.  Simply encapsulate the region you want to output cache within a child action that you invoke from within the view that you are rendering.  For example, below I have a product listing page, and I want to output a “Daily Specials” section on the page as well:

image

Above I’m using the Html.Action() helper method to call the SalesController.DailySpecials() child action method.  Notice that I’m passing a category parameter to it above – which will allow me to customize the “Daily Specials” I display based on what types of products the user is currently browsing (that way if they are browsing “computer” products I can display a list of computer specials, and if they are browsing “baby” products I can display diaper specials).

Below is a simple implementation of the SalesController.DailySpecials() method.  It retrieves an appropriate list of products and then renders back a response using a Razor partial view template:

image

Notice how the DailySpecials method above has an [OutputCache] attribute on it.  This indicates that the partial content rendered by it should be cached (for 3600 seconds/1 hour).  We are also indicating that the cached content should automatically vary based on the category parameter.

If we have 10 categories of products, our DailySpecials method will end up caching 10 different lists of specials – and the appropriate specials list (computers or diapers) will be output depending upon what product category the user is browsing in.  Importantly: no database access or processing logic will happen if the partial content is served out of the output cache – which will reduce the load on our server and speed up the response time.

This new mechanism provides a pretty clean and easy way to add partial-page output caching to your applications.

Unobtrusive JavaScript and Validation

I discussed several of the validation and JavaScript/AJAX improvements coming in ASP.NET MVC 3 with in my blog post about the first ASP.NET V3 preview release.

One of the nice enhancements with ASP.NET MVC V3 is that the AJAX and Validation helpers in ASP.NET MVC now both use an unobtrusive JavaScript approach by default. Unobtrusive JavaScript avoids injecting inline JavaScript into HTML markup, and instead enables cleaner separation of behavior using the new HTML 5 “data-“ convention (which conveniently works on older browsers – including IE6 - as well). This makes your HTML smaller and cleaner, and makes it easier to optionally swap out or customize JS libraries.  The Validation helpers in ASP.NET MVC 3 also now use the jQueryValidate plugin by default.

Client Side Validation On By Default

With previous versions of ASP.NET MVC (including last month’s ASP.NET MVC V3 beta) you needed to explicitly call Html.EnableClientValidation() within your views in order to enable client-side validation to take place.  Starting with today’s RC that is no longer required, and client-side validation (using an unobtrusive approach) is now enabled by default (you can turn this off if you want through a config setting in web.config).

You do still need to reference the appropriate jQuery+jQuery Validation libraries within your site for the client-side validation to light-up.  Because you explicitly reference the JavaScript files, you can choose to either host them on your own server or reference them from a CDN (content delivery network) like Microsoft’s or Google’s. 

Remote Validator

An additional validation feature that is new with today’s RC is support for a new [Remote] validation attribute that enables you to take advantage of the jQuery Validation plug-in’s remote validator support.  This enables the client-side validation library to automatically call a custom method you define on the server to perform validation logic that can only be done server-side.  It provides a very clean way to integrate scenarios like this within your client-side validation experience.

Granular Request Validation

ASP.NET MVC has built-in request validation support that helps automatically protect against XSS and HTML injection attacks.  Sometimes, though, you want to explicitly turn off request validation for some scenarios where you want users to be able to post HTML content (for example: blog authoring or CMS content editing). 

You can now add a [SkipRequestValidation] attribute to models or viewmodels that disables request validation on a per-property basis during model binding:

image

Adding the above attribute to your model/viewmodel enables you to set it once and have it apply in all scenarios.

Other Improvements in the RC

Below is a partial list of other nice improvements in today’s RC:

Improved “New Project” Dialog Box:

When you create an ASP.NET MVC 3 Project you are presented with a dialog like below:

image

The above dialog is now extensible, and you can add additional starter templates, view engines, and unit test project frameworks to it.  We’ll be releasing additional starter templates over time (that will show up in the list) to make it even easier to get up and running on new projects.

Scaffolding Improvements

A number of small, but nice, improvements have been made to the default ASP.NET MVC scaffold templates.  The templates now do a better job of identifying ID/Primary Key properties on models, and handle them appropriately (for example: they now create appropriate links for edit/delete/etc).  The Create/Edit scaffolds also now use Html.EditorFor() by default instead of Html.TextBoxFor() – which makes it easier for you to customize/tweak how your models are displayed.

Add-View Dialog Box Improvements

When you use the Add->View dialog box to add a view that is strongly-typed, the Add View dialog box now filters out more non-applicable types and is sorted/organized in a way that makes it easier to find what you are looking for.

Session-less Controller Support

You can now indicate whether you want a Controller class to use session-state – and if so whether you want it to be read/write or readonly. 

Razor Model Dynamic By Default

If you do not specify a @model directive within your Razor views, the “Model” property on the page will now default to dynamic instead of object.  This enables you to perform late-binding against the model type.  Previously you had to add a ‘@model dynamic” to the top of the file to do this.

New Overloads for Html.LabelFor() and Html.LabelForModel()

New method overloads have been added for the LabelFor() and LabelForModel() helper methods that enable you to optionally specify or override the label text.

Download

A direct link to an installer for the ASP.NET MVC 3 RC can be found here.  It works with both VS 2010 and the free Visual Web Developer 2010 Express.

Please make sure to uninstall any previous ASP.NET MVC 3 releases you have installed on your system (as well as any previous ASP.NET Web Pages setups that you might have installed).

Summary

Today’s ASP.NET MVC 3 RC build contains a bunch of goodness that makes web development with ASP.NET MVC better than ever.  If you have questions or suggestions about the release, or find issues/bugs with it, please post them to the ASP.NET MVC forum on www.asp.net.  The ASP.NET MVC team monitors this forum closely and will be able to help.

We plan on spending the next few weeks monitoring feedback, tuning performance, and fixing the final set of bugs.  Thanks in advance for any issues you send our way!

Hope this helps,

Scott

출처 : http://weblogs.asp.net/scottgu/archive/2010/11/09/announcing-the-asp-net-mvc-3-release-candidate.aspx

posted by Sunny's
2010. 8. 27. 17:34 ASP.NET


C# Naver API 에서 한글 utf8 파라미터 Encode 하기


 public static string EncodeText(string textToEncode)
{

            UTF8Encoding utf8 = new UTF8Encoding();
            Byte[] encodedBytes = utf8.GetBytes(textToEncode);
            string tempStr = "";
            foreach (Byte b in encodedBytes)
            {
                tempStr += "%" + string.Format("{0:X}", b);
            }
            return tempStr;

}

posted by Sunny's
2010. 8. 27. 15:58 ASP.NET

In last article, we explored the ASP.net MVC application structure. Today, we will build a MVC application that will consume an RSS feed. I will modify my previous project for RSS Feed. Follow the these steps.

  1. Select the "Controllers" Folder and then right click and click on Controller as shown below.
  2.  

  3. Press Add, and RssFeedController class will be created as shown below. The SyndicationFeed class from System.ServiceModel.Syndicatation makes it easy to work with RSS Feed. The code below uses an RSS feed from weblogs.asp.net to display asp.net weblogs on a page. 
    		
    	
    		using System.ServiceModel.Syndication;        // add a System.ServiceModel.Web.dll reference 	
    	
    		public class RSSFeedController : Controller	
    	
    		{	
    	
    		        public ActionResult RSSFeed() 	
    	
    		       {	
    	
    		          string strFeed = "http://weblogs.asp.net/aspnet-team/rss.aspx"; 	
    	
    		          using (XmlReader reader = XmlReader.Create(strFeed)) 	
    	
    		         { 	
    	
    		                  SyndicationFeed rssData = SyndicationFeed.Load(reader); 	
    	
    		                 return View(rssData); 	
    	
    		         }	
    	
    		     }	
    	
    		}	
    	

  4. Repeat the above step 2, and Add RSSFeed view in Views\RSSFeed folder. Add the following code in RSSFeed view.


    	<%@ Page Title="" Language="C#" MasterPageFile="~/Views/Shared/Site.Master" Inherits="System.Web.Mvc.ViewPage<SyndicationFeed>" %> 
    	
    	<%@ Import Namespace="System.ServiceModel.Syndication"%>
    	
    	<asp:Content ID="Content1" ContentPlaceHolderID="TitleContent" runat="server">
    	
    	RSSFeed
    	
    	</asp:Content> 
    	
    	<asp:Content ID="Content2" ContentPlaceHolderID="MainContent" runat="server">
    	
    	<h2>RSSFeed</h2>
    	
    	<% foreach (var item in ViewData.Model.Items) 
    	
    	{ 
    	
    	string URL = item.Links[0].Uri.OriginalString; 
    	
    	string Title = item.Title.Text; 
    	
    	Response.Write(string.Format("<p><a href=\"{0}\"><b>{1}</b></a>", URL, Title)); 
    	
    	Response.Write("<br/>" + item.Summary.Text + "</p>"); 
    	
    	} %>
    	
    	</asp:Content>
    	

  5. Now you can run the project and it will display rss feed from weblogs.asp.net as shown below.


출처 : http://fairnet.com/Blog/post/Consuming-RSS-Feed-in-MVC-ASPNET.aspx
posted by Sunny's
2010. 7. 29. 14:34 ASP.NET

자바스크립트에서 서버 함수 실행하기는 다음과 같이 하시면 됩니다..

 가령 id 가 btnTest 라는 버튼을 클릭하면

 서버측에서

private void btnTest_Click(object sender, System.EventArgs e)
{
    Response.Write(" 뭔가를 하겠죠.^^  ");  
}

함수가 실행되게됩니다.

자바스크립트에서 위의 함수가 실행되게 하고 싶으시면요..

가령  Search() 라는 자바스크립트 함수에서 위의 함수가 실행되게 하고 싶으실때는...

function Search(){
    <%=Page.GetPostBackEventReference(btnTest)%>;
}

 이렇게 하시면 됩니다.

 나중에 렌더링된 걸 보면 위의 스크립트가

function Search()
{
    __doPostBack('btnTest', '');
}


이렇게 렌더링된 걸 보실 수 있습니다.

posted by Sunny's
2010. 7. 22. 19:37 ASP.NET

Get Microsoft Silverlight

Additional Downloads

To download, right click the file type you would like and pick ‘Save Target As’ or ‘Save Link As’


출처 : p://www.msteched.com/2010/NorthAmerica/WEB206

posted by Sunny's
2010. 7. 21. 09:13 ASP.NET

Continuing from ASP.NET Performance Tips Part 1 we now conclude with Performance Tips 26-50.

26. Batched Queries:

Queries can be used in a batch and thus network traffic can be reduced: Here is an example:

“Select EmpNo, EmpName, EmpAddress from Employee”;
“Select DepNo, DeptName From Department”;

From the above two queries it seems that there will be database hit twice .

Both the above queries can be executed in batched form and a single database hit will occur as follows:

“Select EmpNo, EmpName, EmpAddress from Employee; Select DepNo, DeptName From Department”;
27. Use IIS Compression

Page size can also be reduced using Http compression in IIS. Compression tool can also be used to reduced the size of rendered content.

28. Normalization

We should follow normalization rules in database table design but over Normalized tables can cause  excessive joins for simple requirement. We should not make excessive joins for performance overhead and hence it is better to normalize only as much as required keeping in mind the performance issue.

29. Efficient Coding

While coding we should keep in mind the below issues which are potential performance drains:

1.       Avoid use of Finalize method unless it is absolutely necessary.
2.       Make a class sealed if inheritance is not required.
3.       Avoid calling GC.Collect();
4.       Use X+=1 instead X=X+1 to avoid evaluating X twice;
5.       Use overloaded methods instead of different method names where possible.

30. Define The Scope of An Object

Defining an object’s scope properly increases efficient memory management and thus improve performance. We should keep the object scope at a lower level instead of a global level if possible because the garbage collector works more frequently on short lived object .

31. Using Loops

We should keep in mind while using loops in our code:

1.       Better to use for a loop instead of foreach.
2.       Do not create objects inside loop if not required absolutely.
3.       Calling methods and properties inside loops is expensive.
4.       Evaluating count etc. before loop starts. For example:

for(int i=0;i<Grid.Rows.Count;i++) {}can be written as
int iCount= Grid.Rows.Count; for(int i=0;i< iCount;i++){}

5.       Never write exception handling code inside loop. Keep the exceptions handling code outside of the loop for better performance.

32. Dispose Instead of Finalize

Avoid using Finalize unless it is absolutely necessary. It is normally better to dispose of unmanaged resources if no longer required.

33. Minimize Thread Creation

Avoid creating threads on a per-request basis. Also avoid using Thread.Abort or Thread.Suspend.

34. Leave Connection pooling Enable

Connection Pooling is enabled by default. It boosts application performance as existing connections can be re-used from the pool rather than created . Leave this option enabled.

35. Using Blocks

Using blocks can be used as a short form of try..finally and it should be used only for those objects that implement the iDisposable interface. Here is a code snippet.

Using(SqlConnection con=new SqlConnection(connectionString)
{
try
{
con.Open();

//some code
}
catch(Exception e)
{

}

}

In the above example,there is no need to dispose of the connection object. The Connection object will be disposed automatically when it is out of scope.

36. Error Handling in Global.asax

Although implementing an error handling in Global.asax does not necessarily increase the performance of the application, it helps to identify unexpected exceptions that might occur in the application.

37. Efficient String Handling

We should keep in mind the followings when using string object in code.

1.       Use the Equals method of the string object instead of the == operator for comparison purposes.
2.       Use String.Empty for creation of an empty string instead of “”;
3.       Use String.Length for checking an empty string.
4.       Do not create string instances inside of loop.
5.       Use StringBuilder for concating more than 4 strings.

38. Selection of Collection object

While working with the collection object, we should choose a proper collection object just to avoid the boxing and unboxing overhead. Strongly typed arrays are always preferable otherwise a generic list is a better choice to avoid boxing and unboxing. For example:

List<string> list=new List<string>();
List.Add(“India”);
List.Add(“Japan”);
List.Add(“China”);
List.Add(“USA”);

39. Build Assemblies in Release Mode

When deploying assemblies to the production server build the assemblies in Release mode.

40. Kernel Caching

Use kernel caching for IIS6.0 or higher.

41. Obfuscation

Obfuscated assemblies to reduce size and improve performance.

42. Application Pooling

An application pool can cover one or more applications but it is optimal to maintain an application pool for each application separately to improve maintainability and scalability. Proper recycle intervals can be set for our application pools in IIS so that the connectivity in the web server will never be lost.

43. Compiled LINQ queries

In compiled LINQ queries the query plan is cached in a static class. So there is no need for  building the query plan from scratch as  LINQ uses the query plan from the static class which acts like  a global cache. As a result there is a significant performance gain.

44. PLINQ

When there are several processors in a system, PLINQ can help to speed up execution of various operations such as processing a collection of items from a database.

45. Use Ajax

In a data driven and interactive web application we should avail of the performance improvements of ASP.NET Ajax.

46. Minimize the content in UpdatePanels.

UpdatePanels are a very powerful and easy-to-use but they add a lot of overhead. Instead of having a single UpdatePanel wrapping a lot of content, only include the parts of the page that need to be updated in the UpdatePanel. Use multiple UpdatePanels on a page if necessary.

47. Literals Not Labels

There is a temptation to use only labels when rendering text on a page. Labels always add a <span> tag around the text, instead consider using Literals which add no additional markup.

48. Use The Repeater Control

The Repeater control is lighter-weight than other alternatives such as DataLists or GridViews, so where possible use the Repeater control.

49. Avoid Nested User Controls

User controls are a powerful way to re-use page elements but they do add a performance cost to page rendering. Nesting user controls is an even bigger drain on resources and should be avoided where possible.

50. Use SqlDataReader Instead of Dataset :

DataReader is faster than DataSet. While reading a table sequentially we should use the DataReader instead of  DataSet. The DataReader object creates a read only and forward only stream of data that will increase application performance because only one row is in memory at a time.

If you are looking for additional resources  -  10 Best Practices to Boost Website Speed onCloudHostingMag.com is a good place to start.

출처 : http://www.aspnet101.com/2010/03/50-tips-to-boost-asp-net-performance-part-i/

posted by Sunny's
2010. 7. 21. 09:12 ASP.NET

When we are looking to optimize the performance of  web applications we should keep in mind about Memory Load, Processor Load and Network Bandwidth. Here are 50  best practices to improve the performance and scalability of ASP.NET applications.

1. Page.IsPostBack Property

Keep code which only needs to be loaded once inside an IsPostBack block.

if(!IsPostBack)
{
BindDropDownList();
LoadDynamicControls();
}

As a result there will be no unnecessary database hits and server processing.

2. Enable Buffering

A buffer is a region in main memory to store temporary data for input and output .Data retrival from memory is faster than data retrieval from disk. We should leave buffering on unless there is any specific reason to turn it off. By default buffering is enable.

3. Remove unused HttpModules

There may be lot of HttpModules in Machine.Config that are not actually required for a particular application. In this scenario we should remove those unused HttpModules from application specific web.config file.

4. Trim Page Sizes

Reduce page size by removing any unnecessary space and tab characters from the page. As a result network traffic will be reduced.

5. Use a CDN

Not a performance tip exclusive to ASP.NET but an important step in speeding up a site is to use a Content Delivery Network (CDN) . CDN’s minimize the latency site visitors experience when they request a larger file from a data center that is located geographically far away. CDN’s cache files at numerous edge locations around the world to minimize latency.
If you are using Azure consider using the Windows Azure CDN , Amazon’s CloudFront cheap and easy to integrate into a website (if you happen to have a WordPress blog you can  integrate S3 and CloudFront into WordPress)

6. Server.Transfer and Response.Redirect

“To perform client side redirection in ASP.NET, users can call Response.Redirect and pass the URL. When Response.Redirect is called, the server sends a command back to the browser telling it to request the page redirected to it.  An extra roundtrip happens, which hit the performance.  We can send information from the source page by using a query string.  There is a limitation on the length of a query string; it cannot be used to pass large amounts of data over the wire.

To perform server-side redirection, users can use Server.Transfer.  As the execution is transferred on the server, Server.Transfer does not require the client to request another page.  In Server.Transfer, by using HttpContext we can access the source page’s items collection in target page.  The drawback of using this method is that the browser does not know that a different page was returned to it.  It displays the first page’s URL in the browser’s address bar.  This can confuse the user and cause problems if the user tries to bookmark the page.  Transfer is not recommended since the operations typically flow through several different pages.”

7. Precompiling

Precompiling an ASP.NET Web site provides faster initial response time for users because pages do not have to be compiled the first time they are requested. This is particularly useful for large Web sites that are updated frequently. In order to achieve that we can use ASP.NET Compilation Tool (Aspnet_compiler.exe).

8. Session State Management

Efficient state management helps to boost the performance and scalability of application. It is not advisable to keep large objects in a session variable and it is optimal to make disable session state whenever it is not required. We can turn session state off either at the Page level or at the application level using the  config file.

9. ViewState

By default the viewstate is enabled for applications and we should disable it whenever it is not required. Otherwise it will increase the page size. Every byte added to a web page by enabling its viewstate causes two bytes of network traffic – one in each direction. Disable

view state in any of the following scenarios:

(i)  A readonly page where there is no user input.

(ii) A  page that does not postback to the server

(iii) A page which requires rebuilding server controls on each post back without checking the post back data.

It is best practice to turn ViewState off at the application level and then enable it as required at the page or even control level.

10. Caching

Probably the number one performance tip is to use caching. In order to store static data caching is ideal one. There are different types of caching: Page output caching, Page fragment caching data caching and we have to select the correct type as per requirement.
In almost all scenarios at least a part of a page can be cached.

11. Locking and Shared Resources

Acquire shared resources late and release them as early as possible.  Avoid locking unless absolutely necessary.  Do not set lock on the “this;” it is better to use a private object to lock on as follows:

public Class Test
{
private stativ readonly objLock=new Object();
public static Test Singleton
{
lock(ObjLock)
{
return new test();
}
}

12. Exception Handling

Handling exceptions in an improper way reduces the application performance drastically. We should try to avoid exceptions. Let’s explain with some code snippet:

try
{
validateUser (username,password)
}
Catch(Exception e)
{
DisplayMessage();
}

The above code can be written in better and optimized way to avoid exception as follows:

If(validateUser)
{
//Some code
}
else
{
DisplayMessage();
}

We should avoid rethrowing exceptions because they are expensive as the stack trace is lost and a new stack trace must be created, for example:

try
{
//some code
}
catch (Exception ex)
{
throw ex;
}

An optimized version of the above code is as follows:

try
{
//some code
}
catch (Exception ex)
{
throw ; //stack trace information is preserved here.
}

13. Null check

Performance can be improved if we check for a null value instead of catching exceptions from attempting to read null items. Here is a code snippet:

Object objItem=Session[“myItem”];
If(objItem==null)
{
//do something else
}

14. Enable the web gardening for multiprocessors computers

In IIS Server there may be multiple application pools and each application pool should have at least a single Worker Process. In multiprocessor machines the work is distributed to several processes – one to each CPU and this technique is known as Web Gardening. Web Gardening should have multiple Worker processes. In case of Web Garden Session Mode should be “out proc” and we can use “Session State Server” or “SQL-Server Session State”. The worker processes in a Web Garden share the requests that come from that particular application pool. If any particular worker process fails, another worker process can continue to process requests and that is the main advantage for application performance and scalability.

15. Disable Tracing

Tracing may expose private information, such as the amount of information in view state, page processing time, etc. Enabling tracing adds performance overhead so it should be enabled only while an application is being actively analyzed. Tracing should be turned off using

< trace enabled =”false”  - – - – -/> in config file.

16. Disable debug

By default this attribute is set to “true”  which  is essential at development time, but always set debug=”false” before deployment otherwise file size will be longer by adding pdb information which delays the page processing.

Note : Check out Debugging in Visual Studio Tutorial if you are looking to get started using Visual Studio for debugging

17. Ensure  checking of  Page.IsValid

While using Validator Controls, make sure that Page.IsValid is checked in code before processing of page.

18. Use Paging

We should always load data in a grid type control using paging  for faster page loading.

19. Avoid Recursive Functions and  Nested Loops

A lot of memory consumption occurs when using recursive functions and nested loops. It is always better to avoid nested loops and recursive functions to improve performance.

20. Cleaning Up code

Find and remove unnecessary or redundant code to minimize page size. We can use tools like FXCop in for this.

21. Keep StyleSheets in the Header and Scripts to the end of Document

Always place StyleSheets into the Header and place scripts at the end of the document. Progressive rendering is blocked until all StyleSheets have been downloaded and progressive rendering is stopped for all content below the script until it is fully loaded.

22. Keep JavaScript and CSS External

Keeping Javascript and CSS files external instead of inline can reduce the page size and allow for faster page processing as the JavaScript and CSS files are cached by the browser.

23. Minimize the number of web server controls

Only use the ASP.NET server controls when they are required otherwise use standard html controls for faster rendering.

24. Validate all Input received from the Users

It is always better to validate all Input received from the users at client side to avoid the server round trip. Server side validation is required for security purpose.

25. Use stored procedures:

As per MSDN, a stored procedure is a group of Transact-SQL statements compiled into a single execution plan.

Using stored procedure as compared to dynamic quaries boost application performance because stored procedure are precompiled. As a result the network traffic and server overhead are reduced. When a stored procedure is getting executed, sql server creates an execution plan in memory. Subsequent executions of the procedure are much faster because the plan is already available. On the other hand, execution plan for sql queries are recreated for each and every execution. Another point to be noted that when when a stored procedure is executed, a message is transmitted from the server to the client that indicates the number of rows are effected. This can be turned off to reduce network traffic by the following statement:

SET NOCOUNT ON

출처 : http://www.aspnet101.com/2010/03/50-tips-to-boost-asp-net-performance-part-i/

posted by Sunny's
2010. 7. 14. 10:06 ASP.NET


Introduction

There are a lot of articles out there that show you how to integrate with the jQuery jqGrid Plugin from a listing, paging, sorting approach, but I haven’t seen many that show the integration with the add/edit/delete features that jqGrid offers.

It turns out that it isn’t very difficult to do, but it took quite a bit of digging in the jqGrid API documentation for me to find all the things I needed.

The following article will show how to customize the add/edit/delete modal experience inside of the jqGrid with ASP.NET MVC.

Contact ViewModel

First, you start off with your ViewModel. In this case the following is really bare bones. I haven’t annotated the properties with metadata because I actually do that manually in the jqGrid columns. That isn’t optimal, but it would be nice to have these automatically mapped. That sounds like another blog post ;)

 
01.public class ContactViewModel
02.{
03.    public System.Guid ContactId { get; set; }
04.  
05.    public string Name { get; set; }
06.  
07.    public string Email { get; set; }
08.  
09.    public string PhoneNumber { get; set; }
10.  
11.    public DateTime DateOfBirth { get; set; }
12.  
13.    public bool IsMarried { get; set; }
14.}

Contact View

The following code setups up the jqGrid to support add, edit, and delete.

The first function you’ll see is a custom validator that checks to see if the phone number has a length of 14. Yes, it isn’t bullet-proof validation by any stretch of the imagination, but its more of an example of what can be done.

Next you’ll see the updateDialog object literal defining the look and behavior of the add, edit, and delete dialog windows. The main property to define is the URL where the AJAX requests will post the data. You can also control whether the dialog closes immediately, if it’s a modal dialog, etc…

The next important thing to notice is the “key: true” property of the ContactId column. If you don’t set this property then the POST for the delete command  only send the relative ID that jqGrid generates, not the ContactId that you need. So, this is important ;)

Note: You’ll see some code below setting global properties for the jqGrid such as the title of the dialogs, buttons, etc. If you don’t do this then you’ll get generic titles. I figured these customizations made the user experience a little nicer, but things will work just find without them.

 
01.function isValidPhone(value, name) {
02.    console.log('isValidPhone');
03.    var errorMessage = name + ': Invalid Format';
04.    var success = value.length === 14;
05.    return [success, success ? '' : errorMessage];
06.}  
07.  
08.$(document).ready(function () {
09.    var updateDialog = {
10.        url: '<%= Url.Action("Update", "Contact") %>'
11.        , closeAfterAdd: true
12.        , closeAfterEdit: true
13.        , afterShowForm: function (formId) {
14.            $("#PhoneNumber").mask("(999) 999-9999");
15.            $("#DateOfBirth").datepicker();
16.        }
17.        , afterclickPgButtons: function (whichbutton, formid, rowid) {
18.            $("#PhoneNumber").mask("(999) 999-9999");
19.        }
20.        , modal: true
21.        , width: "400"
22.    };
23.  
24.    $.jgrid.nav.addtext = "Add";
25.    $.jgrid.nav.edittext = "Edit";
26.    $.jgrid.nav.deltext = "Delete";
27.    $.jgrid.edit.addCaption = "Add Contact";
28.    $.jgrid.edit.editCaption = "Edit Contact";
29.    $.jgrid.del.caption = "Delete Contact";
30.    $.jgrid.del.msg = "Delete selected Contact?";
31.  
32.    $("#list").jqGrid({
33.        url: '<%= Url.Action("List", "Contact") %>',
34.        datatype: 'json',
35.        mtype: 'GET',
36.        colNames: ['ContactId', 'Name', 'Date of Birth', 'E-mail', 'Phone Number', 'Married'],
37.        colModel: [
38.            { name: 'ContactId', index: 'ContactId', width: 40, align: 'left', key: true, editable: true, editrules: { edithidden: false }, hidedlg: true, hidden: true },
39.            { name: 'Name', index: 'Name', width: 300, align: 'left', editable: true, edittype: 'text', editrules: { required: true }, formoptions: { elmsuffix: ' *'} },
40.            { name: 'DateOfBirth', index: 'DateOfBirth', width: 200, align: 'left', formatter: 'date', datefmt: 'm/d/Y', editable: true, edittype: 'text', editrules: { required: true, date: true }, formoptions: { elmsuffix: ' *'} },
41.            { name: 'Email', index: 'Email', width: 200, align: 'left', formatter: 'mail', editable: true, edittype: 'text', editrules: { required: true, email: true }, formoptions: { elmsuffix: ' *'} },
42.            { name: 'PhoneNumber', index: 'PhoneNumber', width: 200, align: 'left', editable: true, edittype: 'text', editrules: { required: true, custom: true, custom_func: isValidPhone }, formoptions: { elmsuffix: ' *'} },
43.            { name: 'IsMarried', index: 'IsMarried', width: 200, align: 'left', editable: true, edittype: 'checkbox', editoptions: { value: "True:False" }, editrules: { required: true}}],
44.        pager: $('#listPager'),
45.        rowNum: 1000,
46.        rowList: [1000],
47.        sortname: 'ContactId',
48.        sortorder: "desc",
49.        viewrecords: true,
50.        imgpath: '/Content/Themes/Redmond/Images',
51.        caption: 'Contact List',
52.        autowidth: true,
53.        ondblClickRow: function (rowid, iRow, iCol, e) {
54.            $("#list").editGridRow(rowid, prmGridDialog);
55.        }
56.    }).navGrid('#listPager',
57.        {
58.            edit: true, add: true, del: true, search: false, refresh: true
59.        },
60.        updateDialog,
61.        updateDialog,
62.        updateDialog
63.    );
64.});

Contact Controller Update Action

The add/update/delete feature takes one URL where you can change the logic based on the operation type. The MVC Modal Binder will map the fields into your ViewModel in most cases. The exception is the “id” that is passed on the delete operation, but there is a way to get around that later in this post ;)

 
01.public ActionResult Update(ContactViewModel viewModel, FormCollection formCollection)
02.{
03.    var operation = formCollection["oper"];
04.    if (operation.Equals("add") || operation.Equals("edit"))
05.    {
06.        repository.SaveOrUpdate(new ContactViewModel
07.        {
08.            ContactId = viewModel.ContactId,
09.            DateOfBirth = viewModel.DateOfBirth,
10.            Email = viewModel.Email,
11.            IsMarried = viewModel.IsMarried,
12.            Name = viewModel.Name,
13.            PhoneNumber = viewModel.PhoneNumber
14.        });
15.    }
16.    else if (operation.Equals("del"))
17.    {
18.        repository.Delete(new ContactViewModel
19.        {
20.            ContactId = new Guid(formCollection["id"])
21.        });
22.    }
23.  
24.    return Content(repository.HasErrors.ToString().ToLower()); 
25.}

What About Using Complex Keys?

Instead of having ContactId (“key: true”) as your key to delete, you might have a more complex key to identify which item to delete. As it turns out, you can bind to the onclickSubmit event of the add/edit/delete dialog and change what data is POST’ed to the controller.

A nice side effect of this is that you name your property such that the MVC Modal Binder works.

Updated Dialog Object Literal

 
01.var updateDialog = {
02.    url: '<%= Url.Action("Update", "Contact") %>'
03.    , closeAfterAdd: true
04.    , closeAfterEdit: true
05.    , afterShowForm: function (formId) {
06.        $("#PhoneNumber").mask("(999) 999-9999");
07.        $("#DateOfBirth").datepicker();
08.    }
09.    , afterclickPgButtons: function (whichbutton, formid, rowid) {
10.        $("#PhoneNumber").mask("(999) 999-9999");
11.    }
12.    , modal: true
13.    , onclickSubmit: function (params) {
14.        var ajaxData = {};
15.  
16.        var list = $("#list");
17.        var selectedRow = list.getGridParam("selrow");
18.        rowData = list.getRowData(selectedRow);
19.        ajaxData = { ContactId: rowData.ContactId };
20.  
21.        return ajaxData;
22.    }
23.    , width: "400"
24.};

Updated Contact Controller Update Action

 
01.public ActionResult Update(ContactViewModel viewModel, FormCollection formCollection)
02.{
03.    var operation = formCollection["oper"];
04.    if (operation.Equals("add") || operation.Equals("edit"))
05.    {
06.        repository.SaveOrUpdate(new ContactViewModel
07.        {
08.            ContactId = viewModel.ContactId,
09.            DateOfBirth = viewModel.DateOfBirth,
10.            Email = viewModel.Email,
11.            IsMarried = viewModel.IsMarried,
12.            Name = viewModel.Name,
13.            PhoneNumber = viewModel.PhoneNumber
14.        });
15.    }
16.    else if (operation.Equals("del"))
17.    {
18.        repository.Delete(new ContactViewModel
19.        {
20.            ContactId = viewModel.ContactId
21.        });
22.    }
23.  
24.    return Content(repository.HasErrors.ToString().ToLower()); 
25.}

Conclusion

I hope you found the above article of some use in your everyday coding. The jqGrid also provides an inline editing feature similar to what you might experience in an Excel grid. You might look into that if you are interested.

Please give me your feedback. Thanks!

posted by Sunny's
2010. 7. 13. 01:58 IPhone

ASP.NET 컴포넌트로 유명한 회사인 ComponentOne에서 Studio for iPhone 이라는 제품을 내놨네요.
한마디로, ASP.NET으로 iPhone용 앱을 개발할 수 있다. 입니다.

관심있으시면 여기로 가시면 되겠습니다.

근데 왜 WinForm이 아니라 ASP.NET이지?

경로 : http://www.componentone.com/SuperProducts/StudioiPhone/
posted by Sunny's
2010. 7. 8. 01:59 ASP.NET

Introducing “Razor” – a new view engine for ASP.NET

One of the things my team has been working on has been a new view engine option for ASP.NET.

ASP.NET MVC has always supported the concept of “view engines” – which are the pluggable modules that implement different template syntax options.  The “default” view engine for ASP.NET MVC today uses the same .aspx/.ascx/.master file templates as ASP.NET Web Forms.  Other popular ASP.NET MVC view engines used today include Spark and NHaml.

The new view-engine option we’ve been working on is optimized around HTML generation using a code-focused templating approach. The codename for this new view engine is “Razor”, and we’ll be shipping the first public beta of it shortly.

Design Goals

We had several design goals in mind as we prototyped and evaluated “Razor”:

  • Compact, Expressive, and Fluid: Razor minimizes the number of characters and keystrokes required in a file, and enables a fast, fluid coding workflow. Unlike most template syntaxes, you do not need to interrupt your coding to explicitly denote server blocks within your HTML. The parser is smart enough to infer this from your code. This enables a really compact and expressive syntax which is clean, fast and fun to type.

  • Easy to Learn: Razor is easy to learn and enables you to quickly be productive with a minimum of concepts. You use all your existing language and HTML skills.

  • Is not a new language: We consciously chose not to create a new imperative language with Razor. Instead we wanted to enable developers to use their existing C#/VB (or other) language skills with Razor, and deliver a template markup syntax that enables an awesome HTML construction workflow with your language of choice.

  • Works with any Text Editor: Razor doesn’t require a specific tool and enables you to be productive in any plain old text editor (notepad works great).

  • Has great Intellisense: While Razor has been designed to not require a specific tool or code editor, it will have awesome statement completion support within Visual Studio. We’ll be updating Visual Studio 2010 and Visual Web Developer 2010 to have full editor intellisense for it.

  • Unit Testable: The new view engine implementation will support the ability to unit test views (without requiring a controller or web-server, and can be hosted in any unit test project – no special app-domain required).

We’ve spent the last few months building applications with it and doing lots of usability studies of it with a variety of volunteers (including several groups of non-.NET web developers). The feedback so far from people using it has been really great.

Choice and Flexibility

One of the best things about ASP.NET is that most things in it are pluggable. If you find something doesn’t work the way you want it to, you can swap it out for something else.

The next release of ASP.NET MVC will include a new “Add->View” dialog that makes it easy for you to choose the syntax you want to use when you create a new view template file.  It will allow you to easily select any of of the available view engines you have installed on your machine – giving you the choice to use whichever view approach feels most natural to you:

AddView9

Razor will be one of the view engine options we ship built-into ASP.NET MVC.  All view helper methods and programming model features will be available with both Razor and the .ASPX view engine. 

You’ll also be able to mix and match view templates written using multiple view-engines within a single application or site.  For example, you could write some views using .aspx files, some with .cshtml or .vbhtml files (the file-extensions for Razor files – C# and VB respectively), and some with Spark or NHaml.  You can also have a view template using one view-engine use a partial view template written in another.  You’ll have full choice and flexibility.

Hello World Sample with Razor

Razor enables you to start with static HTML (or any textual content) and then make it dynamic by adding server code to it.  One of the core design goals behind Razor is to make this coding process fluid, and to enable you to quickly integrate server code into your HTML markup with a minimum of keystrokes.

To see a quick example of this let’s create a simple “hello world” sample that outputs a message like so:

image

Building it with .ASPX Code Nuggets

If we were to build the above “hello world” sample using ASP.NET’s existing .ASPX markup syntax, we might write it using <%= %> blocks to indicate “code nuggets” within our HTML markup like so:

image

One observation to make about this “hello world” sample is that each code nugget block requires 5 characters (<%= %>) to denote the start and stop of the code sequence.  Some of these characters (in particular the % key – which is center top on most keyboards) aren’t the easiest to touch-type.

Building it with Razor Syntax

You denote the start of a code block with Razor using a @ character.  Unlike <% %> code nuggets, Razor does not require you to explicitly close the code-block:

image

The Razor parser has semantic knowledge of C#/VB code used within code-blocks – which is why we didn’t need to explicitly close the code blocks above.  Razor was able to identify the above statements as self-contained code blocks, and implicitly closed them for us.

Even in this trivial “hello world” example we’ve managed to save ourselves 12 keystrokes over what we had to type before.  The @ character is also easier to reach on the keyboard than the % character which makes it faster and more fluid to type. 

Loops and Nested HTML Sample

Let’s look at another simple scenario where we want to list some products (and the price of each product beside it):

image

Building it with .ASPX Code Nuggets

If we were to implement this using ASP.NET’s existing .ASPX markup syntax, we might write the below code to dynamically generate a <ul> list with <li> items for each product inside it:

image 

Building it with Razor Syntax

Below is how to generate the equivalent output using Razor:

image

Notice above how we started a “foreach” loop using the @ symbol, and then contained a line of HTML content with code blocks within it.  Because the Razor parser understands the C# semantics in our code block, it was able to determine that the <li> content should be contained within the foreach and treated like content that should be looped.  It also recognized that the trailing } terminated the foreach statement.

Razor was also smart enough to identify the @p.Name and @p.Price statements within the <li> element as server code – and execute them each time through the loop. Notice how Razor was smart enough to automatically close the @p.Name and @p.Price code blocks by inferring how the HTML and code is being used together.

The ability to code like this without having to add lots of open/close markers throughout your templates ends up making the whole coding process really fluid and fast.

If-Blocks and Multi-line Statements

Below are a few examples of other common scenarios:

If Statements

Like our foreach example above, you can embed content within if statements (or any other C# or VB language construct), without having to be explicit about the code block’s begin/end.  For example:

image

Multi-line Statements

You can denote multiple lines of code by wrapping it within a @{ code } block like so:

image 

Notice above how variables can span multiple server code blocks – the “message” variable defined within the multi-line @{ } block, for example, is also being used within the @message code block.  This is conceptually the same as the <% %> and <%= %> syntax within .aspx markup files.

Multi-Token Statements

The @( ) syntax enables a code block to have multiple tokens.  For example, we could re-write the above code to concatenate a string and the number together within a @( code ) block:

image 

Integrating Content and Code

The Razor parser has a lot of language smarts built-into it – enabling you to rely on it to do the heavily lifting, as opposed to you having to explicitly do it yourself. 

Does it break with email addresses and other usages of @ in HTML?

Razor’s language parser is clever enough in most cases to infer whether a @ character within a template is being used for code or static content.  For example, below I’m using a @ character as part of an email address:

image

When parsing a file, Razor examines the content on the right-hand side of any @ character and attempts to determine whether it is C# code (if it is a CSHTML file) or VB code (if it is a VBHTML file) or whether it is just static content.  The above code will output the following HTML (where the email address is output as static content and the @DateTime.Now is evaluated as code:

image

In cases where the content is valid as code as well (and you want to treat it as content), you can explicitly escape out @ characters by typing @@.

Identifying Nested Content

When nesting HTML content within an if/else, foreach or other block statement, you should look to wrap the inner content within an HTML or XML element to better identify that it is the beginning of a content block.

For example, below I’ve wrapped a multi-line content block (which includes a code-nugget) with a <span> element:

image

This will render the below content to the client – note that it includes the <span> tag:

image

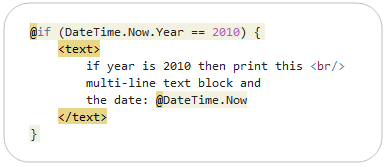
You can optionally wrap nested content with a <text> block for cases where you have content that you want to render to the client without a wrapping tag:

image

The above code will render the below content to the client – note that it does not include any wrapping tag:

image 

HTML Encoding

By default content emitted using a @ block is automatically HTML encoded to better protect against XSS attack scenarios.

Layout/MasterPage Scenarios – The Basics

It is important to have a consistent look and feel across all of the pages within your web-site/application.  ASP.NET 2.0 introduced the concept of “master pages” which helps enable this when using .aspx based pages or templates.  Razor also supports this concept using “layout pages” – which allow you to define a common site template, and then inherit its look and feel across all the views/pages on your site.

Simple Layout Example

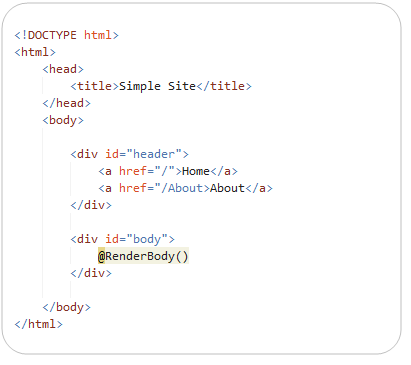
Below is a simple example of a layout page – which we’ll save in a file called “SiteLayout.cshtml”.  It can contain any static HTML content we want to include in it, as well as dynamic server code.  We’ll then add a call to the “RenderBody()” helper method at the location in the template where we want to “fill in” specific body content for a requested URL:

image

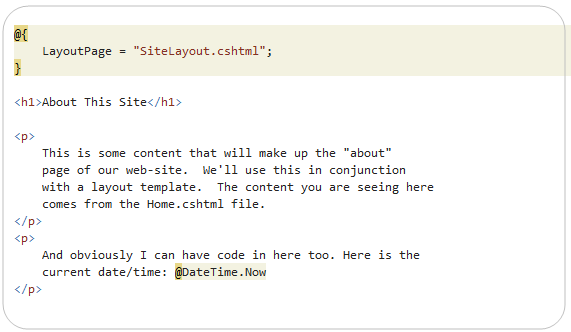
We can then create a view template called “Home.cshtml” that contains only the content/code necessary to construct the specific body of a requested page, and which relies on the layout template for its outer content:

image

Notice above how we are explicitly setting the “LayoutPage” property in code within our Home.cshtml file.  This indicates that we want to use the SiteLayout.cshtml template as the layout for this view.  We could alternatively indicate the layout file we want to use within a ASP.NET MVC Controller invoking Home.cshtml as a view template, or by configuring it as the default layout to use for our site (in which case we can specify it in one file in our project and have all view templates pick it up automatically).

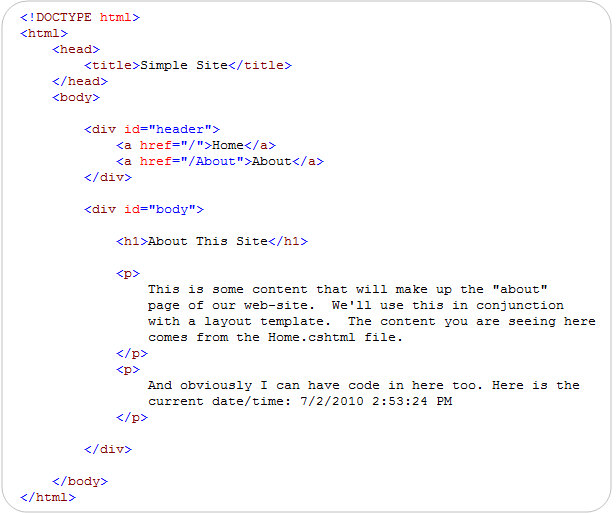
When we render Home.cshtml as a view-template, it will combine the content from the layout and sub-page and send the following content to the client:

image

Compact, Clean, Expressive Code

One of the things to notice in the code above is that the syntax for defining layouts and using them from views/pages is clean and minimal.  The code screen-shots above of the SiteLayout.cshtml and Home.cshtml files contain literally all of the content in the two .cshtml files – there is no extra configuration or additional tags, no <%@ Page%> prefix, nor any other markup or properties that need to be set.

We are trying to keep the code you write compact, easy and fluid.  We also want to enable anyone with a text editor to be able to open, edit and easily tweak/customize them.  No code generation or intellisense required.

Layout/MasterPage Scenarios – Adding Section Overrides

Layout pages optionally support the ability to define different “sections” within them that view templates based on the layout can then override and “fill-in” with custom content.  This enables you to easily override/fill-in discontinuous content regions within a layout page, and provides you with a lot of layout flexibility for your site.

For example, we could return to our SiteLayout.cshtml file and define two sections within our layout that the view templates within our site can optionally choose to fill-in.  We’ll name these sections “menu” and “footer” – and indicate that they are optional (and not required) within our site by passing an optional=true parameter to the RenderSection() helper call (we are doing this using the new C# optional parameter syntax that I’ve previously blogged about).

image

Because these two sections are marked as “optional”, I’m not required to define them within my Home.cshtml file.  My site will continue to work fine if they aren’t there. 

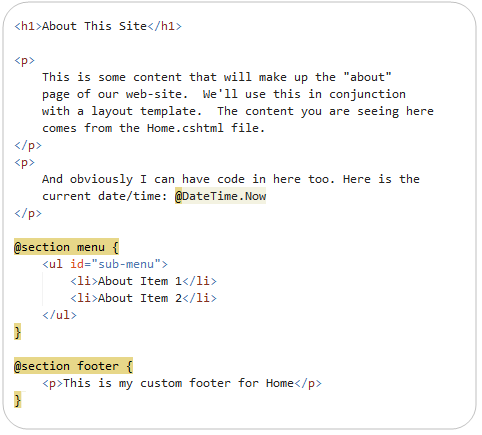
Let’s go back into Home.cshtml, though, and define a custom Menu and Footer section for them.  The below screenshot contains all of the content in Home.cshtml – there is nothing else required in the file.  Note: I moved setting the LayoutPage to be a site wide setting – which is why it is no longer there.

image

Our custom “menu” and “footer” section overrides are being defined within named @section { } blocks within the file.  We chose not to require you to wrap the “main/body” content within a section and instead to just keep it inline (which both saves keystrokes and enables you to easily add sections to your layout pages without having to go back through all your existing pages changing their syntax). 

When we render Home.cshtml as a view-template again, it will now combine the content from the layout and sub-page, integrating the two new custom section overrides in it, and send down the following content to the client:

image

Encapsulation and Re-Use with HTML Helpers

We’ve covered how to maintain a consistent site-wide look and feel using layout pages.  Let’s now look at how we can also create re-usable “HTML helpers” that enable us to cleanly encapsulate HTML generation functionality into libraries that we can re-use across our site – or even across multiple different sites.

Code Based HTML Helpers

ASP.NET MVC today has the concept of “HTML Helpers” – which are methods that can be invoked within code-blocks, and which encapsulate generating HTML.  These are implemented using pure code today (typically as extension methods).  All of the existing HTML extension methods built with ASP.NET MVC (both ones we’ve built and ones built by others) will work using the “Razor” view engine (no code changes required):

image

Declarative HTML Helpers

Generating HTML output using a code-only class approach works – but is not ideal.

One of the features we are looking to enable with Razor is an easy way to create re-usable HTML helpers using a more declarative approach.  Our plan is to enable you to define reusable helpers using a @helper { } declarative syntax like below. 

image

You’ll be able to place .cshtml files that contain these helpers into a Views\Helpers directory and then re-use them from any view or page in your site (no extra steps required):

image

Note above how our ProductListing() helper is able to define arguments and parameters.  This enables you to pass any parameters you want to them (and take full advantage of existing languages features like optional parameters, nullable types, generics, etc).  You’ll also get debugging support for them within Visual Studio.

Note: The @helper syntax won’t be in the first beta of Razor – but is something we hope will be enabled with the next drop.  Code-based helpers will work with the first beta.

Passing Inline Templates as Parameters

One other useful (and extremely powerful) feature we are enabling with Razor is the ability to pass “inline template” parameters to helper methods.  These “inline templates” can contain both HTML and code, and can be invoked on-demand by helper methods.

Below is an example of this feature in action using a “Grid” HTML Helper that renders a DataGrid to the client:

image

The Grid.Render() method call above is C#.  We are using the new C# named parameter syntax to pass strongly-typed arguments to the Grid.Render method - which means we get full statement completion/intellisense and compile-time checking for the above syntax.

The “format” parameter we are passing when defining columns is an “inline template” – which contains both custom html and code, and which we can use to customize the format of the data.  What is powerful about this is that the Grid helper can invoke our inline template as a delegate method, and invoke it as needed and as many times as it wants. In the scenario above it will call it each time it renders a row in the grid – and pass in the “item” that our template can use to display the appropriate response.

This capability will enable much richer HTML helper methods to be developed.  You’ll be able to implement them using both a code approach (like the way you build extension methods today) as well as using the declarative @helper {} approach.

Visual Studio Support

As I mentioned earlier, one of our goals with Razor is to minimize typing, and enable it to be easily edited with nothing more than a basic text editor (notepad works great).  We’ve kept the syntax clean, compact and simple to help enable that.

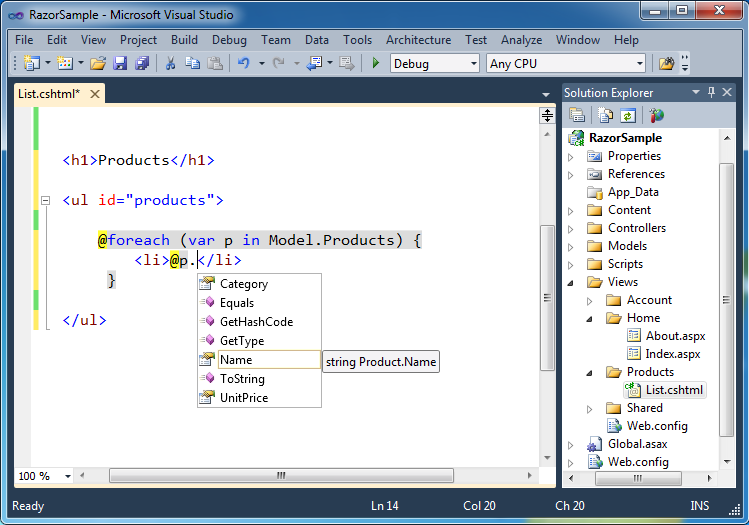
We have also designed Razor so that you get a rich code editing experience within Visual Studio.  We will provide full HTML, JavaScript and C#/VB code intellisense within Razor based files:

image

Notice above how we are providing intellisense for a Product object on the “@p.” code embedded within the <li> element inside a foreach loop.  Also notice how our \Views folder within the Solution Explorer contains both .aspx and .cshtml view templates.  You can use multiple view engines within a single application – making it easy to choose whichever syntax feels best to you.

Summary

We think “Razor” provides a great new view-engine option that is streamlined for code-focused templating.  It a coding workflow that is fast, expressive and fun.  It’s syntax is compact and reduces typing – while at the same time improving the overall readability of your markup and code.  It will be shipping as a built-in view engine with the next release of ASP.NET MVC.  You can also drop standalone .cshtml/.vbhtml files into your application and run them as single-pages – which also enables you to take advantage of it within ASP.NET Web Forms applications as well.

The feedback from developers who have been trying it out the last few months has been extremely positive.  We are going to be shipping the first public beta of it shortly, and are looking forward to your feedback on it.

Hope this helps,

Scott


출처 : http://weblogs.asp.net/scottgu/archive/2010/07/02/introducing-razor.aspx

posted by Sunny's
prev 1 2 3 next