블로그 이미지
Sunny's

calendar

1 2 3 4
5 6 7 8 9 10 11
12 13 14 15 16 17 18
19 20 21 22 23 24 25
26 27 28 29 30 31

Notice

2010. 6. 16. 19:32 JQUERY

Last month I blogged about how Microsoft is starting to make code contributions to jQuery, and about some of the first code contributions we were working on: jQuery Templates and Data Linking support.

Today, we released a prototype of a new jQuery Globalization Plugin that enables you to add globalization support to your JavaScript applications. This plugin includes globalization information for over 350 cultures ranging from Scottish Gaelic, Frisian, Hungarian, Japanese, to Canadian English.  We will be releasing this plugin to the community as open-source.

You can download our prototype for the jQuery Globalization plugin from our Github repository:

http://github.com/nje/jquery-glob

You can also download a set of samples that demonstrate some simple use-cases with it here.

Understanding Globalization

The jQuery Globalization plugin enables you to easily parse and format numbers, currencies, and dates for different cultures in JavaScript. For example, you can use the Globalization plugin to display the proper currency symbol for a culture:

image

You also can use the Globalization plugin to format dates so that the day and month appear in the right order and the day and month names are correctly translated:

image

Notice above how the Arabic year is displayed as 1431. This is because the year has been converted to use the Arabic calendar.

Some cultural differences, such as different currency or different month names, are obvious. Other cultural differences are surprising and subtle. For example, in some cultures, the grouping of numbers is done unevenly. In the "te-IN" culture (Telugu in India), groups have 3 digits and then 2 digits. The number 1000000 (one million) is written as "10,00,000". Some cultures do not group numbers at all. All of these subtle cultural differences are handled by the jQuery Globalization plugin automatically.

Getting dates right can be especially tricky. Different cultures have different calendars such as the Gregorian and UmAlQura calendars. A single culture can even have multiple calendars. For example, the Japanese culture uses both the Gregorian calendar and a Japanese calendar that has eras named after Japanese emperors. The Globalization Plugin includes methods for converting dates between all of these different calendars.

Using Language Tags

The jQuery Globalization plugin uses the language tags defined in the RFC 4646 and RFC 5646 standards to identity cultures (see http://tools.ietf.org/html/rfc5646). A language tag is composed out of one or more subtags separated by hyphens. For example:

Language Tag Language Name (in English)
en-AU English (Australia)
en-BZ English (Belize)
en-CA English (Canada)
Id Indonesian
zh-CHS Chinese (Simplified) Legacy
Zu isiZulu

Notice that a single language, such as English, can have several language tags. Speakers of English in Canada format numbers, currencies, and dates using different conventions than speakers of English in Australia or the United States.  You can find the language tag for a particular culture by using the Language Subtag Lookup tool located here:  http://rishida.net/utils/subtags/

The jQuery Globalization plugin download includes a folder named globinfo that contains the information for each of the 350 cultures. Actually, this folder contains more than 700 files because the folder includes both minified and un-minified versions of each file.

For example, the globinfo folder includes JavaScript files named jQuery.glob.en-AU.js for English Australia, jQuery.glob.id.js for Indonesia, and jQuery.glob.zh-CHS for Chinese (Simplified) Legacy.

Example: Setting a Particular Culture

Imagine that you have been asked to create a German website and want to format all of the dates, currencies, and numbers using German formatting conventions correctly in JavaScript on the client. The HTML for the page might look like this:

image

Notice the span tags above. They mark the areas of the page that we want to format with the Globalization plugin. We want to format the product price, the date the product is available, and the units of the product in stock.

To use the jQuery Globalization plugin, we’ll add three JavaScript files to the page: the jQuery library, the jQuery Globalization plugin, and the culture information for a particular language:

image

In this case, I’ve statically added the jQuery.glob.de-DE.js JavaScript file that contains the culture information for German. The language tag “de-DE” is used for German as spoken in Germany.

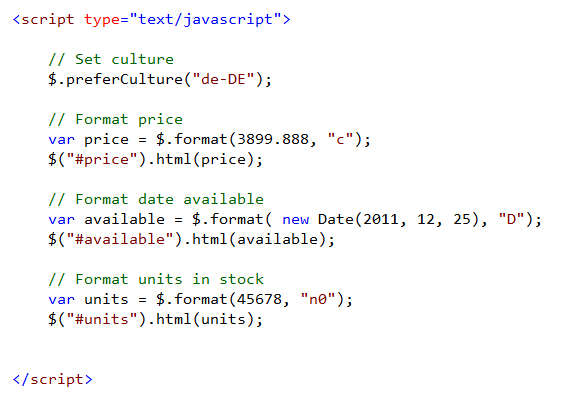
Now that I have all of the necessary scripts, I can use the Globalization plugin to format the product price, date available, and units in stock values using the following client-side JavaScript:

image

The jQuery Globalization plugin extends the jQuery library with new methods - including new methods named preferCulture() and format(). The preferCulture() method enables you to set the default culture used by the jQuery Globalization plugin methods. Notice that the preferCulture() method accepts a language tag. The method will find the closest culture that matches the language tag.

The $.format() method is used to actually format the currencies, dates, and numbers. The second parameter passed to the $.format() method is a format specifier. For example, passing “c” causes the value to be formatted as a currency. The ReadMe file at github details the meaning of all of the various format specifiers: http://github.com/nje/jquery-glob

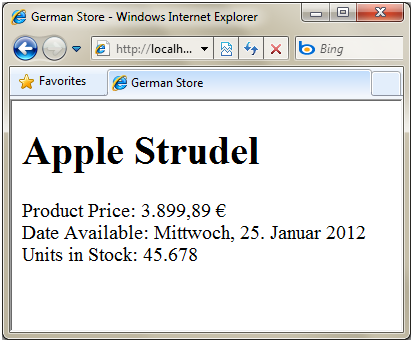
When we open the page in a browser, everything is formatted correctly according to German language conventions. A euro symbol is used for the currency symbol. The date is formatted using German day and month names. Finally, a period instead of a comma is used a number separator:

image

You can see a running example of the above approach with the 3_GermanSite.htm file in this samples download.

Example: Enabling a User to Dynamically Select a Culture

In the previous example we explicitly said that we wanted to globalize in German (by referencing the jQuery.glob.de-DE.js file). Let’s now look at the first of a few examples that demonstrate how to dynamically set the globalization culture to use.

Imagine that you want to display a dropdown list of all of the 350 cultures in a page. When someone selects a culture from the dropdown list, you want all of the dates in the page to be formatted using the selected culture.

image

Here’s the HTML for the page:

image

Notice that all of the dates are contained in a <span> tag with a data-date attribute (data-* attributes are a new feature of HTML 5 that conveniently also still work with older browsers). We’ll format the date represented by the data-date attribute when a user selects a culture from the dropdown list.

In order to display dates for any possible culture, we’ll include the jQuery.glob.all.js file like this:

image

The jQuery Globalization plugin includes a JavaScript file named jQuery.glob.all.js. This file contains globalization information for all of the more than 350 cultures supported by the Globalization plugin.  At 367KB minified, this file is not small. Because of the size of this file, unless you really need to use all of these cultures at the same time, we recommend that you add the individual JavaScript files for particular cultures that you intend to support instead of the combined jQuery.glob.all.js to a page. In the next sample I’ll show how to dynamically load just the language files you need.

Next, we’ll populate the dropdown list with all of the available cultures. We can use the $.cultures property to get all of the loaded cultures:

image

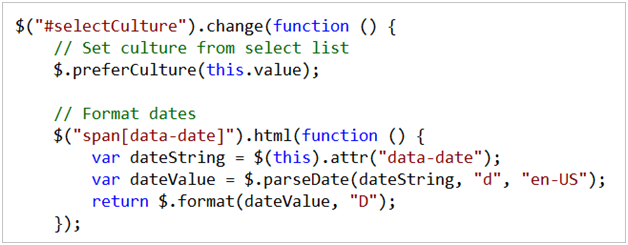
Finally, we’ll write jQuery code that grabs every span element with a data-date attribute and format the date:

image

The jQuery Globalization plugin’s parseDate() method is used to convert a string representation of a date into a JavaScript date. The plugin’s format() method is used to format the date. The “D” format specifier causes the date to be formatted using the long date format.

And now the content will be globalized correctly regardless of which of the 350 languages a user visiting the page selects.  You can see a running example of the above approach with the 4_SelectCulture.htm file in this samples download.

Example: Loading Globalization Files Dynamically

As mentioned in the previous section, you should avoid adding the jQuery.glob.all.js file to a page whenever possible because the file is so large. A better alternative is to load the globalization information that you need dynamically.

For example, imagine that you have created a dropdown list that displays a list of languages:

image

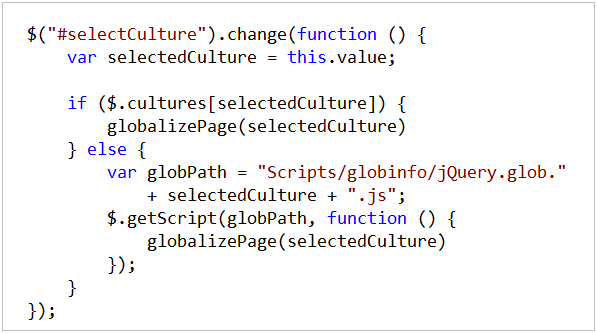
The following jQuery code executes whenever a user selects a new language from the dropdown list. The code checks whether the globalization file associated with the selected language has already been loaded. If the globalization file has not been loaded then the globalization file is loaded dynamically by taking advantage of the jQuery $.getScript() method.
image

The globalizePage() method is called after the requested globalization file has been loaded, and contains the client-side code to perform the globalization.

The advantage of this approach is that it enables you to avoid loading the entire jQuery.glob.all.js file. Instead you only need to load the files that you need and you don’t need to load the files more than once.

The 5_Dynamic.htm file in this samples download demonstrates how to implement this approach.

Example: Setting the User Preferred Language Automatically

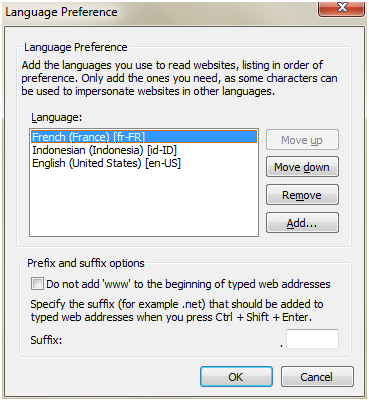
Many websites detect a user’s preferred language from their browser settings and automatically use it when globalizing content. A user can set a preferred language for their browser. Then, whenever the user requests a page, this language preference is included in the request in the Accept-Language header.

When using Microsoft Internet Explorer, you can set your preferred language by following these steps:

  1. Select the menu option Tools, Internet Options.
  2. Select the General tab.
  3. Click the Languages button in the Appearance section.
  4. Click the Add button to add a new language to the list of languages.
  5. Move your preferred language to the top of the list.

image

Notice that you can list multiple languages in the Language Preference dialog. All of these languages are sent in the order that you listed them in the Accept-Language header:

Accept-Language: fr-FR,id-ID;q=0.7,en-US;q=0.3

Strangely, you cannot retrieve the value of the Accept-Language header from client JavaScript. Microsoft Internet Explorer and Mozilla Firefox support a bevy of language related properties exposed by the window.navigator object, such as windows.navigator.browserLanguage and window.navigator.language, but these properties represent either the language set for the operating system or the language edition of the browser. These properties don’t enable you to retrieve the language that the user set as his or her preferred language.

The only reliable way to get a user’s preferred language (the value of the Accept-Language header) is to write server code. For example, the following ASP.NET page takes advantage of the server Request.UserLanguages property to assign the user’s preferred language to a client JavaScript variable named acceptLanguage (which then allows you to access the value using client-side JavaScript):

image

In order for this code to work, the culture information associated with the value of acceptLanguage must be included in the page. For example, if someone’s preferred culture is fr-FR (French in France) then you need to include either the jQuery.glob.fr-FR.js or the jQuery.glob.all.js JavaScript file in the page or the culture information won’t be available.  The “6_AcceptLanguages.aspx” sample in this samples download demonstrates how to implement this approach.

If the culture information for the user’s preferred language is not included in the page then the $.preferCulture() method will fall back to using the neutral culture (for example, using jQuery.glob.fr.js instead of jQuery.glob.fr-FR.js). If the neutral culture information is not available then the $.preferCulture() method falls back to the default culture (English).

Example: Using the Globalization Plugin with the jQuery UI DatePicker

One of the goals of the Globalization plugin is to make it easier to build jQuery widgets that can be used with different cultures.

We wanted to make sure that the jQuery Globalization plugin could work with existing jQuery UI plugins such as the DatePicker plugin. To that end, we created a patched version of the DatePicker plugin that can take advantage of the Globalization plugin when rendering a calendar. The following image illustrates what happens when you add the jQuery Globalization and the patched jQuery UI DatePicker plugin to a page and select Indonesian as the preferred culture:

image

Notice that the headers for the days of the week are displayed using Indonesian day name abbreviations. Furthermore, the month names are displayed in Indonesian.

You can download the patched version of the jQuery UI DatePicker from our github website. Or you can use the version included in this samples download and used by the 7_DatePicker.htm sample file.

Summary

I’m excited about our continuing participation in the jQuery community. This Globalization plugin is the third jQuery plugin that we’ve released.

We’ve really appreciated all of the great feedback and design suggestions on the jQuery templating and data-linking prototypes that we released earlier this year.  We also want to thank the jQuery and jQuery UI teams for working with us to create these plugins.

Hope this helps,

Scott

출처 : http://weblogs.asp.net/scottgu/archive/2010/06/10/jquery-globalization-plugin-from-microsoft.aspx

posted by Sunny's
2010. 6. 16. 19:28 JQUERY
jQuery 를 이용해서 HTML 테이블을 엑셀로 저장하는 간단한 방법입니다.

다음은 HTML 코드입니다.

<form action="/SaveToExcel.php" method="post" target="_blank"
    onsubmit='$("#dataToDisplay").val( $("<div>").append( $("#ReportTable").eq(0).clone() ).html() )'
>
    <pre><input type="image" src="/images/icons/save_excel.png"></pre>
   <pre><input type="hidden" id="dataToDisplay" name="dataToDisplay" />
</form>

설명
reportTable - 저장하기 원하는 테이블 ID
dataToDisplay - 서버로 POST될 베이블을 위한 hidden변수


폼의 onSubmit시에 저장할 HTML 테이블을 jQuery 메서드로 쉽게 처리할수 있다.


<table>을 포함한 HTML코드를 가져오는 부분의 처리가 중요하다.

jQuery.html() 메서드는 innerHTML만 가져오므로  table id를 기준으로 실행하면 <table> 태그가 빠지게 된다.

그래서 <div> 안에  전체 <table> 을 append하면  <div> <table>...</table> </div>  가 되고

여기서  .html() 을 실행하면  <table>...</table> 을 리턴하므로 원하는 결과를 얻을 수 있다.


서버소스
<?php
header("Content-type: application/vnd.ms-excel; name='excel'");
header("Content-Disposition: filename=export.xls");
// Fix for crappy IE bug in download.
header("Pragma: ");
header("Cache-Control: ");
?>
<html>
<head></head>
<body><?=$_REQUEST['dataToDisplay']?>
</body>
</html>

posted by Sunny's
2010. 5. 13. 10:23 ASP.NET

Abstract:
In this article we are going to demonstrate jqGrid, JQuery Grid plugin which is used to display tabular data on the form. The article will also discuss how to export the Grid to the Excel format.
Why JQuery Grid Plugin?

You can always use the plain vanilla HTML code to create your tables but JQuery Grid gives you the ability perform sorting, paging, searching and many other operations which are very cumbersome to write.

Setting Up the Project:

We are using ASP.NET MVC 1.0 for our demo. First, you can download the JQuery library and the JGrid library from the following URLs:

1) JQuery
2) JGrid

The JGrid documentation explains how and where to put all the .js files. If you find it hard to follow then just download the source code at the end of this article and set up your project similar to the download sample.

Populating Grid with Data:

Before we start retrieving products from the database we should make a reference to all the required scripts in our page. Since, we are using master pages we will include all the script and CSS references in the master page as shown below:

1  <link href="../../Content/Site.css" rel="stylesheet" type="text/css" />
2     <link href="../../Content/ui.jqgrid.css" rel="stylesheet" type="text/css" />
3     <script src="../Scripts/jquery-1.3.2.js" type="text/javascript"></script>
4     <script src="../Scripts/jquery.jqGrid.js" type="text/javascript"></script>
5     <script src="../../Scripts/Site.js" type="text/javascript"></script>


After creating all the references our next task is to populate the Grid with data. We will be using the Northwind database "Products" table. Here is our simple repository which returns all the products from the Products table as a List<Product>.

01  public class ProductRepository : IProductRepository
02     {
03         public List<Product> GetAll()
04         {
05             using(var db = new NorthwindDataContext())
06             {
07                 return (from p in db.Products
08                        select p).ToList();
09             }
10         }
11     }
  

The loadProducts JavaScript function is responsible for populating the View with the data.

01 <script language="javascript" type="text/javascript">
02     // load the products
03     loadProducts();
04 </script> 
05 <% using (Html.BeginForm(new { Action = "ExportToExcel" }))
06  {%>
07    
08 <table id="list"></table>
09 <input type="submit" value="Export to Excel" />
10 <%
11         
12  }%>


Let's take a look at the loadProducts method.

01 function loadProducts()
02 {
03     jQuery(document).ready(function() {
04         jQuery("#list").jqGrid({
05             url: '/Home/GetProducts/',
06             datatype: 'json',
07             mtype: 'GET',
08             colNames: ['Id', 'Name', 'QuantityPerUnit',"UnitPrice"],
09             colModel: [
10           { name: 'Id', index: 'Id', width: 40, align: 'left' },
11           { name: 'Name', index: 'Name', width: 40, align: 'left' },
12           { name: 'QuantityPerUnit', index: 'QuantityPerUnit', width: 200, align: 'left' },
13           { name: 'UnitPrice', index: 'UnitPrice', width: 200, align: 'left' }],
14             rowNum: 10,
15             rowList: [5, 10, 20, 50],
16             sortname: 'Id',
17             sortorder: "desc",
18             viewrecords: true,
19             caption: 'My first grid'
20         });
21     });
22 }


The above code assigns different values to the jqGrid. The url attribute represents the controller action that will be fired. The colNames represent the header text of the table that will be displayed. The colModel refers to the individual grid columns as an array of properties.  

Now, let's see what the controller looks like:

01  public ActionResult GetProducts(string sidx, string sord, int page, int rows)
02         {
03   var products = _productRepository.GetAll();
04             var totalPages = 1; // we'll implement later
05             var totalRecords = 3; // implement later
06             var jsonData = new
07                                {
08                                    total = totalPages,
09                                    page = page,
10                                    records = totalRecords,
11                                    rows = (from p in products
12                                            select new
13                                                       {
14                                                           id = p.ProductID,
15                                                           cell = new string[]
16                                                                      {
17                                                                          p.ProductID.ToString(), p.ProductName,
18                                                                          p.ProductName
19                                                                      }
20                                                       }).ToArray()
21                                };
22             return Json(jsonData);
23 }


The _productRepository.GetAll() method is responsible for fetching all the products from the Products table. Finally, we created an Anonymous type jsonData which contains the properties required by the jqGrid. The rows collection contains an object with id property and cells collection.

When you run the above example you will see the following output:


The above image shows that Grid is rendered on the page successfully. There are few columns which are not displayed because they were not included in the jqGrid column collection. 

The code in the GetProducts action of the HomeController is very nasty. We should move this code to a different place where it can be reused.

Creating ToJsonForjqGrid<T> Extension Method:

The purpose of ToJsonForjqGrid<T> extension method is to convert a List<T> collection into a format supported by the jqGrid.

01   public static object ToJsonForjqGrid<T>(this List<T> list,string primaryKey,string[] columnNames) where T : new()
02         {
03             if(list.Count() == 0)
04                 throw new ArgumentException("List does not contain any items!");
05             var jsonData = new
06                                {
07                                    
08                                    rows = (from p in list
09                                           select new
10                                         {
11                                             id = p.GetPropertyValue(primaryKey),
12                                             cell = p.GetPropertyValues(columnNames)       
13                                         }).ToArray()                              
14                                };
15             return jsonData; 
16         }


ToJsonForJqGrid<T> takes two arguments. The first argument is the primary key of the object which will be assigned to the id property of the row. The second argument is the columnNames[] which contains the name of the columns to be included in the jqGrid.

And here is the GetProducts action using the ToJsonForJqGrid<T> method.

1  public ActionResult GetProducts(string sidx, string sord, int page, int rows)
2         {
3             var jsonData = _productRepository.GetAll().ToJsonForjqGrid("ProductID", new[] { "ProductID", "ProductName" });
4             return Json(jsonData);
5         }


And the result is shown below:


If we need to include a couple of more columns we can add the names in the string[] collection for the columnNames parameter to the ToJsonForjqGrid<T> method.

1 public ActionResult GetProducts(string sidx, string sord, int page, int rows)
2         {
3             var jsonData = _productRepository.GetAll().ToJsonForjqGrid("ProductID", new[] { "ProductID", "ProductName", "QuantityPerUnit","UnitPrice" });
4             return Json(jsonData);
5         }


A little better!

And here is the result:


Exporting Grid to Excel:

When the export to excel button is clicked the form is submitted and "ExportToExcel" action is fired.

01  public ActionResult ExportToExcel()
02         {
03             var products = _productRepository.GetAll();
04             var grid = new GridView();
05             grid.DataSource = from p in products
06                               select new
07                                          {
08                                              ProductName = p.ProductName,
09                                              SomeProductId = p.ProductID
10                                          };
11             grid.DataBind();
12             Response.ClearContent();
13             Response.AddHeader("content-disposition", "attachment; filename=MyExcelFile.xls");
14             Response.ContentType = "application/excel";
15             StringWriter sw = new StringWriter();
16             HtmlTextWriter htw = new HtmlTextWriter(sw);
17             grid.RenderControl(htw);
18             Response.Write(sw.ToString());
19             Response.End();
20             return View("Index");
21         }


NOTE: You should not put the export to excel code right into the controller action. Create a ExportToExcel service and use that to perform the exportation task.

Inside the ExportToExcel action we simply retrieve the products from the database and creates an anonymous type collection and assign to the GridView control. Later the GridView control is rendered to the HtmlTextWriter and send as an attachement with the response.


Conclusion:

In this article we learned how to use jqGrid to display data from the database. We also learned how to export the grid to excel.

References:

1) Using JQuery Grid with ASP.NET MVC

[Download Sample]

posted by Sunny's
2010. 5. 12. 12:50 Ajax

 The jQuery library has a passionate community of developers, and it is now the most widely used JavaScript library on the web today.

Two years ago I announced that Microsoft would begin offering product support for jQuery, and that we’d be including it in new versions of Visual Studio going forward. By default, when you create new ASP.NET Web Forms and ASP.NET MVC projects with VS 2010 you’ll find jQuery automatically added to your project.

A few weeks ago during my second keynote at the MIX 2010 conference I announced that Microsoft would also begin contributing to the jQuery project.  During the talk, John Resig -- the creator of the jQuery library and leader of the jQuery developer team – talked a little about our participation and discussed an early prototype of a new client templating API for jQuery.

In this blog post, I’m going to talk a little about how my team is starting to contribute to the jQuery project, and discuss some of the specific features that we are working on such as client-side templating and data linking (data-binding).

Contributing to jQuery

jQuery has a fantastic developer community, and a very open way to propose suggestions and make contributions.  Microsoft is following the same process to contribute to jQuery as any other member of the community.

As an example, when working with the jQuery community to improve support for templating to jQuery my team followed the following steps:

  1. We created a proposal for templating and posted the proposal to the jQuery developer forum (http://forum.jquery.com/topic/jquery-templates-proposal and http://forum.jquery.com/topic/templating-syntax ).
  2. After receiving feedback on the forums, the jQuery team created a prototype for templating and posted the prototype at the Github code repository (http://github.com/jquery/jquery-tmpl ).
  3. We iterated on the prototype, creating a new fork on Github of the templating prototype, to suggest design improvements. Several other members of the community also provided design feedback by forking the templating code.

There has been an amazing amount of participation by the jQuery community in response to the original templating proposal (over 100 posts in the jQuery forum), and the design of the templating proposal has evolved significantly based on community feedback.

The jQuery team is the ultimate determiner on what happens with the templating proposal – they might include it in jQuery core, or make it an official plugin, or reject it entirely.  My team is excited to be able to participate in the open source process, and make suggestions and contributions the same way as any other member of the community.

jQuery Template Support

Client-side templates enable jQuery developers to easily generate and render HTML UI on the client.  Templates support a simple syntax that enables either developers or designers to declaratively specify the HTML they want to generate.  Developers can then programmatically invoke the templates on the client, and pass JavaScript objects to them to make the content rendered completely data driven.  These JavaScript objects can optionally be based on data retrieved from a server.

Because the jQuery templating proposal is still evolving in response to community feedback, the final version might look very different than the version below. This blog post gives you a sense of how you can try out and use templating as it exists today (you can download the prototype by the jQuery core team at http://github.com/jquery/jquery-tmpl or the latest submission from my team at http://github.com/nje/jquery-tmpl). 

jQuery Client Templates

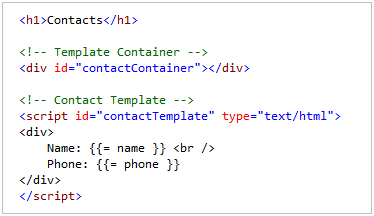
You create client-side jQuery templates by embedding content within a <script type="text/html"> tag.  For example, the HTML below contains a <div> template container, as well as a client-side jQuery “contactTemplate” template (within the <script type="text/html"> element) that can be used to dynamically display a list of contacts:

image

The {{= name }} and {{= phone }} expressions are used within the contact template above to display the names and phone numbers of “contact” objects passed to the template.

We can use the template to display either an array of JavaScript objects or a single object. The JavaScript code below demonstrates how you can render a JavaScript array of “contact” object using the above template. The render() method renders the data into a string and appends the string to the “contactContainer” DIV element:

image

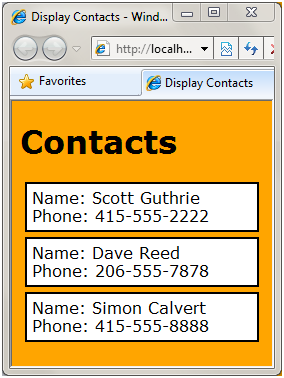
When the page is loaded, the list of contacts is rendered by the template.  All of this template rendering is happening on the client-side within the browser:

image 

Templating Commands and Conditional Display Logic

The current templating proposal supports a small set of template commands - including if, else, and each statements. The number of template commands was deliberately kept small to encourage people to place more complicated logic outside of their templates.

Even this small set of template commands is very useful though. Imagine, for example, that each contact can have zero or more phone numbers. The contacts could be represented by the JavaScript array below:

image

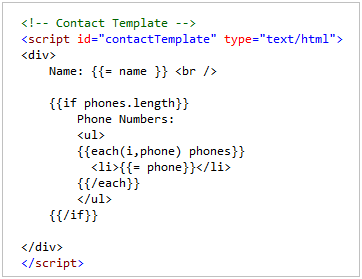
The template below demonstrates how you can use the if and each template commands to conditionally display and loop the phone numbers for each contact:

image

If a contact has one or more phone numbers then each of the phone numbers is displayed by iterating through the phone numbers with the each template command:

image

The jQuery team designed the template commands so that they are extensible. If you have a need for a new template command then you can easily add new template commands to the default set of commands.

Support for Client Data-Linking

The ASP.NET team recently submitted another proposal and prototype to the jQuery forums (http://forum.jquery.com/topic/proposal-for-adding-data-linking-to-jquery). This proposal describes a new feature named data linking. Data Linking enables you to link a property of one object to a property of another object - so that when one property changes the other property changes.  Data linking enables you to easily keep your UI and data objects synchronized within a page.

If you are familiar with the concept of data-binding then you will be familiar with data linking (in the proposal, we call the feature data linking because jQuery already includes a bind() method that has nothing to do with data-binding).

Imagine, for example, that you have a page with the following HTML <input> elements:

image

The following JavaScript code links the two INPUT elements above to the properties of a JavaScript “contact” object that has a “name” and “phone” property:

image

When you execute this code, the value of the first INPUT element (#name) is set to the value of the contact name property, and the value of the second INPUT element (#phone) is set to the value of the contact phone property. The properties of the contact object and the properties of the INPUT elements are also linked – so that changes to one are also reflected in the other.

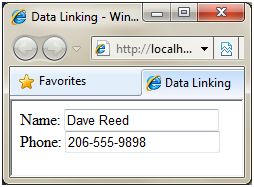
Because the contact object is linked to the INPUT element, when you request the page, the values of the contact properties are displayed:

image

More interesting, the values of the linked INPUT elements will change automatically whenever you update the properties of the contact object they are linked to.

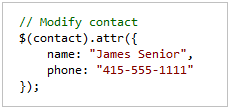
For example, we could programmatically modify the properties of the “contact” object using the jQuery attr() method like below:

image

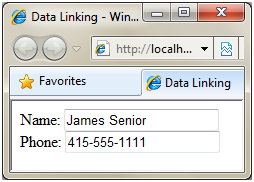
Because our two INPUT elements are linked to the “contact” object, the INPUT element values will be updated automatically (without us having to write any code to modify the UI elements):

image

Note that we updated the contact object above using the jQuery attr() method. In order for data linking to work, you must use jQuery methods to modify the property values.

Two Way Linking

The linkBoth() method enables two-way data linking. The contact object and INPUT elements are linked in both directions. When you modify the value of the INPUT element, the contact object is also updated automatically.

For example, the following code adds a client-side JavaScript click handler to an HTML button element. When you click the button, the property values of the contact object are displayed using an alert() dialog:

image

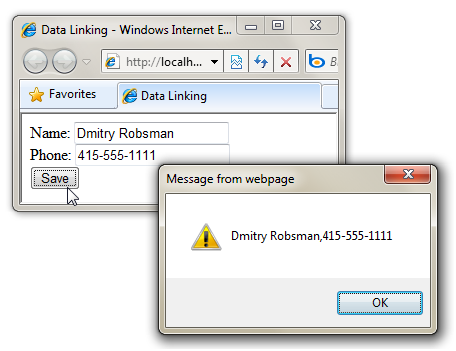
The following demonstrates what happens when you change the value of the Name INPUT element and click the Save button. Notice that the name property of the “contact” object that the INPUT element was linked to was updated automatically:

image

The above example is obviously trivially simple.  Instead of displaying the new values of the contact object with a JavaScript alert, you can imagine instead calling a web-service to save the object to a database. The benefit of data linking is that it enables you to focus on your data and frees you from the mechanics of keeping your UI and data in sync.

Converters

The current data linking proposal also supports a feature called converters. A converter enables you to easily convert the value of a property during data linking.

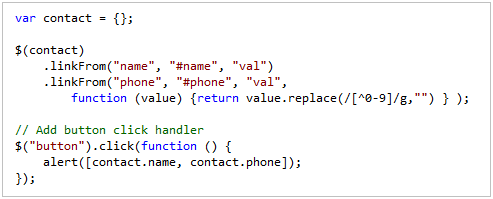
For example, imagine that you want to represent phone numbers in a standard way with the “contact” object phone property. In particular, you don’t want to include special characters such as ()- in the phone number - instead you only want digits and nothing else. In that case, you can wire-up a converter to convert the value of an INPUT element into this format using the code below:

image

Notice above how a converter function is being passed to the linkFrom() method used to link the phone property of the “contact” object with the value of the phone INPUT element. This convertor function strips any non-numeric characters from the INPUT element before updating the phone property.  Now, if you enter the phone number (206) 555-9999 into the phone input field then the value 2065559999 is assigned to the phone property of the contact object:

image

You can also use a converter in the opposite direction also. For example, you can apply a standard phone format string when displaying a phone number from a phone property.

Combining Templating and Data Linking

Our goal in submitting these two proposals for templating and data linking is to make it easier to work with data when building websites and applications with jQuery. Templating makes it easier to display a list of database records retrieved from a database through an Ajax call. Data linking makes it easier to keep the data and user interface in sync for update scenarios.

Currently, we are working on an extension of the data linking proposal to support declarative data linking. We want to make it easy to take advantage of data linking when using a template to display data.

For example, imagine that you are using the following template to display an array of product objects:

image

Notice the {{link name}} and {{link price}} expressions. These expressions enable declarative data linking between the SPAN elements and properties of the product objects. The current jQuery templating prototype supports extending its syntax with custom template commands. In this case, we are extending the default templating syntax with a custom template command named “link”.

The benefit of using data linking with the above template is that the SPAN elements will be automatically updated whenever the underlying “product” data is updated.  Declarative data linking also makes it easier to create edit and insert forms. For example, you could create a form for editing a product by using declarative data linking like this:

image

Whenever you change the value of the INPUT elements in a template that uses declarative data linking, the underlying JavaScript data object is automatically updated. Instead of needing to write code to scrape the HTML form to get updated values, you can instead work with the underlying data directly – making your client-side code much cleaner and simpler.

Downloading Working Code Examples of the Above Scenarios

You can download this .zip file to get with working code examples of the above scenarios.  The .zip file includes 4 static HTML page:

  • Listing1_Templating.htm – Illustrates basic templating.
  • Listing2_TemplatingConditionals.htm – Illustrates templating with the use of the if and each template commands.
  • Listing3_DataLinking.htm – Illustrates data linking.
  • Listing4_Converters.htm – Illustrates using a converter with data linking.

You can un-zip the file to the file-system and then run each page to see the concepts in action.

Summary

We are excited to be able to begin participating within the open-source jQuery project.  We’ve received lots of encouraging feedback in response to our first two proposals, and we will continue to actively contribute going forward.  These features will hopefully make it easier for all developers (including ASP.NET developers) to build great Ajax applications.

Hope this helps,

Scott

출처 : http://weblogs.asp.net/scottgu/archive/2010/05/07/jquery-templates-and-data-linking-and-microsoft-contributing-to-jquery.aspx

posted by Sunny's
2009. 10. 9. 11:33 Ajax
<!DOCTYPE html PUBLIC "-//W3C//DTD XHTML 1.0 Strict//EN" "http://www.w3.org/TR/xhtml1/DTD/xhtml1-strict.dtd">
<html>
<head>
<meta http-equiv="Content-Type" content="text/html;charset=utf-8" />
<script type="text/javascript" src="jquery.min.js"></script>
<script type="text/javascript" src="jquery.webservice.js"></script>
<script type="text/javascript">
$(document).ready(function() {
$('input').click(function() {
$.webservice({
url: "http://61.96.206.106/Service.asmx",
data: {_company:"infraware",_id:"kimbokki"},
dataType: "text",
nameSpace: "https://www.infraware.net/",
methodName: "GetImagePreViewData",
requestType: "soap1.2",
success:function(data,textStatus){
$(data).find('name').each(function(){
alert('[name] : ' + $(this).text());
});
//alert('[name] : ' + $(data).find('name').text());
//alert('[name] : ' + $('name', data).text());
alert('[success data] : ' + data);
},
});
});
});
</script>
</head>
<body>
<input type="button" value="click!" />
</body>
</html>


PS. JavaScript로 WebService를 호출하는 방법이 있어야 하는데, jQuery쪽에서 하는 Plugin이 있어서 사용했다.
그냥 JavaScript를 사용하려면 XMLHttpRequest 객체를 직접 사용해서 호출하는 방법을 사용하면 된다.
data에 Soap Data를 넣어서 호출하면 됨.

출처 : http://itbaby.egloos.com/4539237

posted by Sunny's
2009. 10. 9. 11:11 Ajax

When used correctly, jQuery can help you make your website more interactive, interesting and exciting. This article will share some best practices and examples for using the popular Javascript framework to create unobtrusive, accessible DOM scripting effects. The article will explore what constitutes best practices with regard to Javascript and, furthermore, why jQuery is a good choice of a framework to implement best practices.

1. Why jQuery?

jQuery is ideal because it can create impressive animations and interactions. jQuery is simple to understand and easy to use, which means the learning curve is small, while the possibilities are (almost) infinite.

Javascript and Best Practices

Javascript has long been the subject of many heated debates about whether it is possible to use it while still adhering to best practices regarding accessibility and standards compliance.

The answer to this question is still unresolved, however, the emergence of Javascript frameworks like jQuery has provided the necessary tools to create beautiful websites without having to worry (as much) about accessibility issues.

Obviously there are cases where a Javascript solution is not the best option. The rule of thumb here is: use DOM scripting to enhance functionality, not create it.

Unobtrusive DOM Scripting

While the term “DOM scripting” really just refers to the use of scripts (in this case, Javascripts) to access the Document Object Model, it has widely become accepted as a way of describing what should really be called “unobtrusive DOM scripting”—basically, the art of adding Javascript to your page in such a way that if there were NO Javascript, the page would still work (or at least degrade gracefully). In the website world, our DOM scripting is done using Javascript.

The Bottom Line: Accessible, Degradable Content

The aim of any web producer, designer or developer is to create content that is accessible to the widest range of audience. However, this has to be carefully balanced with design, interactivity and beauty. Using the theories set out in this article, designers, developers and web producers will have the knowledge and understanding to use jQuery for DOM scripting in an accessible and degradable way; maintaining content that is beautiful, functional AND accessible.

2. Unobtrusive DOM Scripting?

In an ideal world, websites would have dynamic functionality AND effects that degrade well. What does this mean? It would mean finding a way to include, say, a snazzy Javascript Web 2.0 animated sliding news ticker widget in a web page, while still ensuring that it fails gracefully if a visitor’s browser can’t (or won’t) run Javascripts.

The theory behind this technique is quite simple: the ultimate aim is to use Javascript for non-invasive, “behavioural” elements of the page. Javascript is used to add or enhance interactivity and effects. The primary rules for DOM scripting follow.

Rule #1: Separate Javascript Functionality

Separate Javascript functionality into a “behavioural layer,” so that it is separate from and independent of (X)HTML and CSS. (X)HTML is the markup, CSS the presentation and Javascript the behavioural layer. This means storing ALL Javascript code in external script files and building pages that do not rely on Javascript to be usable.

For a demonstration, check out the following code snippets:

CrossBad markup:

Never include Javascript events as inline attributes. This practice should be completely wiped from your mind.

  1. <a onclick="doSomething()" href="#">Click!</a>  
TickGood markup:

All Javascript behaviours should be included in external script files and linked to the document with a <script> tag in the head of the page. So, the anchor tag would appear like this:

  1. <a href="backuplink.html" class="doSomething">Click!</a>  

And the Javascript inside the myscript.js file would contain something like this:

  1. ...   
  2.   
  3. $('a.doSomething').click(function(){   
  4.     // Do something here!   
  5.     alert('You did something, woo hoo!');   
  6. });   
  7. ...  

The .click() method in jQuery allows us to easily attach a click event to the result(s) of our selector. So the code will select all of the <a> tags of class “doSomething” and attach a click event that will call the function. In practice, this

In Rule #2 there is a further demonstration of how a similar end can be achieved without inline Javascript code.

Rule #2: NEVER Depend on Javascript

To be truly unobtrusive, a developer should never rely on Javascript support to deliver content or information. It’s fine to use Javascript to enhance the information, make it prettier, or more interactive—but never assume the user’s browser will have Javascript enabled. This rule of thumb can in fact be applied to any third-party technology, such as Flash or Java. If it’s not built into every web browser (and always enabled), then be sure that the page is still completely accessible and usable without it.

CrossBad markup:

The following snippet shows Javascript that might be used to display a “Good morning” (or “afternoon”) message on a site, depending on the time of day. (Obviously this is a rudimentary example and would in fact probably be achieved in some server-side scripting language).

  1. <script language="javascript">  
  2. var now = new Date();   
  3. if(now.getHours() < 12)   
  4.     document.write('Good Morning!');   
  5. else   
  6.     document.write('Good Afternoon!');   
  7. </script>  

This inline script is bad because if the target browser has Javascript disabled, NOTHING will be rendered, leaving a gap in the page. This is NOT graceful degradation. The non-Javascript user is missing out on our welcome message.

TickGood markup:

A semantically correct and accessible way to implement this would require much simpler and more readable (X)HTML, like:

  1. <p title="Good Day Message">Good Morning!</p>  

By including the “title” attribute, this paragraph can be selected in jQuery using a selector (selectors are explained later in this article) like the one in the following Javascript snippet:

  1. var now = new Date();   
  2. if(now.getHours() >= 12)   
  3. {   
  4.     var goodDay = $('p[title="Good Day Message"]');   
  5.     goodDay.text('Good Afternoon!');   
  6. }  

The beauty here is that all the Javascript lives in an external script file and the page is rendered as standard (X)HTML, which means that if the Javascript isn’t run, the page is still 100% semantically pure (X)HTML—no Javascript cruft. The only problem would be that in the afternoon, the page would still say “Good morning.” However, this can be seen as an acceptable degradation.

Rule #3: Semantic and Accessible Markup Comes First

It is very important that the (X)HTML markup is semantically structured. (While it is outside the scope of this article to explain why, see the links below for further reading on semantic markup.) The general rule here is that if the page’s markup is semantically structured, it should follow that it is also accessible to a wide range of devices. This is not always true, though, but it is a good rule of thumb to get one started.

Semantic markup is important to unobtrusive DOM scripting because it shapes the path the developer will take to create the DOM scripted effect. The FIRST step in building any jQuery-enhanced widget into a page is to write the markup and make sure that the markup is semantic. Once this is achieved, the developer can then use jQuery to interact with the semantically correct markup (leaving an (X)HTML document that is clean and readable, and separating the behavioural layer).

CrossTerrible markup:

The following snippet shows a typical list of items and descriptions in a typical (and terribly UNsemantic) way.

  1. <table>  
  2.     <tr>  
  3.         <td onclick="doSomething();">First Option</td>  
  4.         <td>First option description</td>  
  5.     </tr>  
  6.     <tr>  
  7.         <td onclick="doSomething();">Second Option</td>  
  8.         <td>Second option description</td>  
  9.     </tr>  
  10. </table>  
CrossBad markup:

The following snippet shows a typical list of items and descriptions in a more semantic way. However, the inline Javascript is far from perfect.

  1. <dl>  
  2.     <dt onclick="doSomething();">First Option</dt>  
  3.     <dd>First option description</dd>  
  4.     <dt onclick="doSomething();">Second Option</dt>  
  5.     <dd>Second option description</dd>  
  6. </dl>  
TickGood markup:

This snippet shows how the above list should be marked up. Any interaction with Javascript would be attached at DOM load using jQuery, effectively removing all behavioural markup from the rendered (X)HTML.

  1. <dl id="OptionList">  
  2.     <dt>First Option</dt>  
  3.     <dd>First option description</dd>  
  4.     <dt>Second Option</dt>  
  5.     <dd>Second option description</dd>  
  6. </dl>  

The <id> of “OptionList” will enable us to target this particular definition list in jQuery using a selector—more on this later.

3. Understanding jQuery for Unobtrusive DOM Scripting

This section will explore three priceless tips and tricks for using jQuery to implement best practices and accessible effects.

Understanding Selectors: the Backbone of jQuery

The first step to unobtrusive DOM scripting (at least in jQuery and Prototype) is using selectors. Selectors can (amazingly) select an element out of the DOM tree so that it can be manipulated in some way.

If you’re familiar with CSS then you’ll understand selectors in jQuery; they’re almost the same thing and use almost the same syntax. jQuery provides a special utility function to select elements. It is called $.

A set of very simple examples of jQuery selectors:
  1. $(document); // Activate jQuery for object   
  2. $('#mydiv')  // Element with ID "mydiv"   
  3. $('p.first'// P tags with class first.   
  4. $('p[title="Hello"]'// P tags with title "Hello"   
  5. $('p[title^="H"]'// P tags title starting with H  
So, as the Javascript comments suggest:
  1. $(document);
    The first option will apply the jQuery library methods to a DOM object (in this case, the document object).
  2. $(’#mydiv’)
    The second option will select every <div> that has the <id> attribute set to “mydiv”.
  3. $(’p.first’)
    The third option will select all of the <p> tags with the class of “first”.
  4. $(’p[title="Hello"]‘)
    This option will select from the page all <p> tags that have a title of “Hello”. Techniques like this enable the use of much more semantically correct (X)HTML markup, while still facilitating the DOM scripting required to create complex interactions.
  5. $(’p[title^="H"]‘)
    This enables the selection of all of the <p> tags on the page that have a title that starts with the letter H.
These examples barely scratch the surface.

Almost anything you can do in CSS3 will work in jQuery, plus many more complicated selectors. The complete list of selectors is well documented on the jQuery Selectors documentation page. If you’re feeling super-geeky, you could also read the CSS3 selector specification from the W3C.

Get ready.
$(document).ready()

Traditionally Javascript events were attached to a document using an “onload” attribute in the <body> tag of the page. Forget this practice. Wipe it from your mind.

jQuery provides us with a special utility on the document object, called “ready”, allowing us to execute code ONLY after the DOM has completely finished loading. This is the key to unobtrusive DOM scripting, as it allows us to completely separate our Javascript code from our markup. Using $(document).ready(), we can queue up a series of events and have them execute after the DOM is initialized.

This means that we can create entire effects for our pages without changing the markup for the elements in question.

Hello World! Why $(document).ready() is SO cool

To demonstrate the beauty of this functionality, let’s recreate the standard introduction to Javascript: a “Hello World” alert box.

The following markup shows how we might have run a “Hello World” alert without jQuery:

CrossBad markup:
  1. <script language="javascript">  
  2. alert('Hello World');   
  3. </script>  
TickGood markup:

Using this functionality in jQuery is simple. The following code snippet demonstrates how we might call the age-old “Hello World” alert box after our document has loaded. The true beauty of this markup is that it lives in an external Javascript file. There is NO impact on the (X)HTML page.

  1. $(document).ready(function()   
  2. {   
  3.     alert('Hello World');   
  4. });  
How it works

The $(document).ready() function takes a function as its argument. (In this case, an anonymous function is created inline—a technique that is used throughout the jQuery documentation.) The function passed to $(document).ready() is called after the DOM has finished loading and executes the code inside the function, in this case, calling the alert.

Dynamic CSS Rule Creation

One problem with many DOM scripting effects is that they often require us to hide elements of the document from view. This hiding is usually achieved through CSS. However, this is less than desirable. If a user’s browser does not support Javascript (or has Javascript disabled), yet does support CSS, then the elements that we hide in CSS will never be visible, since our Javascript interactions will not have run.

The solution to this comes in the form of a plugin for jQuery called cssRule, which allows us to use Javascript to easily add CSS rules to the style sheet of the document. This means we can hide elements of the page using CSS—however the CSS is ONLY executed IF Javascript is running.

CrossBad markup:
  1. HTML:   
  2. <h2>This is a heading</h2>  
  3. <p class="hide-me-first">  
  4. This is some information about the heading.   
  5. </p>  
  6.   
  7. CSS:   
  8. p.hide-me-first   
  9. {   
  10.     display: none;   
  11. }  

Assuming that a paragraph with the class of “hide-me-first” is going to first be hidden by CSS and then be displayed by a Javascript after some future user interaction, if the Javascript never runs the content will never be visible.

TickGood markup:
  1. HTML:   
  2. <h2>This is a heading</h2>  
  3. <p class="hide-me-first">  
  4. This is some information about the heading.   
  5. </p>  
  6.   
  7. jQuery Javascript:   
  8. $(document).ready(function{   
  9.     jQuery.cssRule("p.hide-me-first", "display", "none");   
  10. });  

Using a $(document).ready() Javascript here to hide the paragraph element means that if Javascript is disabled, the paragraphs won’t ever be hidden—so the content is still accessible. This is the key reason for runtime, Javascript-based, dynamic CSS rule creation.

4. Conclusion

jQuery is an extremely powerful library that provides all the tools necessary to create beautiful interactions and animations in web pages, while empowering the developer to do so in an accessible and degradable manner.

This article has covered:

  1. Why unobtrusive DOM scripting is so important for accessibility,
  2. Why jQuery is the natural choice to implement unobtrusive DOM scripting effects,
  3. How jQuery selectors work,
  4. How to implement unobtrusive CSS rules in jQuery.

5. Further Reading

Further Reading: jQuery and JavaScript Practices

  1. jQuery Web Site: How jQuery Works and Tutorials
    John Resig + Other Contributors
    One of jQuery’s true strengths is the documentation provided by John Resig and his team.
  2. 51 Best jQuery Tutorials and Examples
  3. Easy As Pie: Unobtrusive JavaScript
  4. Seven Rules of Unobtrusive JavaScript
  5. Learning jQuery
  6. Visual jQuery
  7. jQuery Tutorials For Designers
  8. jQuery For Designers
    jQuery for Designers: learn how easy it is to apply web interaction using jQuery.
  9. 15 Days Of jQuery
    jQuery tutorials and example code that takes you from zero to hero in no time flat.
  10. 15 Resources To Get You Started With jQuery From Scratch
  11. The Seven Rules Of Pragmatic Progressive Enhancement
  12. The Behaviour Layer Slides
    Jeremy Keith
    Great slide notes giving a quick rundown on unobtrusive Javascripting.
  13. A List Apart: Behavioral Separation
    Jeremy Keith
    A more in-depth explanation of the idea of separating Javascript into an unobtrusive “behavioural” layer.
  14. Unobtrusive JavaScript with jQuery
    Simon Willison
    A great set of slides about using jQuery unobtrusively. Also, finishes with a wonderful summary of jQuery methods and usage.

Further Reading: Semantic Markup

  1. Wikipedia: Definition of Semantics
    It’s worth understanding the idea of semantics in general prior to trying to wrap one’s head around the concept of semantic markup.
  2. Who cares about semantic markup?
    Dave Shea
    Dave Shea explores the benefits of semantic markup and
  3. Standards don’t necessarily have anything to do with being semantically correct
    Jason Kottke
    Kottke discusses the differences between standards compliance and semantic markup.
  4. CSS3 selector specification
    W3C
    The complete specification for CSS3 selectors (most of which work perfectly in jQuery selectors also). This is great reading for anyone who likes to keep up to date with best practices and standards compliance.
posted by Sunny's
2009. 9. 29. 10:46 Ajax

jQuery plugin: Autocomplete

Autocomplete an input field to enable users quickly finding and selecting some value, leveraging searching and filtering.

By giving an autocompleted field focus or entering something into it, the plugin starts searching for matching entries and displays a list of values to choose from. By entering more characters, the user can filter down the list to better matches.

This can be used to enter previous selected values, eg. for tags, to complete an address, eg. enter a city name and get the zip code, or maybe enter email addresses from an addressbook.

Current version: 1.1
Compressed filesize: 8.001 bytes
License: MIT/GPL
Tested in: Firefox 3, IE 6 & 7, Opera 9, Safari 3

Files:

Download
Changelog
Demos
Documentation (Plugin Options)

Dependencies

Required

Optional

  • optional: bgiframe plugin to fix select-problems in IE, just include to apply to autocomplete

Support

  • Please post questions to the jQuery discussion list, putting (autocomplete) into the subject of your post, making it easier to spot it and respond quickly. Keep your question short and succinct and provide code when possible; a testpage makes it much more likely that you get an useful answer in no time.
  • Please post bug reports and other contributions (enhancements, features) to the plugins.jQuery.com bug tracker (requires login/registration)
posted by Sunny's
2009. 9. 29. 10:44 Ajax

jQuery 플러그인 중에 autocomplete가 있는데, 이 녀석은 배열을 사용하기 때문에 URL에서 넘어온 JSON 데이터를 제대로 인식하지 못할 뿐더러, JSON을 인식한다쳐도 스프링 JSONView가 만들어주는 JSON에서 모델이름으로 값을 꺼내와야 하는데, 그런 장치가 전혀 없기 때문에... 뜯어 고쳤습니다.

새로운 option을 추가하고, Ajax 요청을 보내는 부분을 고치고, Ajax로 받아온 데이터를 파싱하는 부분을 수정했더니 잘 동작했습니다. 스프링 JsonView에 특화된 jQuery 자동완성 플러긴으로 보면 되겠군요.


목록에 보여줄 형태를 옵션으로 지정해 줄 수 있어서 이름 + " " + 이메일 형태를 보여주도록 설정했습니다. 넓이도 조정할 수 있으니.. 글자가 잘리지 않게 너비를 조정할 수도 있겠네요.

자세한 옵션은 http://docs.jquery.com/Plugins/Autocomplete/autocomplete#url_or_dataoptions

여러가지 사용 예제는 http://jquery.bassistance.de/autocomplete/demo/

모든 옵션을 확인하진 않았지만, 대부분의 옵션(목록 갯수 설정, 검색할 때 필요한 최소 글자 수, 등등등)이 제대로 동작했습니다.

기본으로 화살표 이동도 되고, 캐싱도 지원해주니.. 이 정도면 썩 괜찮으 듯 합니다. 선택이 했을 때는 선택한 데이터 row를 가지고 function을 실행할 수 있게 해주는데, 그걸 이용해서 입력한 값 주변에 기타 정보를 출력하도록 만들 수 있었습니다.

그러나 한글값을 넘겨봤더니 깨지더군요. 그래서 encodeURIComponent()로 값을 감싸서 UTF-8로 보냈습니다. 그런 다음 컨트롤러에서 받아서 디코딩을 했죠.

keyword = URLDecoder.decode(keyword,"UTF-8");

디코딩 하는 방법은 성윤이가 도와줬습니다. 흠.. 사부님 말씀으로는 이렇게 UTF-8로 인코딩/디코딩 하지 않고도 처리할 수 있는 방법이 있는 것 같은데.. 일단 거기까진 신경쓰지 않기로 했습니다. 지금도 충분히 어지러우니까요. @_@

라이선스가 GPL하고 mit 라이선스던데 소스를 공개해야 라이선스를 위반하지 않는거 아닌지 모르겠네요. 대충 고친건데.. 흠..

이젠 테스트 데이터를 왕창 넣고 확인해 봐야겠습니다.
posted by Sunny's
2009. 9. 29. 09:25 .NET Framework

dojo와 더불어서 jQuery는 요즈음 웹 상에서 널리 사용되고 인기도가 높은 자바스크립트 프레임워크들 중 하나입니다. 작은 Foot-print를 유지하면서 무엇하나 모자람이 없는 기능을 제공하고 있고, 또한 ASP.NET 개발자들 사이에서는 ASP.NET MVC에서 공식 채택하기 이전부터 널리 사용되어온 자바스크립트 프레임워크입니다.

jQuery는 AJAX 기능 뿐만 아니라 비동기적으로 자바스크립트를 로드하고, 직렬화된 JSON 컨텐츠를 복원하여 메모리 상에 되살려놓을 수 있는 기능까지 내장하고 있습니다. 하지만 딱 한 가지 아쉬운 점이 있었는데 그 점은 바로 WCF가 노출하는 Contract들 중에서 POST 방식으로 호출해야 할 때 사용이 불편하다는 점입니다.

REST (GET) 방식으로 호출하는 방법은 대개 유용합니다. URL을 이용하여 호출하는 것이므로 프로그래밍하기에는 훨씬 간단한 방법일 수 있습니다. 하지만 경우에 따라서 전달해야 하는 매개 변수의 수가 많거나 복잡한 자료 구조를 전달해야 하는 경우 적절하지 않을 수 있습니다.

이 Article에서는 jQuery를 이용하여 POST 방식의 WCF 서비스를 호출하는 방법을 다뤄보기로 하겠습니다. 이 Article에서 사용하는 Code의 원본은 http://www.west-wind.com/weblog/posts/324917.aspx 에서 가져온 것임을 밝혀둡니다.

 public static void NoCaching(WebOperationContext context)
 {
     if (context == null)
         return;

     context.OutgoingResponse.Headers["Pragma"] = "no-cache";
     context.OutgoingResponse.Headers["Cache-Control"] = "no-cache";
 }

 [OperationContract]
 [WebInvoke(RequestFormat = WebMessageFormat.Json, ResponseFormat = WebMessageFormat.Json)]
 public int CreateArticle(int boardID, string title, string contents)
 {
        NoCaching(WebOperationContext.Current);

        if (!Security.IsLoggedOn)
            return (-1);

        int? newArticleID = null;
        this.dataContext.CreateArticle(
            (int?)boardID,
            title,
            (int?)Security.CurrentUserID,
            contents,
            ref newArticleID);

        return newArticleID.HasValue ? newArticleID.Value : (-1);
 }

위의 코드는 Internet Explorer가 내장하는 XMLHttpRequest의 캐싱 기능을 사용하지 않도록 응답을 내보내는 POST 방식의 WCF Contract 코드 예제입니다. [WebGet] 대신 [WebInvoke]가 사용된 것을 확인하면 됩니다. 그리고 입력과 출력 형식을 모두 JSON으로 지정하였습니다.

이제 아래의 코드를 별도의 JavaScript 파일로 저장합니다.

jQuery.invokeWcf = function(serviceUri, method, data, callback, error, bare) {
    var json = JSON.stringify(data);
    var url = serviceUri + '/' + method;

    $.ajax({
        url: url,
        data: json,
        type: 'POST',
        processData: false,
        contentType: 'application/json',
        timeout: 10000,
        dataType: 'text',
        success: function(rawResult) {
            if (!callback) {
                return;
            }

            var result = JSON.parse(rawResult);

            if (bare) {
                callback(result);
                return;
            }

            for (var eachProperty in result) {
                callback(result[eachProperty]);
                break;
            }
        },
        error: function(xmlHttpRequest) {
            if (!xmlHttpRequest) {
                return;
            }

            if (xmlHttpRequest.responseText) {
                var errorMessage = JSON.parse(xmlHttpRequest.responseText);
                if (errorMessage) {
                    error(errorMessage);
                } else {
                    error({ Message: 'Unknown server error found.' });
                }
            }

            return;
        }
    });
};

그리고 위의 코드를 사용하기 위하여 JSON2.js 파일이 별도로 필요합니다. JSON2.js는 http://www.json.org/js.html 페이지에서 다운로드할 수 있습니다. 마지막으로, jQuery 플러그인으로 개발된 위의 코드를 사용하기 위하여 jQuery를 추가해야 합니다. 위의 코드는 1.3.2 버전에서 테스트하였습니다.

이제 위의 코드를 호출해보기로 하겠습니다.

var editorInstance = FCKeditorAPI.GetInstance('<%= this.articleBody.ClientID %>');
var data = {
    boardID: parseInt(boardID),
    title: $('#' + '<%= this.articleTitle.ClientID %>').attr('value'),
    contents: editorInstance.GetXHTML()
};

$.invokeWcf('Board.svc', 'CreateArticle', data, function(result) {
    result = result.toString();
    if (result == '-1') {
        window.alert('글 쓰기 도중 오류가 발생하였습니다.');
        return;
    }
    if ($('#fileQueue > .uploadifyQueueItem').size() > 0) {
        $('#fileUploads').uploadifySettings('script', 'UploadHandler.ashx?ID=' + result.toString());
        $('#fileUploads').bind('uploadifyAllComplete', function(event, data) {
            window.location.replace('ViewArticle.aspx?ID=' + result.toString());
        });
        $('#fileUploads').uploadifyUpload();
    } else {
        window.location.replace('ViewArticle.aspx?ID=' + result.toString());
    }
}, function(result) { window.alert(result); });

실제 WCF가 제공하거나 입력시 필요로 하는 JSON 코드의 경우 jQuery가 내장하는 getJSON 함수로 다루기에는 까다로운 부분이 많았습니다. 하지만 위의 코드에서처럼 매개 변수를 동적으로 프로그래밍하고 함수 인자를 전달하는 것 만으로 모든 처리가 이루어지게 됩니다.

많은 도움이 되었기를 바라며 글을 마무리합니다.

ps. jQuery를 활용하는 RIA 기반 File Upload 솔루션을 찾고 있다면 uploadify (http://www.uploadify.com) 의 소스 코드를 활용해 보실 것을 권합니다. 무료로 사용 가능하며 약간의 테스트와 개발을 통하여 손쉽게 적용할 수 있습니다.

posted by Sunny's
2009. 7. 20. 13:39 Ajax

Goes through the basics of jQuery, all the way up to building plugins.

Original: http://jquery.bassistance.de/jquery-getting-started.html
Author: Jörn Zaefferer

Similar Tutorials: jQuery CoreSelectorsAttributesTraversingManipulationEventsEffectsAjaxPlugins

This guide is an introduction to the jQuery library. Basic knowledge of JavaScript and the document object model (DOM) is required. It starts from ground up and tries to explain details where necessary. It covers a simple hello world example, selector and event basics, AJAX, FX and usage and authoring of plugins.

This guide contains no "click me" examples. The intention of providing only "copy me" code is to invite you to try it for yourself. Copy an example, see what it does, and modify it.

Contents

Setup

To start, we need a copy of the jQuery library, which we can get from the main download page. The jQuery Starterkit provides some markup and CSS to work with. After downloading and extracting its content we put jquery.js into the same directory and open starterkit.html and custom.js with your favorite editor and starterkit.html with a browser.

Now we have everything to start with the notorious "Hello world" example.

Interesting links for this section:

Hello jQuery

We start with an empty html page:

 <html>                                                                  
 <head>                                                                  
 <script type="text/javascript" src="jquery.js"></script>          
 <script type="text/javascript">                                         
   // we will add our javascript code here                                     
 </script>                                                               
 </head>                                                                 
 <body>                                                                  
   <!-- we will add our HTML content here -->                                        
 </body>                                                                 
 </html>

This page just loads the jquery.js library (make sure the URL points to where you stored your copy of jquery! This example assumes that you store it in the same directory as this example file). Two comments indicate where we will expand this template with code.

As almost everything we do when using jQuery reads or manipulates the document object model (DOM), we need to make sure that we start adding events etc. as soon as the DOM is ready.

To do this, we register a ready event for the document.

 $(document).ready(function() {
   // do stuff when DOM is ready
 });

Putting an alert into that function does not make much sense, as an alert does not require the DOM to be loaded. So lets try something a little more sophisticated: Show an alert when clicking a link.

Add the following to the <body>:

 <a href="">Link</a>

Now update the $(document).ready handler:

 $(document).ready(function() {
   $("a").click(function() {
     alert("Hello world!");
   });
 });

This should show the alert as soon as you click on the link. You are ready now to copy and paste this script into your custom.js file. Then, open starterkit.html in the browser and click any link. You should see a pop-up window with "Hello world!" message regardless of what link was clicked.

Let's have a look at what we are doing: $("a") is a jQuery selector, in this case, it selects all a elements. $ itself is an alias for the jQuery "class", therefore $() constructs a new jQuery object. The click() function we call next is a method of the jQuery object. It binds a click event to all selected elements (in this case, a single anchor element) and executes the provided function when the event occurs.

This is similar to the following code:

 <a href="" onclick="alert('Hello world')">Link</a>

The difference is quite obvious: We don't need to write an onclick for every single element. We have a clean separation of structure (HTML) and behavior (JS), just as we separate structure and presentation by using CSS.

With this in mind, we explore selectors and events a little further.

Interesting links for this section:

Find me: Using selectors and events

jQuery provides two approaches to select elements. The first uses a combination of CSS and XPath selectors passed as a string to the jQuery constructor (eg. $("div > ul a")). The second uses several methods of the jQuery object. Both approaches can be combined.

To try some of these selectors, we select and modify the first ordered list in our starterkit.

To get started, we want to select the list itself. The list has an ID "orderedlist". In classic JavaScript, you could select it by using document.getElementById("orderedlist"). With jQuery, we do it like this:

 $(document).ready(function() {
   $("#orderedlist").addClass("red");
 });

The starterkit provides a stylesheet with a class "red" that simply adds a red background. Therefore, when you reload the page in your browser, you should see that the first ordered list has a red background. The second list is not modified.

Now lets add some more classes to the child elements of this list.

 $(document).ready(function() {
   $("#orderedlist > li").addClass("blue");
 });

This selects all child lis of the element with the id orderedlist and adds the class "blue".

Now for something a little more sophisticated: We want to add and remove the class when the user hovers the li element, but only on the last element in the list.

 $(document).ready(function() {
   $("#orderedlist li:last").hover(function() {
     $(this).addClass("green");
   },function(){
     $(this).removeClass("green");
   });
 });

There are many other selectors similar to CSS and XPath syntax. More examples and a list of all available expressions can be found here.

For every onxxx event available, like onclick, onchange, onsubmit, there is a jQuery equivalent. Some other events, like ready and hover, are provided as convenient methods for certain tasks.

You can find a complete list of all events in the jQuery Events Documentation.

With those selectors and events you can already do a lot of things, but there is more.

 $(document).ready(function() {
   $("#orderedlist").find("li").each(function(i) {
     $(this).append( " BAM! " + i );
   });
 });

find() allows you to further search the descendants of the already selected elements, therefore $("#orderedlist").find("li") is mostly the same as $("#orderedlist li").

each() iterates over every element and allows further processing. Most methods, like addClass(), use each() themselves.

In this example, append() is used to append some text to it and set it as text to the end of each element.

Another task you often face is to call methods on DOM elements that are not covered by jQuery. Think of a form you would like to reset after you submitted it successfully via AJAX.

 $(document).ready(function() {
   // use this to reset a single form
   $("#reset").click(function() {
     $("form")[0].reset();
   });
 });

This code selects the first form element and calls reset() on it. In case you had more than one form, you could also do this:

 $(document).ready(function() {
   // use this to reset several forms at once
   $("#reset").click(function() {
     $("form").each(function() {
       this.reset();
     });
   });
 });

This would select all forms within your document, iterate over them and call reset() for each. Note that in an .each() function, this refers to the actual element. Also note that, since the reset() function belongs to the form element and not to the jQuery object, we cannot simply call $("form").reset() to reset all the forms on the page.

An additional challenge is to select only certain elements from a group of similar or identical ones. jQuery provides filter() and not() for this. While filter() reduces the selection to the elements that fit the filter expression, not() does the contrary and removes all elements that fit the expression. Think of an unordered list where you want to select all li elements that have no ul children.

 $(document).ready(function() {
   $("li").not(":has(ul)").css("border", "1px solid black"); 
 });

This selects all li elements that have a ul element as a child and removes all elements from the selection. Therefore all li elements get a border, except the one that has a child ul.

The [expression] syntax is taken from XPath and can be used to filter by attributes. Maybe you want to select all anchors that have a name attribute:

 $(document).ready(function() {
   $("a[name]").css("background", "#eee" );
 });

This adds a background color to all anchor elements with a name attribute.

More often than selecting anchors by name, you might need to select anchors by their "href" attribute. This can be a problem as browsers behave quite inconsistently when returning what they think the "href" value is (Note: This problem was fixed recently in jQuery, available in any versions after 1.1.1). To match only a part of the value, we can use the contains select "*=" instead of an equals ("="):

 $(document).ready(function() {
   $("a[href*=/content/gallery]").click(function() {
     // do something with all links that point somewhere to /content/gallery
   });
 });

Until now, all selectors were used to select children or filter the current selection. There are situations where you need to select the previous or next elements, known as siblings. Think of a FAQ page, where all answers are hidden first, and shown, when the question is clicked. The jQuery code for this:

 $(document).ready(function() {
   $('#faq').find('dd').hide().end().find('dt').click(function() {
     $(this).next().slideToggle();
   });
 });

Here we use some chaining to reduce the code size and gain better performance, as '#faq' is only selected once. By using end(), the first find() is undone, so we can start search with the next find() at our #faq element, instead of the dd children.

Within the click handler, the function passed to the click() method, we use $(this).next() to find the next sibling starting from the current dt. This allows us to quickly select the answer following the clicked question.

In addition to siblings, you can also select parent elements (also known as ancestors for those more familiar with XPath). Maybe you want to highlight the paragraph that is the parent of the link the user hovers. Try this:

 $(document).ready(function(){
   $("a").hover(function(){
     $(this).parents("p").addClass("highlight");
   },function(){
     $(this).parents("p").removeClass("highlight");
   });
 });

For all hovered anchor elements, the parent paragraph is searched and a class "highlight" added and removed.

Lets go one step back before continuing: jQuery is a lot about making code shorter and therefore easier to read and maintain. The following is a shortcut for the $(document).ready(callback) notation:

 $(function() {
   // code to execute when the DOM is ready
 });

Applied to the Hello world! example, we end with this:

 $(function() {
   $("a").click(function() {
     alert("Hello world!");
   });
 });

Now, with the basics at hand, we want to explore some other aspects, starting with AJAX.

Interesting links for this chapter:

Rate me: Using Ajax

In this part we write a small Ajax application, that allows the user to rate something, just like it is done on youtube.com.

We need some server code for this. My example uses a php file that reads the "rating" parameter and returns the number of ratings and the average rating. Have a look at rate.php for the server-side code.

We don't want this example to work without Ajax, although it may be possible, we therefore generate the necessary markup with jQuery and append it to a container div with an ID of "rating".

 $(document).ready(function() {
   // generate markup
   $("#rating").append("Please rate: ");
   
   for ( var i = 1; i <= 5; i++ )
     $("#rating").append("<a href='#'>" + i + "</a> ");
   
   // add markup to container and apply click handlers to anchors
   $("#rating a").click(function(e){
     // stop normal link click
     e.preventDefault();
     
     // send request
     $.post("rate.php", {rating: $(this).html()}, function(xml) {
       // format and output result
       $("#rating").html(
         "Thanks for rating, current average: " +
         $("average", xml).text() +
         ", number of votes: " +
         $("count", xml).text()
       );
     });
   });
 });

This snippet generates five anchor elements and appends them to the container element with the id "rating". Afterwards, for every anchor inside the container, a click handler is added. When the anchor is clicked, a post request is send to rate.php with the content of the anchor as a parameter. The result returned as a XML is then added to the container, replacing the anchors.

If you don't have a web server with PHP installed at hand, you can look at an online example. For a very nice example of a rating system that even works without JavaScript, visit softonic.de and click on "Kurz bewerten!"

More documentation of the Ajax methods of jQuery can be found in the Ajax Documentation or on Visual jQuery filed under Ajax.

A very common problem encountered when loading content by Ajax is this: When adding event handlers to your document that should also apply to the loaded content, you have to apply these handlers after the content is loaded. To prevent code duplication, you can delegate to a function. Example:

 function addClickHandlers() {
   $("a.remote", this).click(function() {
     $("#target").load(this.href, addClickHandlers);
   });
 }
 $(document).ready(addClickHandlers);

Now addClickHandlers is called once when the DOM is ready and then everytime when a user clicked a link with the class remote and the content has finished loading.

Note the $("a.remote", this) query, this is passed as a context: For the document ready event, this refers to the document, and it therefore searches the entire document for anchors with class remote. When addClickHandlers is used as a callback for load(), this refers to a different element: In the example, the element with id target. This prevents that the click event is applied again and again to the same links, causing a crash eventually.

Another common problem with callbacks are parameters. You have specified your callback but need to pass an extra parameter. The easiest way to achieve this is to wrap the callback inside another function:

 // get some data
 var foobar = ...;
 
 // specify handler, it needs data as a paramter
 function handler(data) {
   //...
 }
 
 // add click handler and pass foobar!
 $('a').click(function(){
   handler(foobar);
 });
 
 // if you need the context of the original handler, use apply:
 $('a').click(function(){
   handler.apply(this, [foobar]);
 });

With Ajax this simple we can cover quite a lot of "Web 2.0". Now that we've looked at some basic Ajax, let's add some simple effects and animations to the page.

Interesting links for this chapter:

Animate me: Using Effects

Simple animations with jQuery can be achieved with show() and hide().

 $(document).ready(function(){
   $("a").toggle(function(){
     $(".stuff").hide('slow');
   },function(){
     $(".stuff").show('fast');
   });
 });

You can create any combination of animations with animate(), eg. a slide with a fade:

 $(document).ready(function(){
   $("a").toggle(function(){
     $(".stuff").animate({ height: 'hide', opacity: 'hide' }, 'slow');
   },function(){
     $(".stuff").animate({ height: 'show', opacity: 'show' }, 'slow');
   });
 });

Much fancier effects can be achieved with the interface plugin collection. The site provides demos and documentation. While Interface is at the top of jQuery's plugin list, there are lots of others. The next part shows how to use the tablesorter plugin.

Interesting links for this chapter:

Sort me: Using the tablesorter plugin

The tablesorter plugin allows sorting of tables on the client side. You include jQuery, and the plugin, and tell the plugin which tables you want to sort.

To try this example you need to download the tablesorter plugin and add this line to starterkit.html (below the jquery include):

 <script src="jquery.tablesorter.js"></script>

After including the plugin, you can call it like this:

 $(document).ready(function(){
   $("#large").tablesorter();
 });

Try clicking the headers of the table and see how it is sorted ascending on first click and descending on second.

The table could use some row highlighting, we can add those by passing some options:

 $(document).ready(function() {
   $("#large").tablesorter({
     // striping looking
     widgets: ['zebra']	
   });
 });

There are more examples and documentation about the available options at the tablesorter homepage.

Most plugins can be used like this: Include the plugin file and call the plugin method on some elements, passing some optional settings to customize the plugin.

A up-to-date list of available plugins can be found on the jQuery Plugin site.

When you are using jQuery more often, you may find it useful to package your own code as a plugin, either to reuse it for yourself or your company, or to share it with the community. The next chapter gives some hints on how to structure a plugin.

Interesting links for this chapter:

Plug me: Writing your own plugins

Writing your own plugins for jQuery is quite easy. If you stick to the following rules, it is easy for others to integrate your plugin, too.

Plugin Naming

Find a name for your plugin, lets call our example "foobar". Create a file named jquery.[yourpluginname].js, eg. jquery.foobar.js

Adding a Custom Method

Create one or more plugin methods by extending the jQuery object, eg.:

 jQuery.fn.foobar = function() {
   // do something
 };

Which will then be accessible by performing:

 $(...).foobar();

Default Settings:

Create default settings that can be changed by the user, eg.:

 jQuery.fn.foobar = function(options) {
   var settings = jQuery.extend({
     value: 5, name: "pete", bar: 655
   }, options);
 };

You can then call the plugin without options, using the defaults:

 $("...").foobar();

Or with some options:

 $("...").foobar({ value: 123, bar: 9 });

Documentation

If you release your plugin, you should provide some examples and documentation, too. There are lots of plugins available as a great reference.

Now you should have the basic idea of plugin writing. Lets use this knowledge and write one of our own.

Checkbox Plugin

Something lots of people, trying to manipulate forms with jQuery, ask for, is checking and unchecking of radio buttons or checkboxes. They end up with code like this:

 $("input[@type='checkbox']").each(function() {
   this.checked = true;
   this.checked = false; // or, to uncheck
   this.checked = !this.checked; // or, to toggle
 });

Whenever you have an each in your code, you might want to rewrite that as a plugin, pretty straightforward:

 jQuery.fn.check = function() {
   return this.each(function() {
     this.checked = true;
   });
 };

This plugin can now be used:

 $("input[@type='checkbox']").check();

Now you could write plugins for both uncheck() and toggleCheck(), too. But instead we extend our plugin to accept some options.

 jQuery.fn.check = function(mode) {
   // if mode is undefined, use 'on' as default
   var mode = mode || 'on';
   
   return this.each(function() {
     switch(mode) {
       case 'on':
         this.checked = true;
         break;
       case 'off':
         this.checked = false;
         break;
       case 'toggle':
         this.checked = !this.checked;
         break;
     }
   });
 };

By providing a default for the option, the user can omit the option or pass one of "on", "off", and "toggle", eg.:

 $("input[@type='checkbox']").check();
 $("input[@type='checkbox']").check('on');
 $("input[@type='checkbox']").check('off');
 $("input[@type='checkbox']").check('toggle');

Optional Settings

With more than one optional setting, this approach gets complicated, because the user must pass null values if he wants to omit the first parameter and only use the second.

The use of the tablesorter in the last chapter demonstrates the use of an object literal to solve this problem. The user can omit all parameters or pass an object with a key/value pair for every setting he wants to override.

For an exercise, you could try to rewrite the Voting code from the fourth section as a plugin. The plugin skeleton should look like this:

 jQuery.fn.rateMe = function(options) {
   // instead of selecting a static container with 
   // $("#rating"), we now use the jQuery context
   var container = this;
   
   var settings = jQuery.extend({
     url: "rate.php"
     // put more defaults here
   }, options);
   
   // ... rest of the code ...
   
   // if possible, return "this" to not break the chain
   return this;
 });

And allowing you to run the plugin like so:

 $(...).rateMe({ url: "test.php" });
posted by Sunny's
prev 1 2 3 4 next